

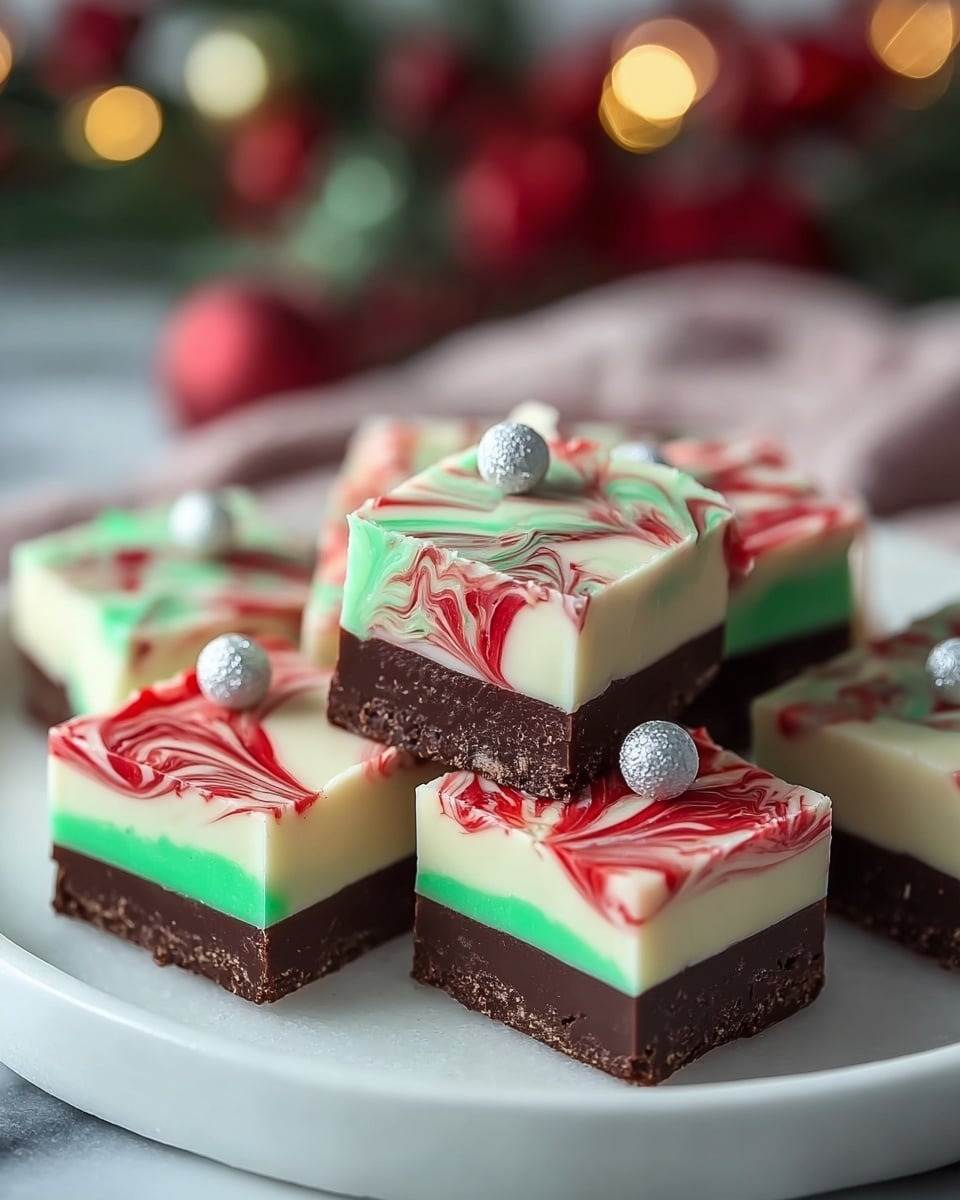
If you’re looking to add a little extra magic to your holiday treats this season, The Joy of Christmas Fudge Recipe is exactly what you need. This delightful dessert combines creamy white chocolate, festive red and green swirls, and the perfect touch of holiday cheer with sprinkles, making it an irresistible treat that’s as beautiful as it is delicious. It’s simple enough for beginners yet impressive enough to wow your guests, ensuring that every bite brings a joyous smile and warm holiday spirit.

Ingredients You’ll Need
The beauty of The Joy of Christmas Fudge Recipe lies in its simplicity—just a handful of ingredients come together to create a rich, creamy, and festive masterpiece. Each ingredient plays a key role in achieving the perfect texture, flavor, and appearance.
- 3 cups white chocolate chips: This is the star of the show, lending sweetness and a smooth base for the fudge.
- 1 (14-ounce) can sweetened condensed milk: Adds creamy richness and helps bind everything together for that classic fudge consistency.
- 1/2 teaspoon vanilla extract: Enhances the flavors with warm, aromatic notes that complement the chocolate perfectly.
- Red and green food coloring: Brings festive holiday colors that make the fudge pop and feel merry.
- 1/4 cup holiday sprinkles (optional): Adds a crunchy, colorful finishing touch and extra holiday cheer.
How to Make The Joy of Christmas Fudge Recipe
Step 1: Prepare Your Pan
Start by lining an 8×8-inch baking dish with parchment paper, making sure to leave extra hanging over the edges. This trick makes it so easy to lift the fudge out once it’s set, which saves you from messy removal attempts and helps keep your fudge bars perfectly intact.
Step 2: Melt the Chocolate Mixture
In a medium saucepan over low heat, combine the white chocolate chips and sweetened condensed milk. Stir constantly until the mixture is completely melted and smooth—this step is crucial to avoid burning and to create that velvety fudge texture that melts in your mouth. Once melted, remove from heat and stir in the vanilla extract for that lovely depth of flavor.
Step 3: Divide and Color the Mixture
Pour the fudge mixture evenly into three separate bowls. Add red food coloring to one bowl and green to another, leaving the last bowl plain white. This colorful division is what makes The Joy of Christmas Fudge Recipe so visually festive and perfect for holiday celebrations.
Step 4: Layer and Swirl the Fudge
Begin by pouring the red fudge mixture into your prepared pan and spread it evenly across the bottom. Carefully add the plain fudge layer on top, then finish with the green fudge. Grab a knife and gently swirl the layers together to create a beautiful marbled effect that looks as amazing as it tastes.
Step 5: Add Festive Sprinkles
If you love a little crunch and sparkle, sprinkle your holiday-themed sprinkles over the fudge while it’s still warm. This adds texture and an extra pop of festive fun that makes every bite even more delightful.
Step 6: Chill Until Firm
Place the fudge in the refrigerator for at least 2 hours so it can set fully. When solid, lift the fudge out using the parchment paper and cut it into small, bite-sized squares. Now, your tasty Christmas treat is ready to bring joy to the season!
How to Serve The Joy of Christmas Fudge Recipe
Garnishes
While the sprinkles on top are already a charming touch, you can also add a few crushed peppermint candies or a light dusting of powdered sugar to enhance the festive look. These garnishes make your fudge even more eye-catching and add a burst of holiday flavor.
Side Dishes
The creamy sweetness of this fudge pairs wonderfully with a cup of hot cocoa or a glass of cold milk. For a more indulgent experience, try serving it alongside gingerbread cookies or spiced nuts to balance the sweetness with some warming spices and crunch.
Creative Ways to Present
Package your fudge in small cellophane bags tied with red and green ribbons for a sweet gift idea. You can also arrange the fudge squares on a festive holiday platter alongside other treats for a beautiful dessert spread that will absolutely impress friends and family.
Make Ahead and Storage
Storing Leftovers
Leftover fudge should be stored in an airtight container at room temperature for up to a week to maintain its creamy texture and fresh flavor. Keep it away from heat and direct sunlight to prevent melting or discoloration.
Freezing
The Joy of Christmas Fudge Recipe freezes beautifully. Wrap the fudge tightly in plastic wrap and store it in a freezer-safe container or bag. When you’re ready to enjoy, thaw it overnight in the refrigerator to preserve its smooth texture.
Reheating
Fudge is best enjoyed chilled or at room temperature, so reheating is generally unnecessary. If your fudge feels too firm after refrigeration or freezing, simply leave it out at room temperature for 30 minutes to soften before serving.
FAQs
Can I use dark or milk chocolate instead of white chocolate chips?
Absolutely, but keep in mind that using dark or milk chocolate will change the flavor and color of the fudge. For The Joy of Christmas Fudge Recipe’s signature look and flavor, white chocolate works best.
Do I have to use food coloring?
You don’t have to. The fudge will still taste delicious without the food coloring, but the festive red and green colors really elevate the holiday vibe, making it more fun and eye-catching.
Can I add nuts or dried fruits to this fudge?
Yes! Feel free to fold in chopped nuts like pecans or walnuts, or even dried cranberries, to add extra texture and flavor that complement the creamy fudge beautifully.
Is it necessary to line the pan with parchment paper?
Using parchment paper makes removing the fudge so much easier and helps keep your squares perfectly neat. It’s a small step that saves a lot of mess and frustration.
How thick should I cut the fudge pieces?
Cut your fudge into about 1-inch squares for the perfect bite-sized treats. You can make them smaller or larger depending on your preference, but smaller pieces are great for sharing and snacking!
Final Thoughts
If you want a dessert that truly captures the spirit and warmth of the season, The Joy of Christmas Fudge Recipe is the way to go. It’s a simple, festive, and utterly delicious treat that brings smiles and sweet memories to any holiday gathering. Give it a try—you’ll wonder how you ever celebrated Christmas without this creamy, colorful delight!
Print
The Joy of Christmas Fudge Recipe
- Prep Time: 10 minutes
- Cook Time: 10 minutes
- Total Time: 2 hours 20 minutes
- Yield: 24 bars
- Category: Dessert
- Method: Stovetop
- Cuisine: American
Description
This festive Christmas fudge recipe features creamy white chocolate layered with vibrant red and green hues for a delightful holiday treat. Easy to prepare with simple ingredients and decorated with holiday sprinkles, this marbled fudge is perfect for gifting or sharing at holiday gatherings.
Ingredients
Fudge Ingredients
- 3 cups white chocolate chips
- 1 (14-ounce) can sweetened condensed milk
- 1/2 teaspoon vanilla extract
- Red food coloring
- Green food coloring
Optional Decoration
- 1/4 cup holiday sprinkles
Instructions
- Prepare the pan: Line an 8×8-inch baking dish with parchment paper, allowing extra paper to hang over the sides for easy removal of the fudge once set.
- Melt ingredients: In a medium saucepan, combine the white chocolate chips and sweetened condensed milk. Stir continuously over low heat until the mixture is completely melted and smooth. Remove from heat and stir in vanilla extract for added flavor.
- Color the fudge: Divide the melted mixture evenly into three bowls. Add red food coloring to one bowl, green to another, and leave the third bowl plain for layering.
- Layer the fudge: Pour the red fudge into the prepared pan and spread evenly. Next, layer the plain fudge over the red layer, followed by the green fudge on top. Use a knife to gently swirl the layers together creating a marbled effect.
- Add sprinkles: While the fudge is still warm, sprinkle the top evenly with holiday-themed sprinkles for festive decoration.
- Chill the fudge: Place the baking dish in the refrigerator and chill for at least 2 hours, or until the fudge is firm enough to cut.
- Cut and serve: Use the parchment paper overhang to lift the fudge out of the pan. Cut into 24 small squares and serve or package for gifting.
Notes
- Ensure low heat while melting to prevent burning the white chocolate.
- Swirling the colors gently achieves a marbled look without mixing colors completely.
- The fudge should be stored refrigerated and consumed within one week for optimal freshness.
- For a dairy-free version, substitute white chocolate chips and sweetened condensed milk with vegan alternatives.


