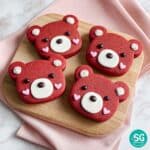
Description
These Tasty Red Velvet Bear Cookies are a delightful twist on classic red velvet flavor, shaped into adorable bear forms perfect for a fun baking project or a charming gift. Rich with cocoa and a subtle tang from vinegar, these cookies are both visually appealing and irresistibly delicious.
Ingredients
Dry Ingredients
- 1.75 cups all-purpose flour
- 3 tbsp cocoa powder
- 0.5 tsp baking soda
- 0.5 tsp baking powder
- 0.75 tsp salt
Wet Ingredients
- 0.5 cup unsalted butter, softened
- 0.25 cup sugar
- 0.25 cup brown sugar
- 1.25 tsp vanilla essence
- 1 tsp white vinegar
- 1 large egg
- red food coloring (as needed)
Decoration
- 2 tbsp semi-sweet chocolate (for detailing)
- 4 tbsp white chocolate (for detailing)
- oil-based food coloring (for coloring chocolate or decoration)
Instructions
- Prepare Dry Ingredients: In a medium bowl, sift together the all-purpose flour, cocoa powder, baking soda, baking powder, and salt. Set aside to ensure even mixing and avoid lumps.
- Cream Butter and Sugars: In a large mixing bowl, cream the unsalted butter, sugar, and brown sugar together until the mixture is light and fluffy. This enhances the texture and helps the cookies rise evenly.
- Add Wet Ingredients: Beat in the vanilla essence, white vinegar, and the large egg into the creamed butter and sugar mixture until fully combined and smooth.
- Incorporate Food Coloring: Add red food coloring gradually to the wet mixture until the desired deep red color is achieved, typical for red velvet treats.
- Combine Dry and Wet Mixtures: Gradually fold the sifted dry ingredients into the wet mixture, mixing gently until a smooth cookie dough forms. Avoid overmixing to keep the cookies tender.
- Shape Cookies: Preheat your oven to 350°F (175°C). Form the dough into bear shapes by hand or using bear-shaped cookie cutters, placing them evenly spaced on a parchment-lined baking sheet.
- Bake: Bake the bear-shaped cookies in the preheated oven for about 12-15 minutes or until the edges are firm and the centers are set.
- Cool: Allow the cookies to cool completely on a wire rack before decoration to ensure the chocolate adheres properly.
- Decorate: Melt the semi-sweet and white chocolate separately. Use the chocolates combined with oil-based food coloring to paint or pipe facial features and details on the cooled bear cookies for a charming finish. Let the decorated cookies set until the chocolate hardens.
Notes
- Use soft unsalted butter to achieve the best creaming results.
- Add food coloring gradually to control the redness and avoid unnatural hues.
- Ensure cookies are fully cooled before decorating to prevent melting and smudging of chocolate details.
- Oil-based food coloring is essential for coloring chocolate without seizing it.
- Store cookies in an airtight container at room temperature for up to one week.
