

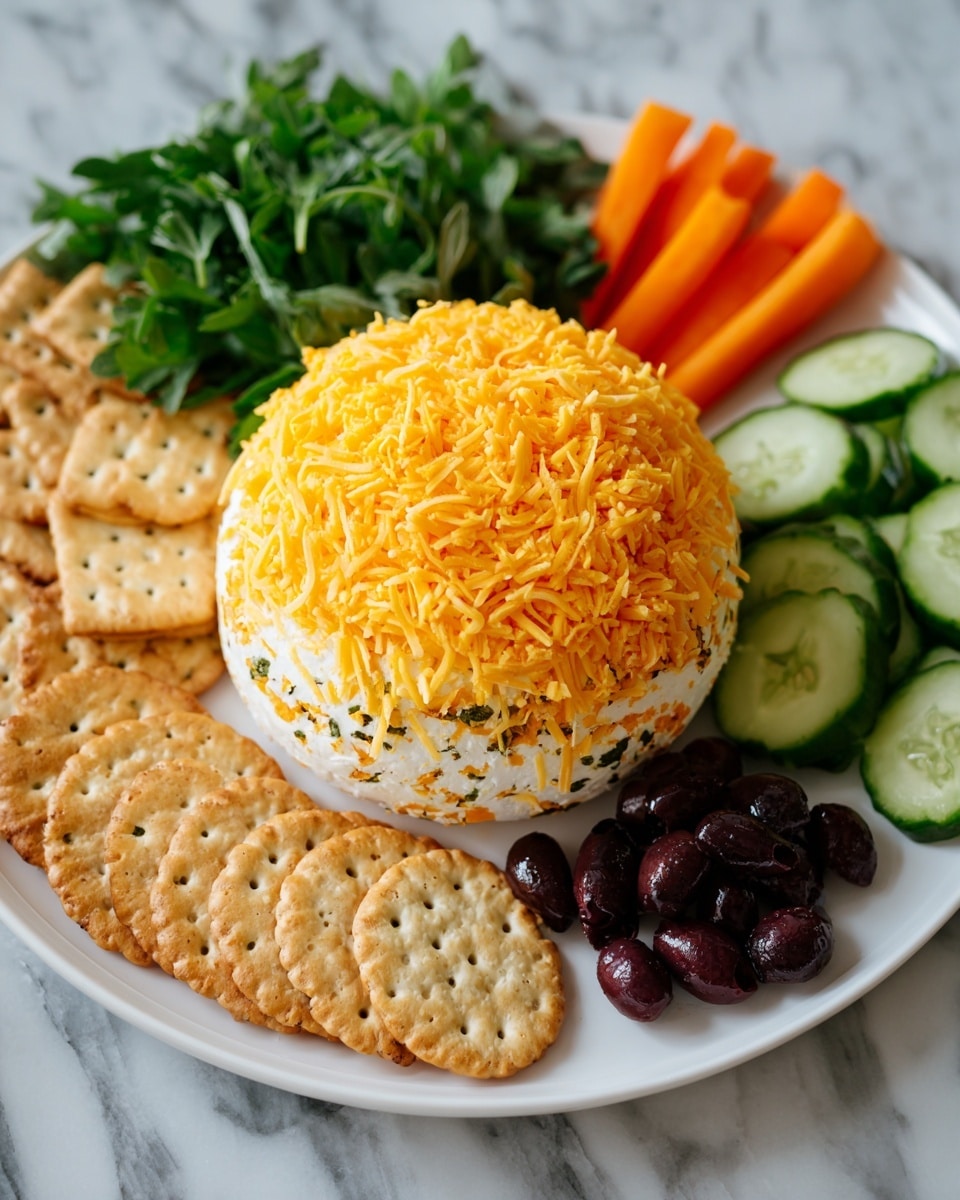
Brighten up your spring gatherings with this Super Easy Easter Cheese Ball Recipe, a delightful blend of creamy cheeses and savory flavors, shaped into charming festive forms. This appetizer is not only simple to prepare but also captures the essence of the season with its colorful presentation and crowd-pleasing taste. Whether you’re hosting an Easter brunch or a casual get-together, this cheese ball brings both cheer and deliciousness to the table effortlessly.

Ingredients You’ll Need
Gathering a handful of straightforward ingredients is all it takes to create this festive favorite. Each component plays a key role in delivering a creamy texture, sharp flavor, or vibrant appearance that makes this dish stand out.
- 16 oz cream cheese (softened): The creamy base that holds the cheese ball together and provides a smooth texture.
- 2 cups shredded sharp cheddar cheese: Adds a rich, tangy depth and a beautiful golden hue.
- 1/4 cup grated Parmesan cheese: Enhances umami with its nutty, salty flavor.
- 1/2 tsp garlic powder: Delivers subtle savory warmth without overpowering.
- 1/2 tsp onion powder: Brings a mild, sweet undertone that balances the sharp cheeses.
- 1/4 tsp black pepper: Provides a gentle kick that lifts the overall taste.
- 1/4 cup finely chopped green onions: Adds fresh, crisp bites and lively color.
- 1/4 cup chopped cooked bacon (optional): Introduces smoky, crispy flavor for those who enjoy a bit of indulgence.
- 2 tbsp chopped parsley: Perfect for coating and imparting a fresh herbal note.
- 1/2 cup crushed pecans or walnuts (optional coating): Adds delightful crunch and nutty flavor outside the cheese ball.
- Pastel-colored sprinkles or crushed crackers for decoration (optional): Makes your cheese ball visually festive and fun.
- Assorted crackers and fresh veggies for serving: Ideal carriers to enjoy every creamy, flavorful bite.
How to Make Super Easy Easter Cheese Ball Recipe
Step 1: Combine the Cheeses and Seasonings
In a large mixing bowl, start by blending your softened cream cheese with shredded sharp cheddar cheese and grated Parmesan. This creamy, cheesy combination forms the backbone of your cheese ball, delivering that irresistible indulgence. Sprinkle in the garlic powder, onion powder, and black pepper next — these seasonings will infuse every bite with subtle complexity. Stir in the finely chopped green onions, which bring fresh zest and a pop of color, plus the optional cooked bacon if you want a smokier profile. Mix everything thoroughly until you have a smooth, well-combined mixture ready to shape.
Step 2: Shape and Chill the Cheese Ball
Once your mixture is perfectly combined, it’s time to shape it into a festive form. Using clean hands, mold the mixture into an egg or oval shape, evoking the cheerful spirit of Easter. Alternatively, you can use plastic wrap to line a bowl and press the cheese mixture inside to get a smooth, even finish. After shaping, pop the cheese ball into the fridge for at least one hour to let it firm up. This chilling step is crucial as it helps the flavors meld together and makes the cheese ball easier to coat and serve.
Step 3: Decorate and Coat Your Cheese Ball
When the cheese ball has firmed up nicely, bring it back to room temperature for a few minutes to make it easier to handle. Gently roll or pat the surface with chopped parsley, crushed nuts, or crushed crackers, depending on the texture and flavor you prefer. This creates a beautiful, flavorful crust and adds an inviting crunch. For an extra festive touch, sprinkle pastel-colored decorations like edible sprinkles or finely crushed crackers on top, making your cheese ball truly stand out as the centerpiece of your appetizer spread.
How to Serve Super Easy Easter Cheese Ball Recipe
Garnishes
Garnishes elevate your cheese ball from delicious to dazzling. Fresh herbs like parsley or chives add vibrant green contrast, while colorful sprinkles bring a playful Easter vibe. A light dusting of paprika or crushed nuts offers both aesthetic appeal and an extra layer of flavor. The key is to pick garnishes that complement without overpowering the creamy richness of the cheese ball.
Side Dishes
This cheese ball pairs beautifully with a variety of sides. Crisp crackers are classic and provide the perfect crunch, but fresh veggies such as carrot sticks, cucumber slices, and bell pepper strips add a refreshing, healthy balance. For a heartier spread, consider including toasted baguette slices or even some homemade pita chips. These options give everyone a variety of textures to enjoy alongside the creamy centerpiece.
Creative Ways to Present
Presentation makes a big difference, especially for special occasions like Easter. Try placing the cheese ball on a festive platter lined with spring greens or colorful napkins. For added charm, use small edible flowers or fresh herb sprigs around the base. You can even create multiple mini cheese balls tinted with natural food coloring to make a pastel-themed assortment that’s just as fun to look at as it is to eat. Serving with an array of complementary dips or olives can also elevate your appetizer game.
Make Ahead and Storage
Storing Leftovers
If you end up with leftovers, no worries! Wrap the cheese ball tightly in plastic wrap or place it in an airtight container and store it in the refrigerator. It will stay fresh for 3 to 5 days, making it an excellent make-ahead option for your holiday gatherings or any time you want a quick, tasty snack.
Freezing
Due to the fresh cheeses, freezing your Easter cheese ball isn’t recommended as it may alter the texture and flavor. Keeping it chilled in the fridge is the best way to maintain its creamy consistency and delicious taste.
Reheating
This cheese ball is meant to be served cold or at room temperature, so reheating is unnecessary. Simply remove it from the refrigerator a few minutes before serving to soften it slightly, enhancing the flavors and making it easier to spread or dip.
FAQs
Can I make the Super Easy Easter Cheese Ball Recipe dairy-free?
While this recipe relies heavily on cream cheese and cheddar for its signature texture and flavor, you can substitute with dairy-free cream cheese and vegan cheeses. Keep in mind the taste and consistency may differ slightly, but it can still be a tasty alternative for those with dietary restrictions.
What can I use instead of bacon for a vegetarian version?
If you want to keep it vegetarian, simply omit the bacon or replace it with finely chopped sun-dried tomatoes or smoked paprika to impart a savory depth without the meat.
How far in advance can I prepare this cheese ball?
You can make the cheese ball up to 1 or 2 days ahead of time. Just be sure to keep it well wrapped and chilled so it stays fresh and firm for serving.
What are some good alternatives to pecans or walnuts for coating?
If you’re allergic to nuts or prefer a different flavor, crushed pretzels, toasted breadcrumbs, or even finely chopped herbs make excellent coatings that add texture without compromising taste.
Can I add different flavors to customize this cheese ball?
Absolutely! Feel free to experiment by mixing in diced peppers, olives, or even a touch of hot sauce for a spicy kick. This recipe is very forgiving and invites creativity.
Final Thoughts
This Super Easy Easter Cheese Ball Recipe is truly a fantastic way to bring flavor, fun, and festivity to your spring celebrations. It’s simple to put together yet impressive to serve, making it a go-to appetizer that guests will love. Give it a try, and watch it become a beloved tradition at your holiday table!
Print
Super Easy Easter Cheese Ball Recipe
- Prep Time: 15 minutes
- Cook Time: 0 minutes
- Total Time: 1 hour 15 minutes
- Yield: 12 servings
- Category: Appetizer
- Method: No-Cook
- Cuisine: American
- Diet: Gluten Free
Description
This Super Easy Easter Cheese Ball is a festive and creamy appetizer perfect for springtime gatherings. Made with a blend of cream cheese, sharp cheddar, Parmesan, and flavorful seasonings, it’s shaped into an egg or bunny form and decorated with colorful toppings for a fun presentation. Ideal for serving with crackers and fresh vegetables, this no-bake cheese ball is simple to prepare and sure to impress.
Ingredients
Cheese Ball Mixture
- 16 oz cream cheese (softened)
- 2 cups shredded sharp cheddar cheese
- 1/4 cup grated Parmesan cheese
- 1/2 tsp garlic powder
- 1/2 tsp onion powder
- 1/4 tsp black pepper
- 1/4 cup finely chopped green onions
- 1/4 cup chopped cooked bacon (optional)
Coating and Decoration
- 2 tbsp chopped parsley
- 1/2 cup crushed pecans or walnuts (optional coating)
- Pastel-colored sprinkles or crushed crackers for decoration (optional)
Serving
- Assorted crackers
- Fresh vegetables
Instructions
- Combine Ingredients: In a large bowl, mix the softened cream cheese, shredded sharp cheddar, grated Parmesan, garlic powder, onion powder, black pepper, finely chopped green onions, and chopped cooked bacon if using. Stir until everything is fully combined and the mixture is smooth.
- Shape Cheese Ball: Using clean hands, mold the cheese mixture into an egg or oval shape, or alternatively, wrap the mixture in plastic wrap and shape it inside a bowl for more uniform form.
- Chill: Place the shaped cheese ball in the refrigerator and chill for at least 1 hour to allow it to firm up properly.
- Coat and Decorate: Before serving, gently roll the chilled cheese ball in chopped parsley, nuts, or crushed crackers to coat the exterior. Add pastel sprinkles or additional toppings as desired to create a festive look.
- Serve: Present the cheese ball on a serving plate accompanied by assorted crackers and fresh vegetables for dipping and spreading.
Notes
- For a colorful touch, divide the cheese mixture into smaller portions and tint each with food coloring to create pastel designs.
- This cheese ball can be prepared 1–2 days in advance and stored in the refrigerator until needed.
- To keep the recipe gluten-free, serve with gluten-free crackers.
- Optional bacon can be omitted for a vegetarian version.


