If you’ve never had a Strawberry Cheesecake Quesadilla before, you’re in for something seriously special. Think of it as a crispy, golden tortilla hugging a warm, creamy, tangy-sweet cheesecake filling, loaded with juicy strawberries and finished with a sparkly dusting of cinnamon sugar. It’s indulgent, fun, and—best of all—ready in just about 20 minutes. This is the kind of dessert that wows guests or satisfies a last-minute sweet tooth without breaking a sweat.
Why You’ll Love This Recipe
- Quick & Easy: Minimal ingredients, just a few steps, and you’ve got a rich, café-style dessert ready in no time.
- Crazy Delicious: The cream cheese melts into the strawberries, creating this lush, gooey filling that contrasts perfectly with the crisp tortillas and that cinnamon-sugar crunch.
- Perfect for Any Occasion: Great for movie nights, date nights, or when you just want to treat yourself to something sweet without turning on the oven.
- Customizable: You can change up the fruit, play with flavors, or serve with different sauces. It’s incredibly flexible.
Ingredients You’ll Need

Here’s what makes these Strawberry Cheesecake Quesadillas shine:
- Cream Cheese: The base of the cheesecake filling. Softened cream cheese gives a smooth, creamy texture.
- Sugar: Sweetens the cream cheese and gives the top that irresistible sparkle when combined with cinnamon.
- Vanilla Extract: Adds a warm, rich flavor that makes the filling taste like actual cheesecake.
- Strawberries: Fresh and juicy, they brighten up the filling and add a little texture and tartness.
- Tortillas: Use 6-inch flour tortillas—they crisp up beautifully and hold the filling perfectly.
- Butter: Helps the tortillas get that golden, crispy finish in the pan and adds richness.
- Cinnamon & Sugar: Sprinkled on top for that iconic dessert quesadilla crunch and flavor.
- Strawberry Sauce: For dipping—or drizzling over the top. It elevates the whole experience.
Variations
Looking to switch things up? Try these fun twists:
- Berry Blend: Swap in raspberries, blueberries, or a mix for a burst of berry flavor.
- Chocolate Drizzle: Drizzle with melted dark or white chocolate instead of (or with) strawberry sauce.
- Nutty Addition: Sprinkle in a few chopped pecans, almonds, or crushed graham crackers for texture.
- Gluten-Free: Use gluten-free tortillas—just make sure they’re soft and pliable enough to fold and cook without tearing.
- Mini Versions: Use smaller tortillas and cut them into wedges for a party-friendly treat.
How to Make Strawberry Cheesecake Quesadillas
Step 1: Make the Filling
In a mixing bowl, beat together softened cream cheese, sugar, and vanilla extract until silky and smooth. This is your dreamy cheesecake base.
Step 2: Add the Strawberries
Dice fresh strawberries and gently fold them into the cream cheese mixture. You want them evenly distributed but not mashed.
Step 3: Assemble the Quesadilla
Spread a generous layer of the filling on one tortilla. It doesn’t need to go all the way to the edge—leave a little space for spreading while cooking.
Step 4: Cook It Up
Heat 1 teaspoon of butter in a skillet over medium-high heat. Once melted, place the tortilla (cheesecake side up) into the pan. Spread a second tortilla with butter and lay it butter-side-up on top.
Step 5: Crisp Both Sides
Cook for about 2–3 minutes per side until the tortilla is golden and crispy. Carefully flip using a spatula—it helps to press it down gently so everything melds together.
Step 6: Sweeten the Top
Mix cinnamon and sugar in a small bowl and sprinkle generously over the top while it’s still hot. That warm sugar will stick and melt just a bit—pure magic.
Step 7: Slice and Serve
Let sit for 2 minutes to set slightly, then slice into wedges. Serve with strawberry sauce for dipping or drizzling.
Pro Tips for Making the Recipe
- Room Temperature Cream Cheese: It blends smoother and faster. If you’re in a rush, microwave it for 10-15 seconds.
- Fresh Strawberries: Avoid frozen ones—they tend to release too much water and make the filling runny.
- Golden Tortillas: Don’t crank up the heat too high; medium-high gives you that perfect golden crust without burning.
- Make Ahead Trick: Mix the filling in advance and refrigerate it for a day or two. Then you can assemble and cook whenever you’re ready.
How to Serve
These quesadillas are perfect just as they are, but you can dress them up too:
Sweet Garnishes:
Top with powdered sugar, a dollop of whipped cream, or fresh mint.
Saucy Pairings:
Serve with strawberry sauce, chocolate syrup, or even caramel for dipping.
Ice Cream Alert:
Pair with a scoop of vanilla or strawberry ice cream for a next-level dessert experience.
Make Ahead and Storage
Storing Leftovers
Wrap any leftovers tightly in foil or place them in an airtight container. Keep in the fridge for up to 3 days. The texture stays surprisingly good!
Freezing
You can freeze them, but it’s best to do so before cooking. Assemble the quesadillas and wrap in plastic wrap, then foil. Freeze for up to a month. Cook straight from frozen—just give them a few more minutes per side.
Reheating
Reheat in a skillet for the best texture. The microwave works too, but it will soften the crispiness. A toaster oven is a happy medium!
FAQs
Can I use other fruits besides strawberries?
Absolutely. Raspberries, blueberries, or even diced peaches or apples would be fantastic. Just avoid fruits that are too juicy—those can make the filling runny.
Do I need to use a nonstick pan?
A nonstick or cast iron skillet works best for getting that perfect golden crust without sticking. Just make sure you use butter to help things along.
Can I make these ahead of time for a party?
Yes! You can make the filling ahead and even assemble the quesadillas a few hours in advance. Keep them in the fridge, then cook right before serving.
Is this recipe kid-friendly?
Kids love these! The crispy outside, sweet filling, and fun dipping sauce make them a total hit. Just let them cool a bit before serving.
Final Thoughts
These Strawberry Cheesecake Quesadillas are everything a dessert should be—quick, indulgent, comforting, and just a little bit unexpected. Whether you’re making them for guests or just treating yourself, they’re guaranteed to deliver smiles. Go ahead—grab those tortillas and get cooking!
Print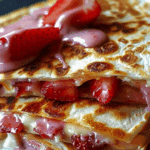
Strawberry Cheesecake Quesadillas Recipe
- Prep Time: 10 minutes
- Cook Time: 10 minutes
- Total Time: 20 minutes
- Yield: 2 quesadillas (about 4 servings)
- Category: Dessert
- Method: Stovetop
- Cuisine: Fusion
Description
A quick and indulgent dessert made with golden, crispy tortillas filled with a creamy cheesecake mixture and juicy strawberries, finished with a cinnamon sugar topping.
Ingredients
- 4 oz cream cheese, softened
- 2 tbsp granulated sugar (plus more for topping)
- 1/2 tsp vanilla extract
- 1/2 cup diced fresh strawberries
- 4 6-inch flour tortillas
- 2 tsp butter (for pan and tortilla)
- 1 tsp ground cinnamon
- Strawberry sauce (for serving)
Instructions
- In a bowl, beat together the softened cream cheese, sugar, and vanilla extract until smooth.
- Gently fold in the diced strawberries.
- Spread a generous layer of the filling onto one tortilla, leaving space around the edge.
- Heat 1 tsp butter in a skillet over medium-high heat. Place the filled tortilla, cheesecake side up, in the pan.
- Spread the second tortilla with butter and place it, butter-side up, over the top.
- Cook for 2–3 minutes per side, pressing gently, until golden and crispy.
- Mix cinnamon and sugar in a small bowl and sprinkle over the hot quesadilla.
- Let it sit for 2 minutes, then slice into wedges and serve with strawberry sauce.
Notes
- Use room temperature cream cheese for easier mixing.
- Only use fresh strawberries to prevent excess moisture.
- Can prepare the filling in advance and refrigerate up to 2 days.
- Drizzle with chocolate or caramel, or serve with ice cream for variations.