

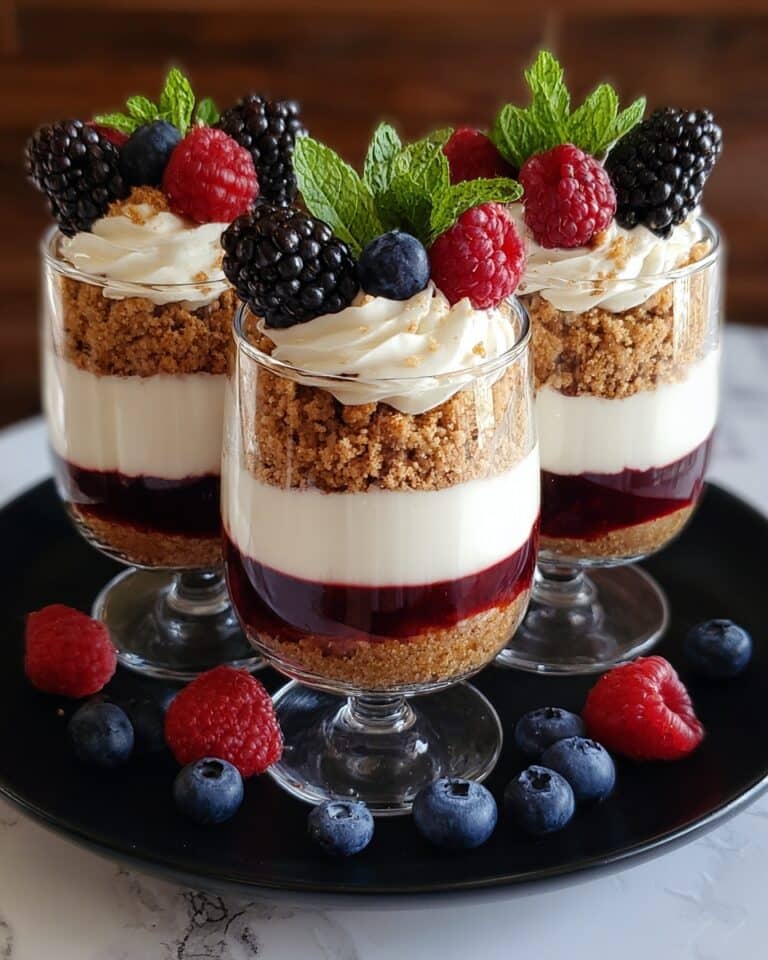
Get ready to wow your friends, family, and your own taste buds with these Red, White, and Blue Mini Cheesecakes. These gorgeous little treats are bursting with creamy cheesecake flavor, nestled on a buttery graham cracker crust, then crowned with juicy strawberries and blueberries for a patriotic splash of color. Whether you’re celebrating the Fourth of July, Memorial Day, or want a fun dessert for any time of year, this show-stopping recipe is easy to make and guaranteed to be a crowd-pleaser. Light, festive, and irresistibly delicious, these cheesecakes will quickly become your go-to for any special occasion!

Ingredients You’ll Need
Creating Red, White, and Blue Mini Cheesecakes starts with a handful of essential ingredients, each one working a bit of magic in the finished dessert. From the golden crunch of a graham cracker crust to the rich, tangy filling and that pop of colorful fruit on top, every ingredient is there for good reason.
- Graham cracker crumbs: This classic base provides a lightly sweet, crisp foundation that perfectly complements the soft cheesecake above.
- Granulated sugar: Used in both the crust and the filling to sweeten and balance flavors just right.
- Unsalted butter (melted): Melted butter binds the crust and infuses every bite with rich, buttery flavor.
- Cream cheese (softened): The hero of the recipe, cream cheese gives the cheesecakes their signature creamy, dreamy texture.
- Vanilla extract: Just a splash of vanilla brings the whole filling to life with inviting, aromatic warmth.
- Large eggs: Eggs help set the cheesecake filling, keeping it smooth and luscious after baking.
- Sour cream: Adds a lovely tang and keeps the cheesecake extra soft and creamy.
- Heavy cream: Lightens the filling and creates that melt-in-your-mouth quality we all adore.
- Fresh strawberries and blueberries: These colorful berries transform your cheesecakes into festive, patriotic treats.
- Whipped cream (optional): A fluffy swirl on top makes the presentation extra special and adds a touch of lightness.
How to Make Red, White, and Blue Mini Cheesecakes
Step 1: Prep Your Muffin Tin
Preheat your oven to 325°F (163°C) and line a 12-cup muffin tin with paper liners. This step not only sets you up for perfectly portioned cheesecakes, it also makes for easy cleanup and easy removal once your mini masterpieces are ready to serve! For the best results, use foil liners or give your paper liners a quick spritz of nonstick spray.
Step 2: Make the Graham Cracker Crust
In a small bowl, blend together the graham cracker crumbs, three tablespoons of sugar, and that luscious melted butter until the texture resembles damp sand. Scoop about one tablespoon into each cupcake liner, gently pressing it down to create a solid crust. The back of a spoon or your fingers work perfectly for this! This crust bakes into a subtly sweet and sturdy base for your creamy filling.
Step 3: Create the Cheesecake Filling
Put your softened cream cheese into a large bowl and beat it until completely smooth—no lumps allowed! Add the remaining half-cup of sugar and your vanilla extract, continuing to beat until the mixture is combined and creamy. Next, add the eggs one at a time, mixing just until incorporated. Finally, blend in the sour cream and heavy cream until the batter is glossy and silky. This is where that signature cheesecake magic happens!
Step 4: Fill and Bake
Divide the velvety cheesecake batter evenly among your muffin cups, filling each until they’re about three-quarters full. Transfer to the preheated oven and bake for 18 to 20 minutes, or until the centers are set but still slightly jiggly. Once done, turn off the oven and crack the door open, letting the cheesecakes sit for five minutes—this gentle cooling helps prevent cracks.
Step 5: Cool and Chill
Carefully remove the cheesecakes from the oven and let them cool completely at room temperature. Then pop them into the refrigerator for at least two hours (overnight is even better) so the flavors and texture can fully develop. Patience is key—it’s what takes these mini cheesecakes from good to absolutely spectacular.
Step 6: Decorate with Red, White, and Blue
Just before serving, top your Red, White, and Blue Mini Cheesecakes with a generous scattering of fresh strawberries and blueberries. Add a swirl of whipped cream for that festive “white” touch! The berries don’t just look gorgeous—they add a fresh burst of flavor and the tricolored finishing touch that makes these cheesecakes extra special for any patriotic get-together.
How to Serve Red, White, and Blue Mini Cheesecakes

Garnishes
A simple topping of halved strawberries and whole blueberries creates that iconic red, white, and blue look. For an extra splash of fun, pipe little stars or pretty swirls of whipped cream on top, or even sprinkle with festive colored sprinkles for extra pizzazz.
Side Dishes
Pairing these Red, White, and Blue Mini Cheesecakes with a fruit salad, a selection of cookies, or even a tangy lemonade makes for a delightful dessert spread at any picnic or summer gathering. Their light, creamy texture also balances nicely with richer treats or a dark chocolate bark.
Creative Ways to Present
Arrange your mini cheesecakes on a large platter in a star pattern for a super festive centerpiece. Or, for an elegant touch, serve each one in a decorative cupcake wrapper, nestled among whole strawberries and blueberries. Individual mini mason jars or clear cups also make a charming and portable presentation that’s perfect for parties.
Make Ahead and Storage
Storing Leftovers
To keep your Red, White, and Blue Mini Cheesecakes tasting fresh, store any leftovers in an airtight container in the refrigerator. They’ll stay delicious for up to four days—just add fresh fruit on top right before serving to keep everything looking vibrant and appealing.
Freezing
These mini cheesecakes freeze surprisingly well! Unadorned cheesecakes (without fruit and whipped cream) can be placed in a single layer in an airtight container or wrapped individually in plastic wrap. Freeze for up to two months, then thaw in the fridge overnight before garnishing and serving.
Reheating
Cheesecakes are at their best enjoyed chilled, so there’s no need to reheat. If you prefer them at room temperature, let them sit out for about 20 minutes before serving. This takes off the chill and softens the texture, especially if they’ve been stored in the fridge or freezer.
FAQs
Can I make Red, White, and Blue Mini Cheesecakes ahead of time?
Absolutely! These cheesecakes are ideal for making a day in advance. Store the baked, cooled mini cheesecakes (without fruit or whipped cream) in the fridge, and simply add your fresh toppings right before serving.
What if I don’t have graham cracker crumbs?
No problem! You can use crushed vanilla wafers, digestive biscuits, or even chocolate wafer cookies for a fun twist. Just make sure to crush them finely and use the same measurements for butter and sugar.
Can I use frozen berries as toppings?
Fresh berries are best for presentation and flavor, but if you only have frozen, thaw and drain them well before chopping and topping your cheesecakes. Keep in mind that frozen berries may be softer and might not hold their shape as nicely.
Can these be made gluten-free?
Definitely! Substitute your favorite gluten-free graham crackers or cookies for the crust, and double-check that all other ingredients are labeled gluten-free. The rest of the recipe stays exactly the same.
How do I prevent the mini cheesecakes from cracking?
To minimize cracking, blend the filling just until smooth (don’t overmix), use room temperature ingredients, and allow the cheesecakes to cool gradually after baking by sitting briefly in the turned-off oven with the door ajar before moving them to the counter and then the fridge.
Final Thoughts
I can’t wait for you to try making your own batch of Red, White, and Blue Mini Cheesecakes. They’re festive, shareable, and so much easier than a full-size cheesecake—plus absolutely stunning on any holiday dessert table. Whip up a dozen and share the joy with the people you love!
Print
Red, White, and Blue Mini Cheesecakes Recipe
- Prep Time: 20 minutes
- Cook Time: 20 minutes
- Total Time: 2 hours 40 minutes (including chilling)
- Yield: 12 mini cheesecakes
- Category: Dessert
- Method: Baking
- Cuisine: American
- Diet: Non-Vegetarian
Description
These Red, White, and Blue Mini Cheesecakes are the perfect festive treat for any patriotic occasion. Creamy and delicious, with a crunchy graham cracker crust and topped with fresh berries, they are sure to impress your guests.
Ingredients
Graham Cracker Crust:
- 1 cup graham cracker crumbs
- 3 tablespoons granulated sugar
- 4 tablespoons unsalted butter, melted
Cheesecake Filling:
- 16 oz cream cheese, softened
- 1/2 cup granulated sugar
- 1 teaspoon vanilla extract
- 2 large eggs
- 1/2 cup sour cream
- 1/4 cup heavy cream
Topping:
- Fresh strawberries and blueberries
- Whipped cream (optional)
Instructions
- Preheat the Oven: Preheat your oven to 325°F (163°C) and line a 12-cup muffin tin with paper liners.
- Prepare the Crust: In a small bowl, mix graham cracker crumbs, 3 tablespoons sugar, and melted butter. Press mixture into each cupcake liner.
- Make the Filling: Beat cream cheese until smooth. Add sugar, vanilla, eggs, sour cream, and heavy cream. Mix until creamy.
- Bake: Divide batter among liners and bake for 18–20 minutes. Let cool in the oven with the door ajar.
- Chill and Serve: Refrigerate for at least 2 hours. Top with berries and whipped cream before serving.
Notes
- These mini cheesecakes can be made a day in advance.
- For easier removal, use foil cupcake liners or lightly grease the paper liners.


