

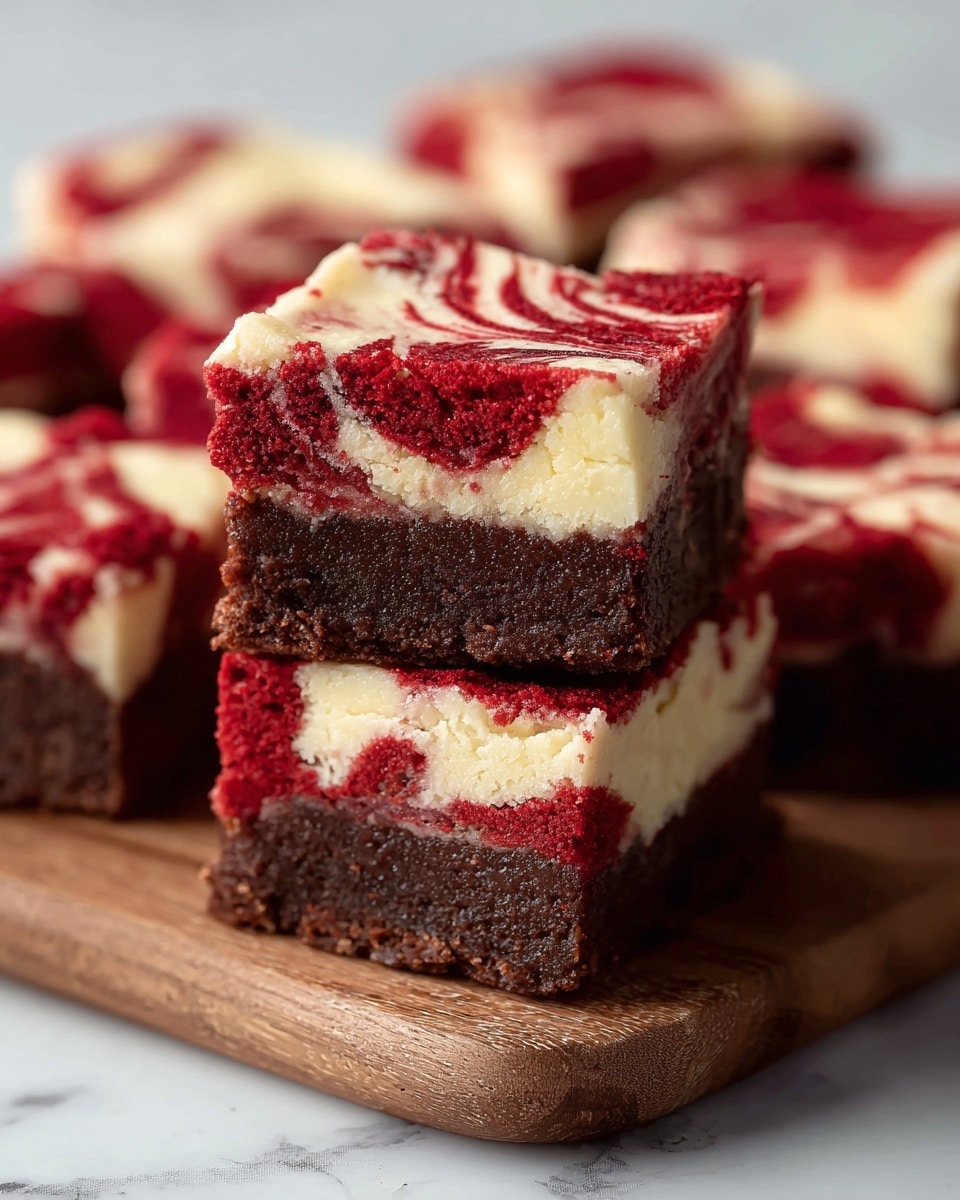
If you’re craving a dessert that’s as stunning in color as it is indulgently rich in flavor, this Red Velvet Brownies Recipe is about to become your new favorite treat. Combining the classic allure of red velvet with the decadent, fudgy texture of a brownie, these morsels offer a perfect balance of subtle cocoa, creamy sweetness, and a moist crumb that melts in your mouth. Whether you’re baking for a special occasion or simply to brighten your day, this recipe turns simple ingredients into an unforgettable dessert experience.

Ingredients You’ll Need
Every ingredient in this Red Velvet Brownies Recipe plays its part in creating a beautiful harmony of texture, flavor, and color. These essentials keep things straightforward but deliver impressive results that any baker will appreciate.
- Unsalted butter: Provides a rich, creamy base that ensures moist and tender brownies.
- Granulated sugar: Balances sweetness and contributes to the smooth batter texture.
- Large eggs: Act as a binder, helping the brownies hold together while providing structure.
- Vanilla extract: Adds warmth and depth to the flavor profile.
- Red food coloring: Gives these brownies their signature jewel-red hue that’s impossible to resist.
- Unsweetened cocoa powder: Provides a subtle chocolatey backbone without overpowering the velvet flavor.
- All-purpose flour: Gives these brownies the perfect fudgy yet firm texture.
- Salt: Enhances the overall flavors and balances the sweetness.
- White chocolate chips (optional): Melt into pockets of creamy sweetness for an extra-special touch.
- Powdered sugar (optional): For a delicate dusting that makes presentation elegant.
How to Make Red Velvet Brownies Recipe
Step 1: Prepare Your Pan and Oven
Start by preheating your oven to 350°F and lining an 8×8-inch baking pan with parchment paper. This ensures easy removal of your brownies and prevents sticking, making cleanup a breeze.
Step 2: Combine Butter and Sugar
In a medium bowl, whisk together your melted unsalted butter and granulated sugar until the mixture is glossy and smooth. This helps incorporate air for a tender crumb while blending the sweetness evenly throughout the brownies.
Step 3: Add Eggs and Flavorings
Beat in the eggs one at a time, mixing well after each addition to create a cohesive batter. Then, stir in the vanilla extract and red food coloring carefully—this is what gives those brownies their iconic look and subtle fruity undertone.
Step 4: Mix Dry Ingredients
Sift together the cocoa powder, all-purpose flour, and salt to prevent lumps and keep the texture light. Gently fold these dry ingredients into the wet mixture until just combined; overmixing can make the brownies tough, so be gentle here.
Step 5: Add White Chocolate (Optional)
If you like a little extra luxury, fold in the white chocolate chips or chunks now. As the brownies bake, these morsels create heavenly pockets of sweetness that contrast beautifully with the cocoa undertones.
Step 6: Bake to Perfection
Pour the batter evenly into your prepared pan and smooth the top. Bake for 25 to 30 minutes or until a toothpick inserted into the center comes out with a few moist crumbs clinging to it. This guarantees fudgy brownies that are neither dry nor undercooked.
Step 7: Cool and Slice
Allow the brownies to cool completely in the pan before slicing. This rest period helps them set perfectly. If you like, dust them with powdered sugar for that extra aesthetic charm.
How to Serve Red Velvet Brownies Recipe
Garnishes
These red velvet brownies look stunning on their own, but a sprinkle of powdered sugar, a drizzle of white chocolate, or even a dollop of cream cheese frosting takes their presentation and taste up a notch. Fresh berries can add a lovely pop of color and slight tartness that complements the chocolaty richness.
Side Dishes
Serve these brownies alongside a scoop of creamy vanilla ice cream or a glass of cold milk for a classic pairing. For an elevated touch, try whipped cream infused with a hint of cinnamon or espresso.
Creative Ways to Present
Cut brownies into bite-sized squares or fun shapes using cookie cutters for parties or special occasions. Layer them in a trifle with whipped cream and berries for an impressive dessert centerpiece. You can also sandwich them with cream cheese frosting to create decadent brownie sandwiches.
Make Ahead and Storage
Storing Leftovers
Keep your brownies fresh by storing them in an airtight container at room temperature for up to 3 days. This keeps them moist without drying out or becoming crumbly.
Freezing
If you want to enjoy these delights later, wrap individual brownies tightly in plastic wrap and place them in a freezer-safe container or bag. They freeze beautifully for up to 3 months and thaw quickly at room temperature.
Reheating
To warm up your brownies, gently microwave them for about 15 seconds, or heat in a low oven (around 300°F) for 5-7 minutes. This refreshes their fudgy texture, especially if you’ve stored them in the fridge.
FAQs
Can I substitute the red food coloring with natural alternatives?
Yes! You can use beet juice or powder as a natural dye to achieve a vibrant red hue, though the color may be a little less intense than traditional food coloring.
Is it necessary to use unsalted butter in this recipe?
Unsalted butter is best because it gives you control over the salt content. Using salted butter can work, but you might want to omit the additional salt to avoid an overly salty taste.
Can I make these brownies vegan?
While this recipe relies on eggs and butter for its texture, you can experiment using vegan substitutes like flax eggs and plant-based butter, but expect some variation in taste and texture.
How do I prevent my brownies from being cakey?
To keep them fudgy and dense, avoid overmixing the batter and watch your baking time closely. Removing them from the oven as soon as a toothpick comes out with moist crumbs is key.
What’s the benefit of adding white chocolate chips?
White chocolate chips add creamy sweetness and a smooth melt-in-your-mouth contrast that complements the subtle cocoa and rich red velvet flavor beautifully.
Final Thoughts
This Red Velvet Brownies Recipe is an absolute joy to make and even better to share. Its vibrant look and luscious taste make it a standout dessert that’s sure to impress anyone lucky enough to take a bite. So absolutely give this recipe a try—your kitchen will fill with inviting aromas, and your sweet tooth will thank you!
Print
Red Velvet Brownies Recipe
- Prep Time: 10 minutes
- Cook Time: 30 minutes
- Total Time: 40 minutes
- Yield: 9 brownies
- Category: Dessert
- Method: Baking
- Cuisine: American
- Diet: Vegetarian
Description
These Red Velvet Brownies offer a rich and fudgy twist on classic brownies, combining the signature red color and subtle cocoa flavor with the moist texture you love. Perfect for holiday celebrations or anytime you crave a decadent dessert, they feature optional white chocolate chips for added sweetness and a beautiful powdered sugar dusting for presentation.
Ingredients
Brownie Batter
- 1/2 cup unsalted butter, melted and slightly cooled
- 1 cup granulated sugar
- 2 large eggs
- 1 teaspoon vanilla extract
- 1 tablespoon red food coloring
- 1/4 cup unsweetened cocoa powder
- 3/4 cup all-purpose flour
- 1/4 teaspoon salt
- 1/2 cup white chocolate chips or chunks (optional)
For Garnish
- Powdered sugar for dusting (optional)
Instructions
- Preheat and Prepare Pan: Preheat your oven to 350°F (175°C) and line an 8×8-inch baking pan with parchment paper to ensure easy removal of the brownies.
- Mix Butter and Sugar: In a medium bowl, whisk together the melted and cooled butter with granulated sugar until the mixture is smooth and well combined.
- Add Eggs and Flavorings: Incorporate the eggs one at a time, mixing thoroughly after each addition to create a smooth batter. Then, stir in the vanilla extract and red food coloring for that classic red velvet hue.
- Combine Dry Ingredients: Sift together the unsweetened cocoa powder, all-purpose flour, and salt to remove lumps, then gently fold this into the wet ingredients just until combined to achieve a tender crumb.
- Fold in White Chocolate Chips: If using, gently fold the white chocolate chips or chunks into the batter for added bursts of sweetness and texture.
- Bake the Brownies: Pour the batter evenly into the prepared baking pan, spreading it out smoothly. Bake in the preheated oven for 25 to 30 minutes, or until a toothpick inserted into the center comes out with a few moist crumbs for a fudgy texture.
- Cool and Slice: Allow the brownies to cool completely in the pan to set before slicing them into 9 squares.
- Garnish: Optionally, dust the cooled brownies with powdered sugar for an elegant finishing touch before serving.
Notes
- For a richer, fudgier texture, slightly underbake the brownies and chill them before cutting.
- Consider adding a cream cheese swirl before baking to enhance the classic red velvet flavor with creamy tanginess.


