

“`html
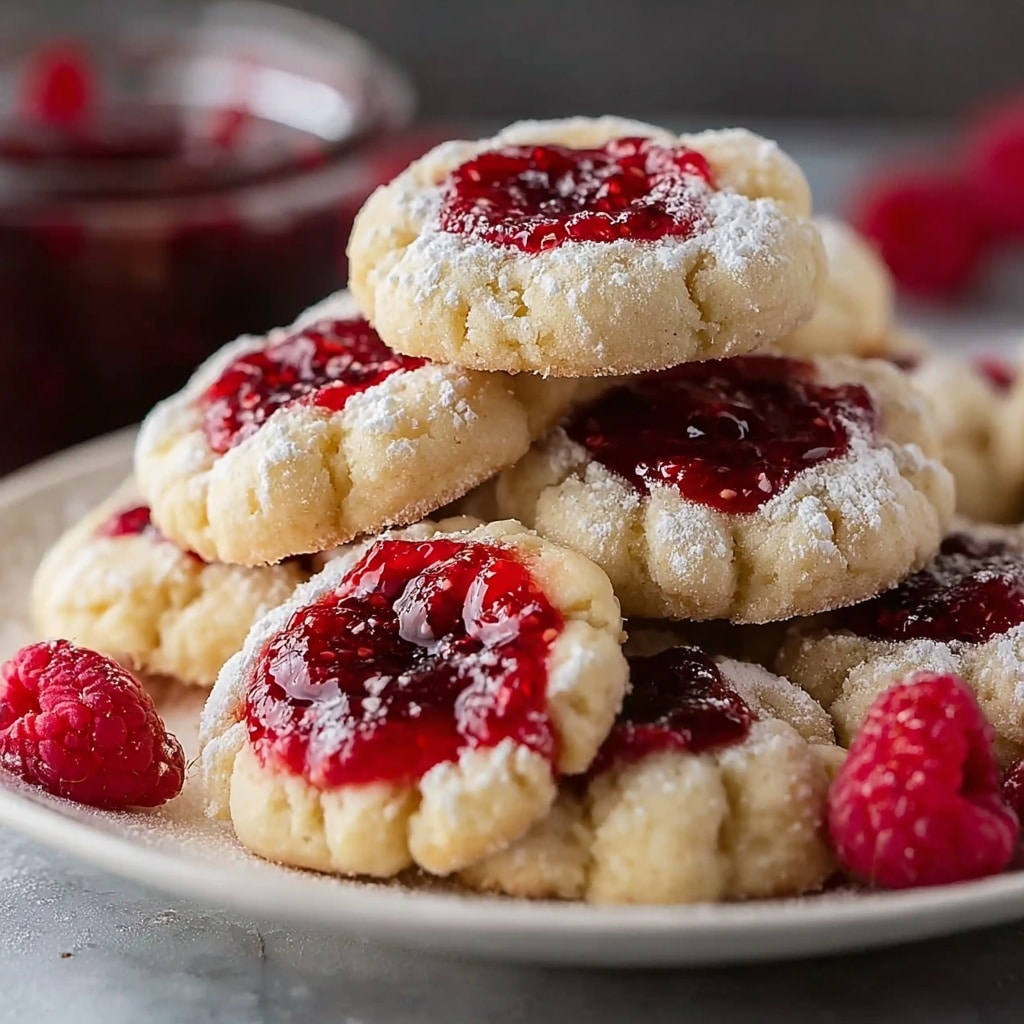
If you adore cozy baking projects that fill your kitchen with a sweet, inviting aroma, then this Raspberry Thumbprint Cookies Recipe is about to become your new go-to treat. These delightful cookies combine a tender, buttery base with a luscious dollop of vibrant raspberry jam nestled right in the center—offering a perfect balance of rich texture and fruity brightness in every bite. Whether you’re baking for a special occasion or just craving something homemade and heartwarming, these thumbprint cookies will quickly win over everyone at your table with their charming look and irresistible flavor.

Ingredients You’ll Need
Gathering the right ingredients is half the fun of baking, and the simplicity of this Raspberry Thumbprint Cookies Recipe is part of its charm. Each component is carefully chosen to bring out the perfect cookie texture and that mouthwatering raspberry pop.
- 1 cup unsalted butter, softened: Creates the tender, rich texture that melts in your mouth.
- 1/2 cup granulated sugar: Adds just the right amount of sweetness while helping with cookie structure.
- 1 large egg: Binds the dough together and adds moisture for softness.
- 1 teaspoon vanilla extract: Gives a subtle warmth and depth to the cookie flavor.
- 2 cups all-purpose flour: Forms the sturdy yet tender base of the cookie dough.
- 1/4 teaspoon salt: Balances the sweetness and enhances all other flavors.
- 1/2 cup raspberry jam (or your favorite fruit jam): This luscious spoonful is the star that crowns each cookie with fruity joy.
- Optional: powdered sugar for dusting: Adds a pretty, delicate finish perfect for gifting or festive occasions.
How to Make Raspberry Thumbprint Cookies Recipe
Step 1: Prepare Your Oven and Baking Sheet
Begin by preheating your oven to 350°F (175°C). It’s important to get this right from the start so your cookies bake evenly. Then, line a baking sheet with parchment paper—this simple step prevents sticking and makes cleanup a breeze.
Step 2: Cream Butter and Sugar
In a large bowl, cream together the softened butter and granulated sugar until they become light and fluffy. This process incorporates air, which will give your cookies a lovely, delicate texture. You’ll notice the mixture turning almost pale in color when it’s ready.
Step 3: Add Egg and Vanilla
Next, mix in the egg and vanilla extract. These add richness and a fragrant, homey note to the dough that sets the tone for the entire baking experience.
Step 4: Incorporate Dry Ingredients
Gradually add the all-purpose flour and salt, stirring just until combined. Be careful not to overmix here, as you want to maintain a tender crumb and avoid tough cookies. The dough will come together and feel just right—creamy but pliable.
Step 5: Shape the Cookies
Take your dough and roll it into 1-inch balls. Place these on the prepared baking sheet, leaving about 2 inches of space between each cookie so they have room to spread slightly as they bake.
Step 6: Make Your Thumbprint Indentations
Use your thumb or the back of a spoon to gently press an indentation into the center of each dough ball. This is the signature move that turns simple cookies into charming thumbprints ready to hold a burst of jam.
Step 7: Fill with Raspberry Jam
Spoon about 1 teaspoon of raspberry jam into each indentation. Take care not to overfill, as the jam will bubble and spread during baking, creating a perfectly glossy center.
Step 8: Bake to Perfection
Place the tray in your preheated oven and bake for 12 to 15 minutes. You’ll know they’re done when the edges are just lightly golden and the jam is bubbling with excitement. The smell at this point will be irresistible!
Step 9: Cool the Cookies
Let your cookies cool on the baking sheet for a few minutes to set before carefully transferring them to a wire rack to cool completely. This step keeps your cookies from breaking apart and ensures they hold their shape beautifully.
Step 10: Add Optional Finishing Touch
If you want to add a festive flair, dust the cooled cookies lightly with powdered sugar. It’s a simple step that makes a visually stunning and delicious presentation.
How to Serve Raspberry Thumbprint Cookies Recipe
Garnishes
These thumbprint cookies look lovely garnished with a fresh raspberry on top of each jam center or a small sprig of mint alongside for a fresh pop of green. It’s an easy way to ramp up their visual appeal and complement the raspberry flavor.
Side Dishes
Serve these cookies with a warm cup of tea, freshly brewed coffee, or even a rich hot chocolate. The buttery sweetness of the cookies pairs perfectly with cozy drinks, making them an ideal companion for afternoon tea or an after-dinner treat.
Creative Ways to Present
Try arranging these cookies on a decorative platter alongside other small pastries for a charming cookie tray perfect for gatherings. Wrapping a few in a cellophane bag tied with a ribbon also makes a delightful homemade gift that friends and family will adore.
Make Ahead and Storage
Storing Leftovers
Once cooled completely, store your Raspberry Thumbprint Cookies Recipe leftovers in an airtight container at room temperature. They will stay fresh and delicious for up to a week, making them perfect for prepping ahead or enjoying over several days.
Freezing
If you want to keep them longer, you can freeze these cookies in a single layer on a baking sheet first. Once frozen, transfer them to a freezer-safe container or bag. When wrapped well, they can last up to 3 months and still retain their delightful texture and flavor.
Reheating
To refresh frozen or room temperature cookies, warm them briefly in a low oven (about 300°F) for 5 to 7 minutes. This brings back the softness and intensifies the jam’s fragrant sweetness, as if they were freshly baked.
FAQs
Can I use other types of jam instead of raspberry in this Raspberry Thumbprint Cookies Recipe?
Absolutely! While raspberry jam is classic, these cookies are wonderfully versatile. Strawberry, apricot, or even blueberry jam can work beautifully, adding your own twist to the flavor profile.
Do I need to chill the dough before baking?
This recipe doesn’t require chilling the dough, which makes it great for quick baking sessions. However, if your kitchen is warm, chilling for 15-20 minutes can make rolling easier.
Can I make these cookies gluten-free?
Yes, you can substitute the all-purpose flour with a gluten-free baking flour blend. Just make sure it’s a blend formulated for 1:1 replacement to maintain the right texture.
How do I prevent the jam from leaking during baking?
Make sure your indentations are deep enough and don’t overfill with jam. Using a slightly thicker jam or reducing excess moisture in the jam before spooning can help keep it in place.
Are these cookies suitable for freezing after baking?
Yes, fully baked and completely cooled cookies freeze well. Just thaw at room temperature or warm briefly before serving to enjoy them at their best.
Final Thoughts
There’s something so wonderfully comforting about making and sharing the Raspberry Thumbprint Cookies Recipe with those you love. These charming cookies bring together buttery, soft dough and bright raspberry jam in a way that tastes like a warm hug. I truly hope you try this recipe soon and enjoy each delicious bite as much as I do!
“`
Print
Raspberry Thumbprint Cookies Recipe
- Prep Time: 15 minutes
- Cook Time: 12-15 minutes
- Total Time: 27-30 minutes
- Yield: 24 cookies
- Category: Dessert, Cookie
- Method: Baking
- Cuisine: American
Description
Delight in these classic Raspberry Thumbprint Cookies, featuring buttery soft dough with a sweet raspberry jam center. Perfectly golden with a tender crumb, these cookies make a charming treat for any occasion.
Ingredients
Cookie Dough
- 1 cup unsalted butter, softened
- 1/2 cup granulated sugar
- 1 large egg
- 1 teaspoon vanilla extract
- 2 cups all-purpose flour
- 1/4 teaspoon salt
Filling
- 1/2 cup raspberry jam (or your favorite fruit jam)
Optional
- Powdered sugar for dusting
Instructions
- Preheat Oven: Preheat the oven to 350°F (175°C) and line a baking sheet with parchment paper to prevent sticking and for easy cleanup.
- Cream Butter and Sugar: In a large bowl, beat the softened butter and granulated sugar together until the mixture turns light and fluffy, ensuring a smooth texture for the cookies.
- Add Egg and Vanilla: Mix in the egg and vanilla extract until fully combined and smooth, adding moisture and flavor to the dough.
- Incorporate Dry Ingredients: Gradually add the all-purpose flour and salt, stirring just until the dough forms to prevent overmixing and keep the cookies tender.
- Form Dough Balls: Roll the dough into 1-inch sized balls and arrange them on the prepared baking sheet, spacing them about 2 inches apart to allow for spreading.
- Create Indentations: Press your thumb or the back of a spoon gently into the center of each ball to create a small well for the jam filling.
- Fill With Jam: Spoon approximately 1 teaspoon of raspberry jam into each indentation, being careful not to overfill to avoid spilling during baking.
- Bake Cookies: Place the baking sheet in the oven and bake for 12-15 minutes, or until the cookie edges turn lightly golden and the jam filling starts to bubble.
- Cool Cookies: Remove from the oven and allow the cookies to cool on the baking sheet for a few minutes before transferring them to a wire rack to cool completely.
- Optional Dusting: Once completely cooled, dust the cookies with powdered sugar for a festive, elegant finish.
Notes
- Ensure the butter is softened to room temperature for easier creaming and better texture.
- You can substitute raspberry jam with any fruit jam or preserve of your choice to vary flavors.
- Do not overfill the indentations with jam to prevent spilling and uneven baking.
- For a crunchier edge, bake the cookies a minute or two longer, but watch closely to avoid burning.
- These cookies can be stored in an airtight container at room temperature for up to 3 days or frozen for longer storage.


