

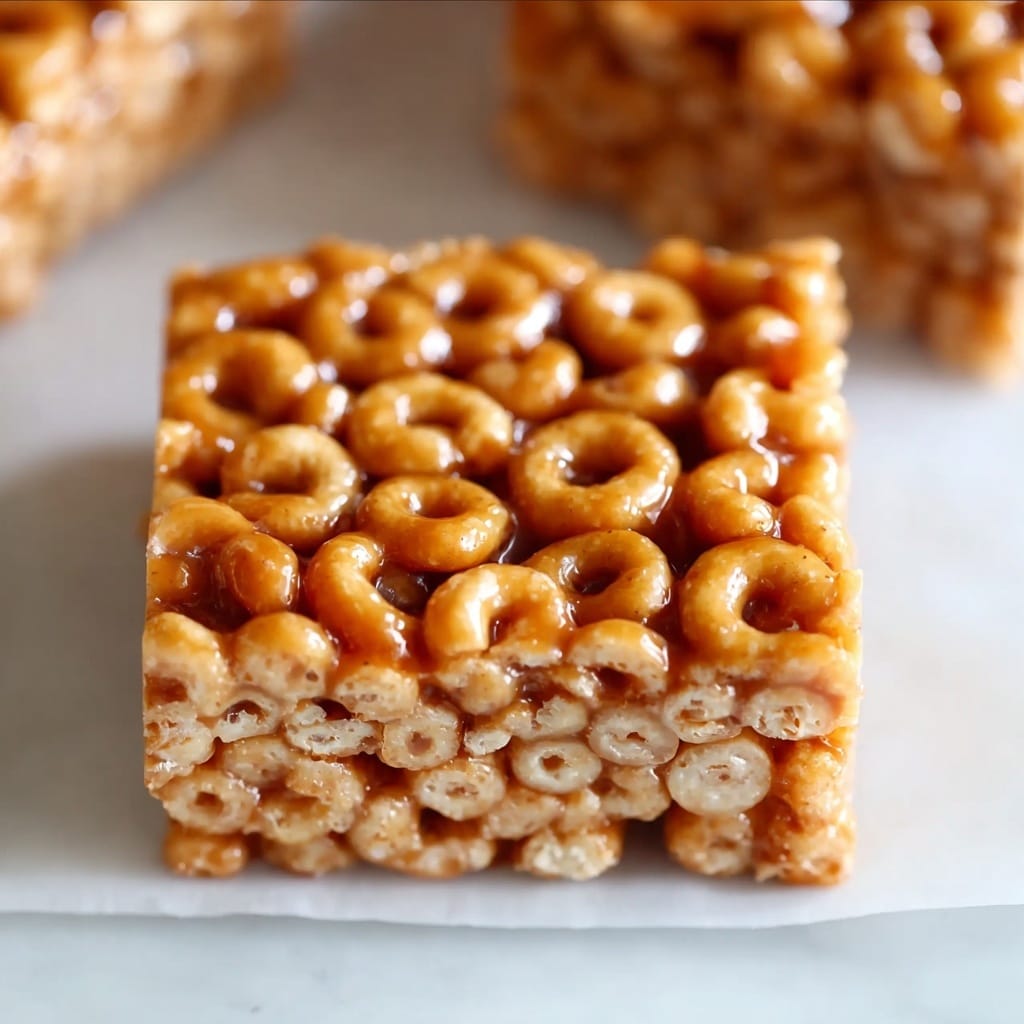
If you’re on the lookout for a delightful treat that combines simplicity with irresistible taste, this Peanut Butter Cheerio Bars Recipe is exactly what you need. These bars capture the perfect harmony of creamy peanut butter, golden honey, and the satisfying crunch of Cheerios, resulting in a snack that’s both wholesome and delicious. Whether you’re packing lunchboxes, craving a quick energy boost, or looking for a kid-friendly snack, these bars are a charming and inviting choice that will have everyone reaching for more.

Ingredients You’ll Need
Gathering simple, wholesome ingredients is the secret to making these bars a standout. Each component plays a vital role—from the creamy richness of peanut butter to the natural sweetness of honey, and, of course, the crisp texture added by Cheerios.
- 2/3 cup peanut butter: Choose creamy peanut butter for easy melting and a smooth binding texture.
- 1/3 cup honey: Acts as a natural sweetener and helps hold the bars together with a glossy finish.
- 3 cups Cheerio cereal: Provides that perfect crispness and light, airy crunch in every bite.
How to Make Peanut Butter Cheerio Bars Recipe
Step 1: Prepare Your Baking Dish
Start by lining an 8×8-inch square baking dish with parchment paper, or lightly grease it if you prefer. This step helps ensure your bars won’t stick and makes for easy removal after setting.
Step 2: Melt Peanut Butter and Honey
Place the peanut butter and honey into a large microwave-safe bowl. Microwave for 30 seconds initially, then stir well. Continue microwaving in 15-second intervals, stirring each time, until the mixture becomes smooth and warm enough to stir easily. This melting process blends the flavors perfectly and allows the mixture to coat the cereal effortlessly.
Step 3: Coat the Cereal
Add the Cheerios directly into the warm peanut butter and honey mixture. Use a rubber spatula to gently toss and coat every piece thoroughly. This step is crucial to achieving that luscious, evenly distributed flavor and ensuring the bars hold together when set.
Step 4: Press Into Pan
Transfer the coated cereal mixture into your prepared pan. Press it down firmly and evenly with the spatula or your hands to compact the mixture tightly. Pressing well helps the bars maintain their shape and makes them easier to slice once set.
Step 5: Freeze to Set
Cover the surface with plastic wrap and press on it again to reinforce the compactness. Place the pan in the freezer for about 30 minutes. Chilling the bars makes them firm and ready to cut without crumbling.
Step 6: Cut and Store
Once chilled, remove the bars from the freezer and lift them out using the parchment paper edges. Cut into 9 evenly sized bars with a sharp knife, and store them in the refrigerator to keep their freshness and chewiness intact.
How to Serve Peanut Butter Cheerio Bars Recipe
Garnishes
While these bars are perfect on their own, adding a sprinkle of mini chocolate chips or a drizzle of melted dark chocolate on top before freezing can elevate their flavor and presentation. A light dusting of sea salt also complements the rich peanut butter beautifully.
Side Dishes
Serve your Peanut Butter Cheerio Bars Recipe alongside a tall glass of cold milk or a cup of hot coffee or tea for a balanced snack experience. Fresh fruit like apple slices or banana rounds can add a refreshing contrast to the richness of the bars.
Creative Ways to Present
For a fun twist, wrap individual bars in wax paper tied with colorful twine for a charming, homemade gift look. Alternatively, cut the bars into bite-size squares and serve them on a platter with toothpicks for easy sharing at a party or playdate.
Make Ahead and Storage
Storing Leftovers
Keep any leftover Peanut Butter Cheerio Bars in an airtight container in the refrigerator. They’ll stay fresh and chewy for up to one week, making them a great make-ahead snack to grab on busy days.
Freezing
For longer storage, wrap each bar individually in plastic wrap and place them inside a freezer-safe bag or container. They freeze beautifully and can last up to two months. Just thaw in the refrigerator before enjoying.
Reheating
These bars taste best cold or at room temperature, but if you prefer a softer treat, gently warm them in the microwave for 10 to 15 seconds. Be cautious not to overheat, or the bars may become too sticky to handle.
FAQs
Can I use crunchy peanut butter instead of creamy?
Absolutely! Using crunchy peanut butter will add extra texture to your bars, giving them a delightful contrast. Just ensure it melts smoothly with the honey for even coating.
Are there any good alternatives for honey?
Yes, you can substitute honey with maple syrup or agave nectar. They are both natural sweeteners and will help hold the bars together, though slight flavor differences may occur.
Can I add other mix-ins?
Definitely! Feel free to mix in dried fruit, nuts, or even mini chocolate chips for added flavor and texture. Just make sure not to add too much or it might affect how well the bars stick together.
How firm should I press the mixture into the pan?
Press firmly but gently to compact the mixture without crushing the cereal. This ensures the bars hold their shape while maintaining the light crunch of Cheerios.
Can these bars be made gluten-free?
Yes, if you use a gluten-free version of Cheerios or a similar gluten-free oat cereal, this recipe is easily adaptable for gluten-sensitive diets.
Final Thoughts
There’s something truly special about making a treat that’s so quick, simple, and delicious like this Peanut Butter Cheerio Bars Recipe. It’s a snack that feels homemade but tastes gourmet, a perfect combination for any time of day. I can’t wait for you to try these bars and see why they’ve become such a beloved favorite in my kitchen. Happy snacking!
Print
Peanut Butter Cheerio Bars Recipe
- Prep Time: 10 minutes
- Cook Time: 0 minutes
- Total Time: 40 minutes
- Yield: 9 servings
- Category: Snack
- Method: No-Cook
- Cuisine: American
- Diet: Vegetarian
Description
These Peanut Butter Cheerio Bars are a quick and easy no-bake treat combining creamy peanut butter, sweet honey, and crunchy Cheerios. Perfect for a nutritious snack or a lunchbox addition, they require minimal ingredients and only 41 minutes total prep and freezing time. The bars are chewy, wholesome, and kid-friendly.
Ingredients
Ingredients
- 2/3 cup peanut butter
- 1/3 cup honey
- 3 cups Cheerio cereal
Instructions
- Prepare the Dish: Line an 8×8-inch square baking dish with parchment paper or grease it lightly to prevent sticking. Set it aside.
- Melt Peanut Butter and Honey: Place peanut butter and honey in a large microwave-safe bowl. Microwave for 30 seconds, stirring every 15 seconds until the mixture becomes warm and smooth enough to stir thoroughly.
- Coat Cereal: Add the Cheerio cereal to the peanut butter and honey mixture. Using a rubber spatula, toss and stir gently until all the cereal is evenly coated with the mixture.
- Press Into Pan: Transfer the coated cereal mixture into the prepared baking dish. Press the mixture firmly and evenly to compact it well and ensure the bars hold together.
- Freeze: Cover the pressed cereal mixture with plastic wrap, press down again firmly, and place the dish in the freezer for 30 minutes to set.
- Cut and Serve: Remove the dish from the freezer, lift the set mixture out using the parchment paper, cut into bars of desired size, and store the bars in the refrigerator until ready to eat.
Notes
- Use natural peanut butter for a healthier option without added sugars.
- Substitute honey with maple syrup or agave nectar for a vegan variation.
- Store bars in an airtight container in the fridge to maintain freshness for up to a week.
- For extra texture, sprinkle in some chopped nuts or dried fruit when mixing the cereal.
- You can use other cereals like Rice Krispies if Cheerios are unavailable.


