

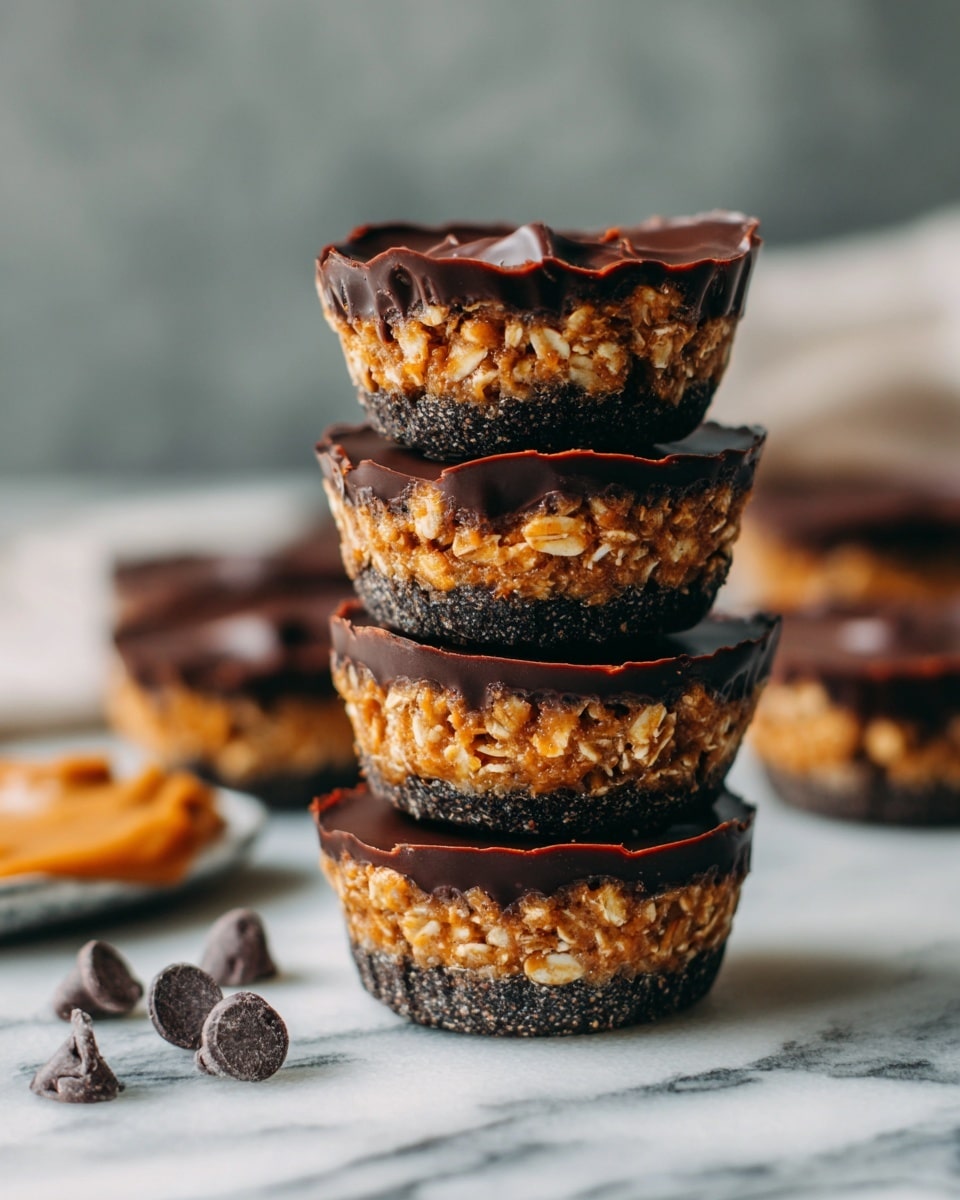
There is something incredibly satisfying about these No-Bake Peanut Butter Oat Cups with Chocolate Topping Recipe. They bring together chewy oats and creamy peanut butter with a decadent chocolate layer, creating a treat that feels indulgent but is surprisingly wholesome. Whether you’re searching for an easy snack, a kid-friendly lunchbox surprise, or a healthier dessert that still feels special, these oat cups deliver on all fronts. Plus, because they are no-bake, they’re perfect for those who want awesome flavors without turning on the oven.

Ingredients You’ll Need
Getting started with this recipe is a breeze because the ingredients are simple, familiar, and each plays a crucial role. From the hearty oats that provide texture and fiber to the smooth peanut butter that lends richness and protein, every element comes together effortlessly to create that perfect balance of flavor and mouthfeel.
- 1 1/2 cups rolled oats: The chewy base that adds heartiness and fiber.
- 1/2 cup natural peanut butter: For creamy texture and that beloved nutty depth.
- 1/4 cup honey or maple syrup: Natural sweetness to tie everything together.
- 1/4 teaspoon salt: Enhances all the flavors without overpowering them.
- 1/2 teaspoon vanilla extract: Adds a subtle warmth and aroma.
- 1/2 cup dark or semi-sweet chocolate chips: The luscious topping that makes these cups irresistible.
- 1 tablespoon coconut oil: Helps melt the chocolate smoothly and adds a silky finish.
How to Make No-Bake Peanut Butter Oat Cups with Chocolate Topping Recipe
Step 1: Prepare Your Muffin Tin
Start by lining a 12-cup muffin tin with paper or silicone liners. This not only prevents sticking but also makes it easier to pop the oat cups out once they’ve set. It’s such a small step that makes all the difference when it’s time to serve!
Step 2: Mix the Base Ingredients
In a mixing bowl, combine the rolled oats, peanut butter, honey or maple syrup, salt, and vanilla extract. Stir everything together until all the oats are evenly coated and the mixture sticks together nicely. This is where the magic begins, as the flavors meld into a chewy, satisfying base.
Step 3: Form the Oat Cup Bases
Scoop about 1 1/2 tablespoons of the oat mixture into each muffin cup. Press down firmly using the back of a spoon to create a compact, solid base that holds its shape. This step ensures you get that perfect bite every time—no crumbly cups here!
Step 4: Melt the Chocolate Topping
In a microwave-safe bowl, combine the chocolate chips and coconut oil. Heat in 20-second intervals, stirring between each, until the mixture is smooth and fully melted. The coconut oil melts into the chocolate, giving it a glossy sheen that will look as good as it tastes.
Step 5: Add the Chocolate Layer
Carefully spoon about 1 teaspoon of the melted chocolate over each oat cup base. Spread it evenly to create a thin, shiny chocolate layer. This is the final touch that transforms these cups from simple oat snacks to a dreamy peanut butter-chocolate treat.
Step 6: Chill and Set
Place the muffin tin in the refrigerator for at least 30 minutes to allow the oat cups to firm up and the chocolate to harden perfectly. When set, they’re ready to enjoy or store for later.
How to Serve No-Bake Peanut Butter Oat Cups with Chocolate Topping Recipe
Garnishes
For a little extra flair, sprinkle some flaky sea salt or chopped peanuts on top before chilling for added crunch and a burst of flavor. Fresh berries on the side can also brighten the plate and complement the rich peanut butter and chocolate beautifully.
Side Dishes
These oat cups are versatile enough to be part of a simple breakfast spread with yogurt and fruit or a no-fuss afternoon snack alongside a warm cup of tea or coffee. Their hearty texture means they pair well with lighter, refreshing sides that balance their richness.
No-Bake Peanut Butter Oat Cups with Chocolate Topping Recipe Creative Ways to Present
Try stacking these cups on a pretty platter with parchment paper between layers for easy sharing at parties. You could also pack them individually in snack bags for a grab-and-go treat. Personalizing each cup with a drizzle of white chocolate or a dusting of cocoa powder can elevate these beauties for special occasions.
Make Ahead and Storage
Storing Leftovers
Once chilled, store your oat cups in an airtight container in the refrigerator. They keep well for up to one week, offering a quick, nutritious option whenever hunger strikes. The fridge helps maintain their shape and prevents the chocolate topping from melting.
Freezing
If you want to make these ahead even further, freezing is a smart choice. Wrap each cup individually in plastic wrap or parchment paper and place them in a freezer-safe container or bag. Frozen, they last for up to 2 months and thaw quickly at room temperature for a delicious treat anytime.
Reheating
These cups don’t require reheating since they’re perfectly enjoyed cold or at room temperature. However, if you prefer a slightly softer texture, you can let them sit out for a few minutes or briefly warm them in your hand before eating.
FAQs
Can I use other nut butters instead of peanut butter?
Absolutely! Almond butter or sunflower seed butter are fantastic alternatives. Just make sure to use natural, unsweetened varieties to keep the flavor balanced and the texture right for the oat cups.
Is this recipe gluten-free?
Yes, as long as you use certified gluten-free oats, this recipe is naturally gluten-free. Always check your ingredients if you have dietary restrictions to ensure they meet your needs.
Can I substitute the honey or maple syrup with another sweetener?
Honey and maple syrup provide the perfect moisture and sweetness, but you can try agave nectar or brown rice syrup. Keep in mind the flavor and consistency might shift slightly.
What type of chocolate works best for the topping?
Dark or semi-sweet chocolate chips work beautifully because they add a rich flavor without too much sweetness. Feel free to experiment with milk chocolate or even white chocolate for a different twist.
How long does it take to make these oat cups?
The hands-on prep time is just around 10 minutes, with no baking needed. Including chilling, you’ll be enjoying them in about 40 minutes total. It’s an easy, quick project with delicious, healthy results.
Final Thoughts
If you ask me, these No-Bake Peanut Butter Oat Cups with Chocolate Topping Recipe are pure snack-time happiness. Easy to make, wholesome, and utterly satisfying, they’re a fantastic way to satisfy your sweet tooth without guilt. I hope you enjoy making and sharing these delightful little bites as much as I do!
Print
No-Bake Peanut Butter Oat Cups with Chocolate Topping Recipe
- Prep Time: 10 minutes
- Cook Time: 0 minutes
- Total Time: 40 minutes
- Yield: 12 cups
- Category: Snack, Dessert
- Method: No-Cook
- Cuisine: American
- Diet: Gluten Free, Vegetarian
Description
These no-bake peanut butter oat cups with a chocolate topping are the perfect blend of chewy, creamy, and rich. Made with wholesome oats, natural peanut butter, and a silky chocolate layer, they’re an easy and satisfying treat you can whip up in minutes. Great for snacks, lunchboxes, or a healthier dessert!
Ingredients
Base
- 1 1/2 cups rolled oats
- 1/2 cup natural peanut butter
- 1/4 cup honey or maple syrup
- 1/4 teaspoon salt
- 1/2 teaspoon vanilla extract
Chocolate Topping
- 1/2 cup dark or semi-sweet chocolate chips
- 1 tablespoon coconut oil
Instructions
- Prepare muffin tin: Line a 12-cup muffin tin with paper liners or silicone liners to ensure easy removal and cleanup.
- Mix base ingredients: In a mixing bowl, combine the rolled oats, natural peanut butter, honey or maple syrup, salt, and vanilla extract. Stir thoroughly until the oats are evenly coated and the mixture holds together well.
- Form base cups: Scoop about 1 1/2 tablespoons of the oat mixture into each muffin cup. Press down firmly using the back of a spoon to create a compact, solid base layer.
- Melt chocolate topping: In a microwave-safe bowl, combine the chocolate chips and coconut oil. Microwave in 20-second intervals, stirring between each, until the mixture is smooth and fully melted.
- Apply chocolate topping: Spoon approximately 1 teaspoon of the melted chocolate over each oat base, spreading evenly to cover the surface.
- Chill to set: Place the muffin tin in the refrigerator and chill for at least 30 minutes or until the oat cups are firm and the chocolate has set completely.
- Store appropriately: Remove the oat cups from the muffin tin and store in an airtight container in the refrigerator for up to 1 week. Optionally, freeze for longer storage.
Notes
- Add a sprinkle of sea salt or chopped peanuts on top of the chocolate before chilling for added texture and flavor.
- These oat cups can be frozen to extend shelf life.
- To make these cups peanut-free, substitute the peanut butter with almond butter or sunflower seed butter.


