

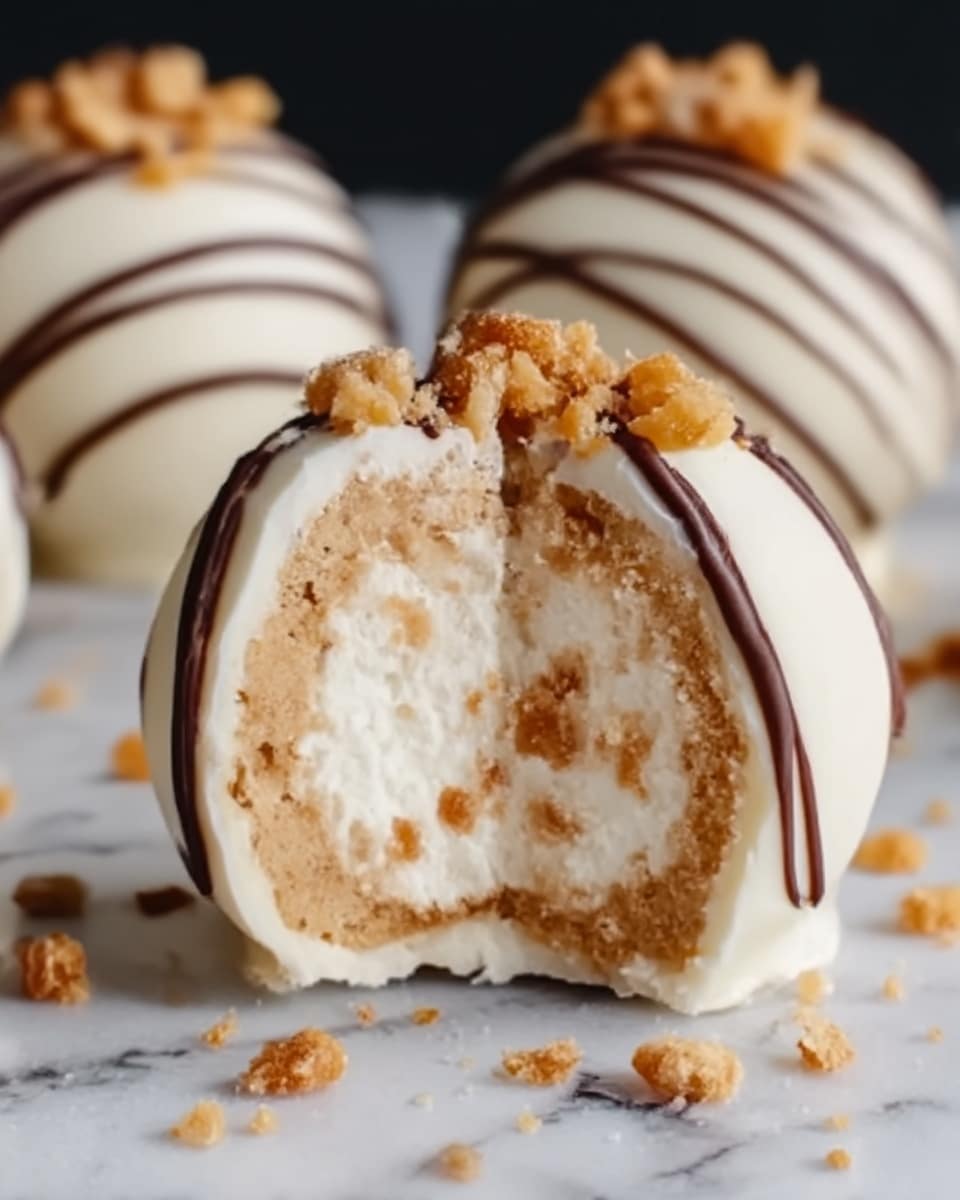
There is something truly delightful about a dessert that brings together creamy, nutty, and sweet elements in a bite-sized treat, and that is exactly what the No-Bake Peanut Butter Cheesecake Balls Recipe delivers. This recipe combines the rich smoothness of cream cheese and peanut butter with the satisfying crunch of graham cracker crumbs and optional crushed peanuts, all coated in luscious chocolate. Perfect for parties, snacks, or anytime you want an indulgent but easy-to-make treat, these cheesecake balls are as fun to make as they are to eat. You’ll love how quickly they come together without any baking, making it a go-to for last-minute dessert cravings.

Ingredients You’ll Need
The beauty of this recipe lies in its simplicity. Each ingredient plays a vital role in creating the perfect balance of creamy, sweet, and crunchy textures that make these cheesecake balls irresistible.
- Cream cheese, 8 oz, softened: Provides the creamy base and tangy richness.
- Creamy peanut butter, 1 cup: Adds nutty flavor and smooth texture that pairs beautifully with cream cheese.
- Powdered sugar, 1/2 cup: Sweetens the mixture without graininess, ensuring silky smooth cheesecake balls.
- Vanilla extract, 1 teaspoon: Enhances the overall flavor with a warm, aromatic touch.
- Graham cracker crumbs, 1 cup: Gives subtle sweetness and a bit of texture for structure.
- Chocolate chips, 1 cup (milk or dark): Melts into a luscious coating that perfectly complements the peanut butter center.
- Crushed peanuts, 1/4 cup (optional): For rolling, adding an extra crunch and peanutty goodness.
How to Make No-Bake Peanut Butter Cheesecake Balls Recipe
Step 1: Prepare the Cheesecake Mixture
Begin by combining the softened cream cheese and creamy peanut butter in a large bowl. Use an electric mixer or sturdy spoon to blend until completely smooth and uniform. Next, sift in the powdered sugar and add the vanilla extract, folding gently until all ingredients are thoroughly incorporated. This silky, peanut-buttery cheesecake mixture will be the star of your recipe.
Step 2: Add the Graham Cracker Crumbs
Sprinkle the graham cracker crumbs over the cheesecake mixture and carefully fold them in. This will thicken the mixture and give it a subtle, crumbly texture that is essential for shaping the cheesecake balls. The crumbs also add a touch of honeyed sweetness that balances the peanut butter perfectly.
Step 3: Shape the Balls
Once the mixture is firm enough to handle, scoop out small portions and roll them between your palms to form smooth, bite-sized balls. Place the balls on a parchment-lined baking sheet or tray and refrigerate them for about 30 minutes to set. Chilling is key to making sure the balls hold their shape during the coating process.
Step 4: Melt and Prepare Chocolate Coating
While the balls are chilling, place your chocolate chips in a microwave-safe bowl and heat in 30-second intervals, stirring in between to prevent burning. Once the chocolate is fully melted and glossy, it’s ready to dip your cheesecake balls into for that irresistible outer shell.
Step 5: Dip the Cheesecake Balls
Using a fork or dipping tool, gently dip each chilled cheesecake ball into the melted chocolate, allowing excess chocolate to drip off. If you love an extra crunch, immediately roll the chocolate-coated ball in crushed peanuts. Then, transfer them back to the parchment paper and refrigerate for another 30 minutes until the chocolate hardens.
How to Serve No-Bake Peanut Butter Cheesecake Balls Recipe
Garnishes
Garnishes elevate these little bites from simple to spectacular. Try sprinkling additional crushed peanuts on top, or drizzle a contrasting white chocolate over the hardened shell for a beautiful decorative touch. A pinch of sea salt sprinkled on top can also highlight the peanut butter’s natural sweetness.
Side Dishes
Although these cheesecake balls are delicious on their own, pairing them with fresh berries or a small glass of cold milk can enhance the tasting experience. For a more decadent treat, serve alongside a dollop of whipped cream or a drizzle of raspberry sauce to complement the peanut butter flavor.
Creative Ways to Present
Presentation is half the fun! Arrange the No-Bake Peanut Butter Cheesecake Balls Recipe on a decorative platter with mini cupcake liners for easy serving. You can also skewer them on toothpicks for a playful “pop” presentation, making them perfect for parties or gatherings. A sprinkle of edible gold dust adds a festive flair if you’re celebrating something special.
Make Ahead and Storage
Storing Leftovers
If you have any leftovers (which might be rare!), store the cheesecake balls in an airtight container in the refrigerator. They will keep their freshness and texture for up to a week, allowing you plenty of time to snack on them without worry.
Freezing
These cheesecake balls freeze beautifully. Place them in a single layer on a baking sheet and freeze until solid, then transfer to a freezer-safe container or bag. They can be stored for up to three months. When ready to enjoy, let them thaw in the refrigerator for a few hours before serving.
Reheating
No reheating is needed for this dessert. Just allow any frozen balls to thaw slowly so the texture remains creamy and smooth. The chocolate outer shell will regain its perfect bite without becoming too soft or melty.
FAQs
Can I use crunchy peanut butter instead of creamy?
You can, but keep in mind that crunchy peanut butter will add more texture to the cheesecake mixture, which might change the smoothness of the balls. If you like extra crunch inside, go for it! Otherwise, creamy peanut butter is ideal for the velvety consistency.
What kind of cream cheese works best?
Use full-fat cream cheese that is softened to room temperature. This ensures the mixture blends smoothly and provides the best rich texture and flavor for the cheesecake balls.
Is it possible to use a sugar substitute?
Yes, you can substitute powdered sugar with a granulated sugar alternative that measures like sugar and powders well, such as erythritol. Adjust to taste since sweetness can vary with substitutes.
Can I make these vegan or dairy-free?
Absolutely! Use dairy-free cream cheese and vegan peanut butter along with dairy-free chocolate chips. The texture might vary slightly but they will still be delicious.
How long do these cheesecake balls last outside the fridge?
They are best kept refrigerated until serving. At room temperature, they can soften and lose their form—try to enjoy them within a couple of hours if left out.
Final Thoughts
If you’re looking for a dessert that’s effortlessly indulgent, crowd-pleasing, and packed with rich peanut butter flavor, the No-Bake Peanut Butter Cheesecake Balls Recipe is an absolute must-try. It’s a delightful treat that feels special but is so simple to whip up. Trust me, once you make these, they’ll become your secret weapon for dessert love at every gathering.
Print
No-Bake Peanut Butter Cheesecake Balls Recipe
- Prep Time: 20 minutes
- Cook Time: 0 minutes
- Total Time: 1 hour 15 minutes (including chilling and setting time)
- Yield: 20 servings
- Category: Dessert
- Method: No-Cook
- Cuisine: American
- Diet: Vegetarian
Description
These No-Bake Peanut Butter Cheesecake Balls are a delightful, easy-to-make treat combining creamy peanut butter, smooth cream cheese, and a touch of sweetness. With a graham cracker crumb base and a chocolate chip coating, these bite-sized desserts are perfect for parties, snacks, or a quick indulgence without the need for baking.
Ingredients
Cheesecake Mixture
- 8 oz cream cheese, softened
- 1 cup creamy peanut butter
- 1/2 cup powdered sugar
- 1 teaspoon vanilla extract
- 1 cup graham cracker crumbs
Coating
- 1 cup chocolate chips (milk or dark)
- 1/4 cup crushed peanuts (optional, for rolling)
Instructions
- Prepare the Cheesecake Mixture: In a large mixing bowl, combine the softened cream cheese and creamy peanut butter until smooth and well blended. Add the powdered sugar and vanilla extract, mixing thoroughly to create a consistent, creamy mixture.
- Add Graham Cracker Crumbs: Gently fold in the graham cracker crumbs into the peanut butter mixture until evenly incorporated, forming a dough-like consistency that’s easy to roll into balls.
- Form the Balls: Using your hands or a small cookie scoop, shape the mixture into bite-sized balls, about 1 inch in diameter. Place the formed balls on a baking sheet lined with parchment paper.
- Chill the Balls: Refrigerate the cheesecake balls for at least 30 minutes to firm up and make them easier to coat.
- Melt the Chocolate: In a microwave-safe bowl, melt the chocolate chips in 20-30 second intervals, stirring between each, until smooth and fully melted.
- Coat the Balls: Dip each chilled cheesecake ball into the melted chocolate, covering it completely. Optionally, roll them quickly in crushed peanuts before the chocolate hardens for added texture and flavor.
- Set the Coating: Place the coated balls back on the parchment-lined baking sheet and refrigerate for an additional 15-20 minutes to allow the chocolate to set firmly.
- Serve: Once fully set, serve the peanut butter cheesecake balls chilled for the best flavor and texture. Store leftovers in an airtight container in the refrigerator.
Notes
- For a firmer texture, freeze the balls briefly before dipping in chocolate.
- Use dark chocolate for a less sweet option.
- Substitute graham cracker crumbs with crushed digestive biscuits for a similar taste.
- These cheesecake balls can be stored refrigerated for up to 5 days or frozen for longer storage.
- Ensure cream cheese is softened to avoid lumps in the mixture.


