Description
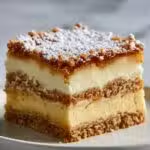
This No-Bake Custard Slice is a delicious, creamy dessert featuring layers of crisp biscuits and smooth homemade custard, topped with a sweet vanilla icing. Perfect for a make-ahead treat that sets in the refrigerator, it requires minimal effort and no baking, making it an ideal dessert for warm days or when you want a fuss-free finish to your meal.
Ingredients
Custard and Layers
- 2 packs plain graham crackers or digestive biscuits (or vanilla wafers)
- 4 cups milk
- 1/2 cup sugar
- 1/3 cup cornstarch
- 2 tsp vanilla extract
- 3 egg yolks
- 2 tbsp butter
Icing
- 1 cup powdered sugar
- 1-2 tbsp milk
- 1/2 tsp vanilla
Instructions
- Prepare the Pan: Line an 8×8 or 9×9 square pan with parchment paper to prevent sticking and make it easier to remove the custard slice once chilled.
- First Biscuit Layer: Arrange a layer of biscuits evenly to cover the bottom of the lined pan.
- Make Custard Base: In a saucepan, whisk together the milk, sugar, and cornstarch until fully smooth with no lumps.
- Cook Custard: Heat the mixture over medium heat while stirring constantly to prevent burning. When the mixture becomes hot, slowly whisk in the egg yolks to temper them and avoid scrambling.
- Thicken Custard: Continue stirring the mixture for 5 to 7 minutes until it thickens to a creamy custard consistency.
- Add Flavor and Fat: Remove the saucepan from heat and stir in the butter and vanilla extract until the custard is smooth and fully blended.
- Layer Custard and Biscuits: Pour half of the custard over the first biscuit layer, spreading evenly, then add another layer of biscuits on top.
- Repeat Layers: Pour the remaining custard over the second biscuit layer, then finish with a final layer of biscuits.
- Prepare Icing: Mix powdered sugar, milk, and vanilla together until you get a smooth icing consistency.
- Ice the Top: Spread the icing evenly over the final biscuit layer to seal and sweeten the top.
- Chill to Set: Refrigerate the assembled custard slice for at least 4 hours, though overnight chilling yields the best texture and flavor fusion.
- Serve: Once set, slice into squares and serve chilled for a refreshing dessert.
Notes
- For a gluten-free option, use gluten-free biscuits.
- The custard needs constant stirring to prevent lumps and burning.
- Use fresh egg yolks and ensure proper whisking to avoid scrambled eggs in custard.
- Overnight chilling enhances texture and flavor melding.
- You can substitute vanilla wafers for digestive biscuits for a sweeter flavor.
