

“`html
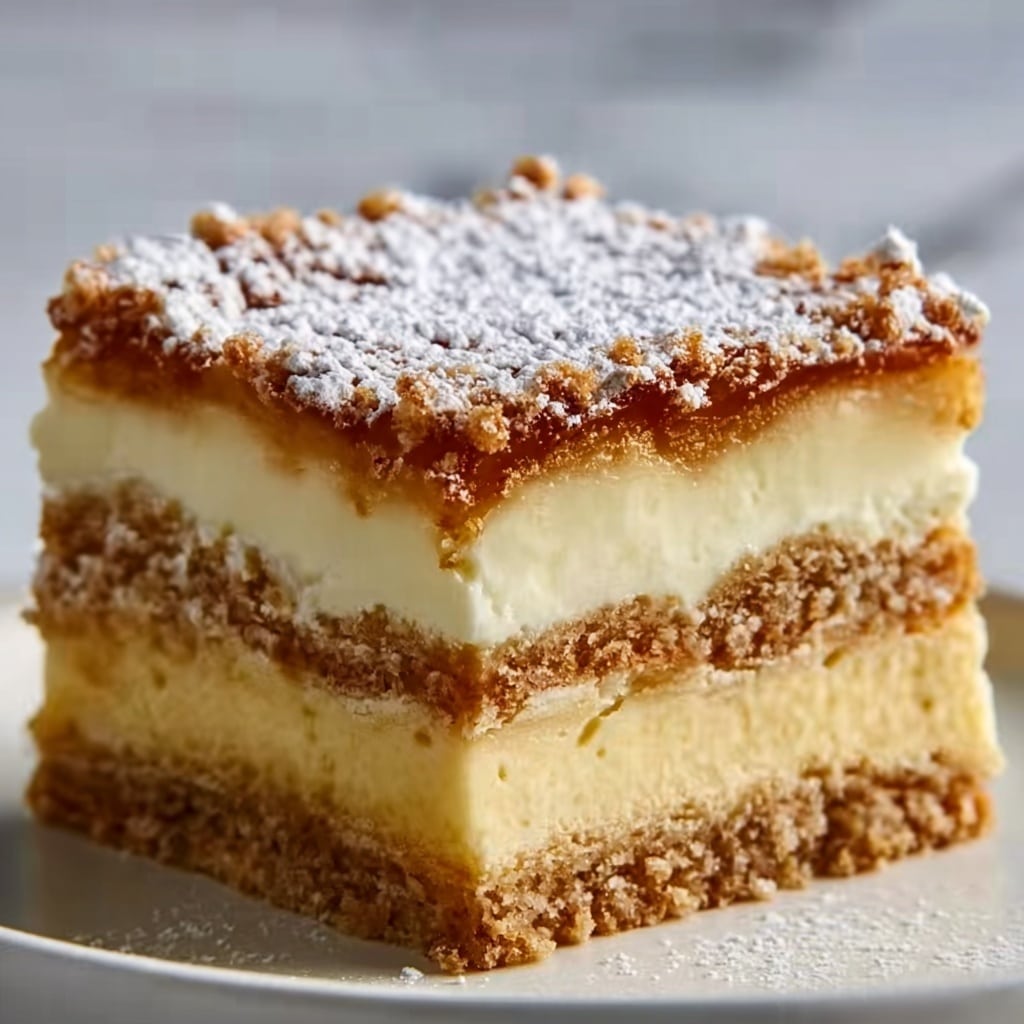
If you’ve ever dreamed of a dessert that combines creamy, velvety layers with a satisfyingly crumbly bite, then this No-Bake Custard Slice Recipe is about to become your new go-to sweet treat. It’s a luscious, effortless delight that layers rich vanilla custard between crisp biscuits, topped with a smooth, glossy icing, all waiting patiently in the fridge to develop that perfect slice-worthy firmness. Whether you’re after a simple weekend indulgence or a gorgeous dessert for guests, this no-fuss, no-bake custard slice ticks all the boxes with dreamy, nostalgic flavors and textures.

Ingredients You’ll Need
Gathering the right ingredients for this No-Bake Custard Slice Recipe is both simple and satisfying. Each component plays a starring role: from the crunchy biscuit base to the silky homemade custard and the sweet icing finish, every ingredient contributes to that irresistible harmony of taste and texture.
- Plain graham crackers or digestive biscuits (or vanilla wafers): These create the crisp, buttery layers that perfectly contrast the creamy custard.
- Milk: Provides the rich, smooth base for the custard, ensuring it’s indulgently soft and silky.
- Sugar: Sweetness that balances and enhances the custard’s delicate vanilla flavor.
- Cornstarch: The thickening agent that gives the custard its lovely, sliceable firmness.
- Vanilla extract: A splash of warmth and aroma to make each bite full of comforting flavor.
- Egg yolks: The secret ingredient for richness and that classic custard body.
- Butter: Adds a silky mouthfeel and depth to the custard.
- Powdered sugar: For the sweet, smooth icing topping that sets the dessert apart.
- Extra milk and vanilla for the icing: To create a luscious, spreadable glaze that seals in all the deliciousness.
How to Make No-Bake Custard Slice Recipe
Step 1: Prepare Your Pan and Biscuit Layers
Start by lining an 8×8 or 9×9 square pan with parchment paper, which makes removing your custard slice a breeze. Then, arrange a neat, single layer of biscuits to cover the bottom completely — this crunchy foundation is what sets the stage for every creamy bite.
Step 2: Mix and Heat the Custard Base
In a saucepan, whisk together the milk, sugar, and cornstarch until the mixture is completely smooth. Heat this over medium heat, stirring constantly to avoid lumps. Once it’s hot, slowly whisk in the egg yolks, which will lend the custard its rich, creamy texture as it cooks.
Step 3: Thicken the Custard
Keep stirring the mixture gently for 5 to 7 minutes until it thickens to a custard-perfect consistency. This patience pays off because a thick custard means your layers will hold beautifully when sliced rather than turning into a runny mess.
Step 4: Add Butter and Vanilla
Remove the pan from heat and stir in butter and vanilla extract until they are fully incorporated. This step enriches the custard, deepening its flavor and creating that silky smooth texture that will have everyone asking for seconds.
Step 5: Assemble the First Custard Layer
Pour half of your warm custard evenly over the first biscuit layer in the pan. Smooth it out gently so the layer is consistent, ready to cradle the next biscuit layer above.
Step 6: Add More Biscuit and Custard Layers
Place another layer of biscuits on top of the custard, pressing lightly but firmly so they set well. Then pour the remaining custard over these biscuits, spreading it evenly one more time to build a thick, creamy middle.
Step 7: Finish with a Final Biscuit Layer
Top your custard with a final layer of biscuits. This last crunchy layer will make your slice stand tall and look as inviting as it tastes.
Step 8: Prepare the Icing and Chill
Mix powdered sugar, milk, and vanilla to form a smooth icing. Spread this gently over the top biscuit layer to seal in the flavors and add a sweet, glossy finish. Chill the entire slice in the refrigerator for at least 4 hours, or better yet, overnight to let those flavors and textures harmonize perfectly.
How to Serve No-Bake Custard Slice Recipe
Garnishes
To elevate your No-Bake Custard Slice Recipe, consider adding a few delicate touches before serving. Fresh berries or a light dusting of cocoa powder add color and a pop of freshness, while a sprinkle of crushed nuts gives extra texture and a hint of savory balance.
Side Dishes
This slice pairs wonderfully with a hot cup of rich coffee or a fragrant herbal tea. If you want more decadence, a scoop of vanilla ice cream or a dollop of freshly whipped cream can turn this simple dessert into an indulgent treat.
Creative Ways to Present
Try cutting your custard slice into mini squares or even small rectangles to make charming finger-food bites for parties. Layering the slices on a decorative platter with edible flowers or serving each piece on a small dessert plate with a drizzle of berry coulis can really impress your friends and family.
Make Ahead and Storage
Storing Leftovers
Your No-Bake Custard Slice Recipe stays fresh and delicious in the refrigerator for up to 3 days. Be sure to cover it tightly with cling wrap or store it in an airtight container to keep the biscuits crisp and the custard smooth.
Freezing
While freezing is possible, it’s best to freeze the custard slice without the icing as this can become grainy when thawed. Wrap tightly in plastic wrap and foil, and freeze for up to 2 months. Thaw overnight in the fridge before adding fresh icing and serving.
Reheating
This custard slice is intended to be enjoyed chilled, so reheating is not recommended as it can break down the custard’s texture. Serve directly from the fridge for the best experience.
FAQs
Can I use other types of biscuits instead of graham crackers?
Absolutely! Digestive biscuits or vanilla wafers are excellent alternatives that maintain a lovely crunch and mild sweetness to complement the custard.
Do I need to use egg yolks in the custard?
Egg yolks add richness and a silky texture that are classic to custard. If allergies or preferences prevent their use, consider custard powder alternatives, though the dish’s texture and flavor will slightly differ.
How long should I chill the slice before serving?
For the best sliceable texture and flavor, refrigerate the custard slice for at least 4 hours, but overnight chilling allows the layers to set perfectly and flavors to fully develop.
Can I make the icing gluten-free?
The icing is naturally gluten-free since it’s made from powdered sugar, milk, and vanilla. Just ensure your powdered sugar is certified gluten-free if necessary.
What’s the best way to cut the custard slice without breaking it?
Use a sharp knife dipped in hot water and wiped dry between cuts. This technique helps create clean slices without tugging or cracking the layers.
Final Thoughts
Trust me, once you try this No-Bake Custard Slice Recipe, it will become a beloved classic in your dessert lineup. It’s one of those rare treats that feels indulgent yet effortlessly comes together with pantry staples and a little patience. Give it a go and watch how quickly this creamy, crunchy delight disappears from the plate — it’s absolutely worth every spoonful.
“`
Print
No-Bake Custard Slice Recipe
- Prep Time: 15 minutes
- Cook Time: 15 minutes
- Total Time: 4 hours 30 minutes
- Yield: 9 servings
- Category: Dessert
- Method: Stovetop
- Cuisine: Western
Description
This No-Bake Custard Slice is a delicious, creamy dessert featuring layers of crisp biscuits and smooth homemade custard, topped with a sweet vanilla icing. Perfect for a make-ahead treat that sets in the refrigerator, it requires minimal effort and no baking, making it an ideal dessert for warm days or when you want a fuss-free finish to your meal.
Ingredients
Custard and Layers
- 2 packs plain graham crackers or digestive biscuits (or vanilla wafers)
- 4 cups milk
- 1/2 cup sugar
- 1/3 cup cornstarch
- 2 tsp vanilla extract
- 3 egg yolks
- 2 tbsp butter
Icing
- 1 cup powdered sugar
- 1–2 tbsp milk
- 1/2 tsp vanilla
Instructions
- Prepare the Pan: Line an 8×8 or 9×9 square pan with parchment paper to prevent sticking and make it easier to remove the custard slice once chilled.
- First Biscuit Layer: Arrange a layer of biscuits evenly to cover the bottom of the lined pan.
- Make Custard Base: In a saucepan, whisk together the milk, sugar, and cornstarch until fully smooth with no lumps.
- Cook Custard: Heat the mixture over medium heat while stirring constantly to prevent burning. When the mixture becomes hot, slowly whisk in the egg yolks to temper them and avoid scrambling.
- Thicken Custard: Continue stirring the mixture for 5 to 7 minutes until it thickens to a creamy custard consistency.
- Add Flavor and Fat: Remove the saucepan from heat and stir in the butter and vanilla extract until the custard is smooth and fully blended.
- Layer Custard and Biscuits: Pour half of the custard over the first biscuit layer, spreading evenly, then add another layer of biscuits on top.
- Repeat Layers: Pour the remaining custard over the second biscuit layer, then finish with a final layer of biscuits.
- Prepare Icing: Mix powdered sugar, milk, and vanilla together until you get a smooth icing consistency.
- Ice the Top: Spread the icing evenly over the final biscuit layer to seal and sweeten the top.
- Chill to Set: Refrigerate the assembled custard slice for at least 4 hours, though overnight chilling yields the best texture and flavor fusion.
- Serve: Once set, slice into squares and serve chilled for a refreshing dessert.
Notes
- For a gluten-free option, use gluten-free biscuits.
- The custard needs constant stirring to prevent lumps and burning.
- Use fresh egg yolks and ensure proper whisking to avoid scrambled eggs in custard.
- Overnight chilling enhances texture and flavor melding.
- You can substitute vanilla wafers for digestive biscuits for a sweeter flavor.


