

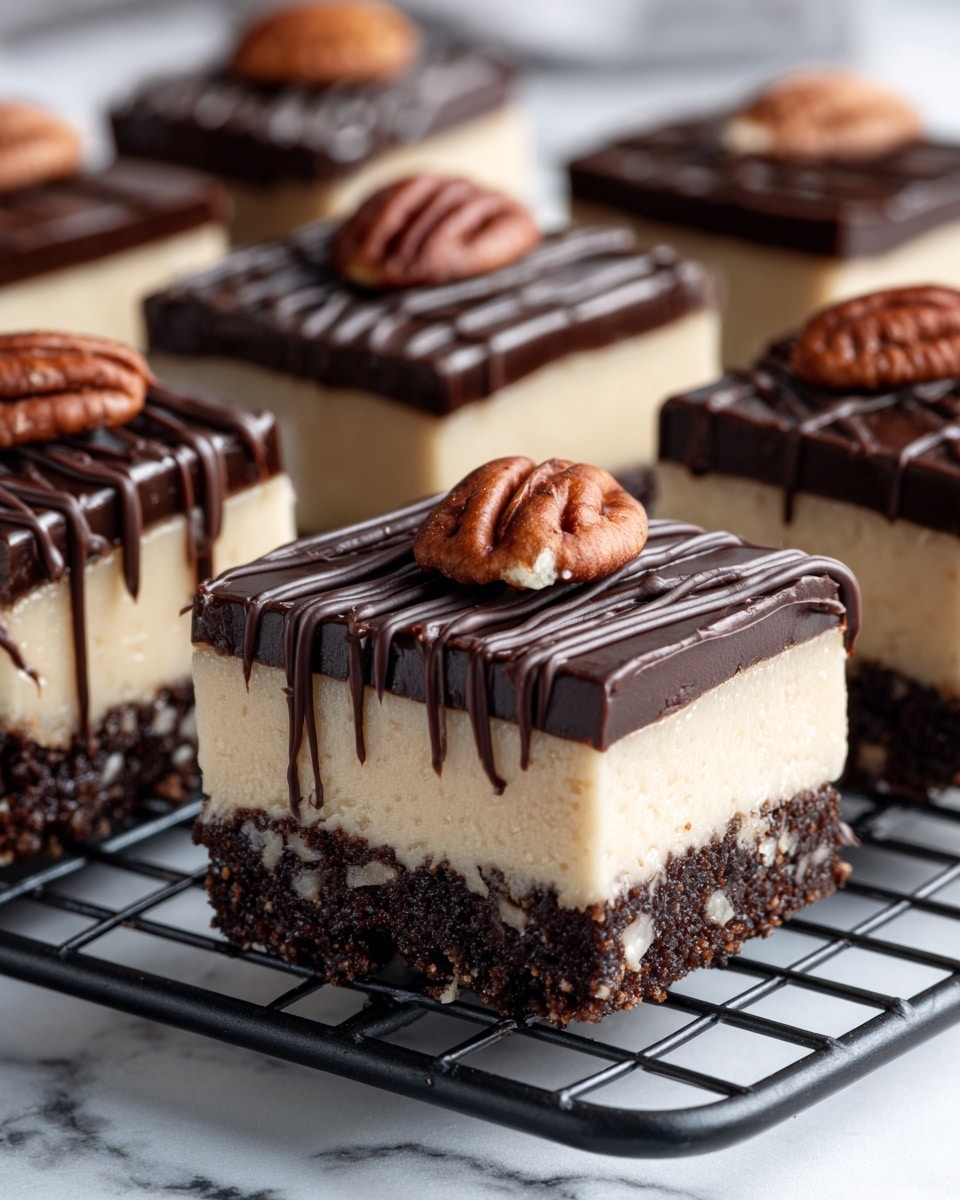
If you adore the perfect harmony of creamy cheesecake, gooey caramel, crunchy pecans, and rich chocolate, then this Mini Turtle Cheesecakes Recipe is made just for you. These little delights pack all the flavor of classic turtle candies into a smooth, individual-sized cheesecake that’s both elegant and irresistibly fun to eat. Whether you’re serving guests or treating yourself, these mini cheesecakes are a crowd-pleaser you’ll want to make again and again.

Ingredients You’ll Need
The magic of this Mini Turtle Cheesecakes Recipe lies in its simple but heartfelt ingredients. Each component plays a vital role: the graham cracker crust brings the perfect crunch, the cream cheese base delivers that signature smoothness, and the toppings add layers of texture and taste that make these cheesecakes truly unforgettable.
- 1 cup graham cracker crumbs: Creates a buttery, crunchy foundation that holds all the flavors together.
- 3 tablespoons unsalted butter, melted: Adds richness to the crust and helps it set perfectly.
- 2 tablespoons granulated sugar: Sweetens the crust just enough for balance.
- 16 oz cream cheese, softened: The star ingredient offering the creamy base texture.
- ½ cup granulated sugar: Sweetens the cheesecake filling to perfection.
- 2 large eggs: Provide structure and richness for a smooth, silky cheesecake.
- 1 teaspoon vanilla extract: Adds a warm, inviting aroma and enhances flavor depth.
- ¼ cup sour cream: Keeps the cheesecake tangy and wonderfully creamy.
- ¼ cup caramel sauce (plus extra for drizzling): Brings that signature sticky sweetness associated with turtle treats.
- ¼ cup mini chocolate chips: Sprinkle in bursts of chocolate flavor in every bite.
- ¼ cup chopped pecans: Add a satisfying crunch and nutty contrast.
- Whipped cream for topping (optional): Light, airy addition that makes each mini cheesecake even more decadent.
How to Make Mini Turtle Cheesecakes Recipe
Step 1: Prepare the Crust
Begin by preheating your oven to 325°F (165°C) and lining a 12-cup muffin tin with paper liners. In a small bowl, mix together the graham cracker crumbs, melted butter, and 2 tablespoons of sugar. This mixture forms that beloved crunchy base, so be sure it’s combined evenly. Press about one tablespoon of this crust mixture into the bottom of each muffin liner to create a compact, even layer that will hold your luscious filling beautifully.
Step 2: Bake the Crust
Pop the crust-filled muffin tin into the oven for 5 minutes, allowing the crusts to set and develop a slightly toasted flavor that complements the creamy cheese layer. After baking, remove the crusts and let them cool completely — this step is crucial for preventing soggy bases later on.
Step 3: Make the Cheesecake Batter
In a large mixing bowl, beat the softened cream cheese until smooth and lump-free. Gradually add ½ cup sugar and continue beating until the mixture becomes creamy and light. Add the eggs one at a time, mixing well after each addition to maintain a silky texture. Stir in the vanilla extract and sour cream last, folding gently just until combined to keep the batter airy and smooth without overworking it.
Step 4: Fill and Bake
Divide the cheesecake batter evenly among the pre-baked crusts, filling each cup almost to the top but leaving a little room for rise. Bake at 325°F for 18 to 22 minutes, checking for centers that are just set but still jiggly to the touch. This ensures that creamy, melt-in-your-mouth texture you expect from perfect cheesecake. Once baked, let them cool in the pan on a wire rack for 30 minutes before chilling.
Step 5: Chill the Mini Cheesecakes
Allow these mini cheesecake beauties to chill in the refrigerator for at least 2 hours. This chilling period helps them firm up for easy removal from the liners and enhances the flavor melding of all those divine ingredients beneath the smooth surface.
Step 6: The Finishing Touches
When ready to serve, drizzle each mini cheesecake generously with caramel sauce. Sprinkle mini chocolate chips and chopped pecans on top for that classic turtle candy crunch and gooey sweetness. Finish with a dollop of whipped cream if you want to add an extra layer of lusciousness and flair. The presentation alone will have everyone oohing before the first bite!
How to Serve Mini Turtle Cheesecakes Recipe
Garnishes
Enhance your dessert’s look and flavor with simple garnishes like extra caramel drizzles, chopped pecans, or a light sprinkle of sea salt to balance the sweetness. Even a fresh mint leaf adds a pop of color and refreshing contrast. These details bring a delightful elegance that shows you cared in every step.
Side Dishes
Mini Turtle Cheesecakes pair beautifully with a cup of rich coffee or a scoop of vanilla ice cream for an indulgent twist. Fresh berries also complement the richness with a subtle tartness that brightens up the palate. For gatherings, a light fruit salad balances the richness and adds a refreshing note.
Creative Ways to Present
Try serving these mini cheesecakes on a charming dessert stand for visual impact, or place them individually in decorative cupcake wrappers for a festive vibe. If you want to get imaginative, stack a few with a dollop of whipped cream between for a layered dessert that wows. Personalizing each with a tiny chocolate or caramel drizzle signature can make your guests feel truly special.
Make Ahead and Storage
Storing Leftovers
These mini cheesecakes keep beautifully in the refrigerator for up to two days, wrapped or covered airtight to preserve moisture and flavor. This makes them a fantastic option for preparing ahead of parties or dessert cravings.
Freezing
You can freeze the mini cheesecakes by placing them on a parchment-lined tray and freezing until solid, then transferring to a freezer-safe container. Freeze for up to one month, and thaw overnight in the fridge before serving to enjoy them at their best.
Reheating
Because these are best served chilled, reheating is generally not recommended. If you prefer them slightly less cold, simply let them sit at room temperature for 10 to 15 minutes before enjoying. This softens the texture without compromising flavor.
FAQs
Can I make a nut-free version of this Mini Turtle Cheesecakes Recipe?
Absolutely! Simply omit the pecans or substitute them with crushed pretzels or toffee bits for that satisfying crunch without the nuts. The cheesecake will still have that wonderful texture and flavor combination.
Is it necessary to chill the cheesecakes for 2 hours?
Yes, chilling is essential. It allows the filling to set properly, making the cheesecakes easier to remove from the liners and enhances the creamy texture and flavor.
Can I use store-bought caramel sauce for this recipe?
Definitely! Store-bought caramel sauce works great and saves time. Just choose a good-quality one for the richest flavor, or make your own if you want a personal touch.
How do I prevent cracks on the surface of my cheesecakes?
To minimize cracking, avoid overmixing the batter and bake at a consistent moderate temperature. Also, letting the cheesecakes cool gradually in the oven with the door slightly open can help maintain a smooth surface.
Can these Mini Turtle Cheesecakes be made gluten-free?
Yes! Use gluten-free graham cracker crumbs or substitute with gluten-free cookie crumbs for the crust to make this recipe gluten-free without sacrificing taste or texture.
Final Thoughts
There is something truly special about making and sharing this Mini Turtle Cheesecakes Recipe. It brings together the nostalgic joy of turtle candies and the luxurious comfort of cheesecake in a perfectly portioned treat. Easy to make, impressive to serve, and delightful to eat, these mini cheesecakes will quickly become your new favorite indulgence. Give them a try and watch how quickly they disappear — trust me, everyone will be asking for seconds!
Print
Mini Turtle Cheesecakes Recipe
- Prep Time: 20 minutes
- Cook Time: 22 minutes
- Total Time: 2 hours 45 minutes
- Yield: 12 mini cheesecakes
- Category: Dessert
- Method: Baking
- Cuisine: American
- Diet: Vegetarian
Description
Delight in these Mini Turtle Cheesecakes, featuring a buttery graham cracker crust topped with creamy cheesecake, luscious caramel, mini chocolate chips, and crunchy pecans. Perfectly portioned as individual treats, these cheesecakes are easy to make and irresistible for any dessert lover.
Ingredients
Crust
- 1 cup graham cracker crumbs
- 3 tablespoons unsalted butter, melted
- 2 tablespoons granulated sugar
Cheesecake Filling
- 16 oz cream cheese, softened
- ½ cup granulated sugar
- 2 large eggs
- 1 teaspoon vanilla extract
- ¼ cup sour cream
Toppings
- ¼ cup caramel sauce (plus extra for drizzling)
- ¼ cup mini chocolate chips
- ¼ cup chopped pecans
- Whipped cream for topping (optional)
Instructions
- Prepare the crust: Preheat your oven to 325°F (165°C) and line a 12-cup muffin tin with paper liners. In a small bowl, combine the graham cracker crumbs, melted butter, and 2 tablespoons sugar until well mixed. Press about 1 tablespoon of this mixture into the bottom of each lined muffin cup to form the crust. Bake for 5 minutes, then remove from the oven and let cool completely.
- Make the cheesecake batter: In a large mixing bowl, beat the softened cream cheese with an electric mixer until smooth and creamy. Add ½ cup granulated sugar and continue mixing until combined. Beat in the eggs one at a time, ensuring each is well incorporated before adding the next. Stir in the vanilla extract and sour cream, mixing just until everything is blended; avoid overmixing to keep the texture light.
- Bake the cheesecakes: Evenly divide the cheesecake batter over the pre-baked crusts in the muffin tin. Bake for 18 to 22 minutes, or until the centers are set but still slightly jiggly when gently shaken. Remove from oven and allow to cool in the pan for 30 minutes.
- Chill the cheesecakes: After cooling, transfer the cheesecakes to the refrigerator and chill for at least 2 hours to fully set.
- Add toppings and serve: Before serving, drizzle each mini cheesecake with caramel sauce, then sprinkle with mini chocolate chips and chopped pecans. Optionally, top with a dollop of whipped cream for extra indulgence. Serve chilled and enjoy!
Notes
- These cheesecakes can be prepared up to 2 days ahead and kept refrigerated to save time.
- For a nut-free alternative, omit the pecans or swap them with crushed pretzels for added crunch.
- Be careful not to overmix the cheesecake batter to prevent cracks and maintain a creamy texture.
- Use full-fat cream cheese for the best rich and creamy results.


