

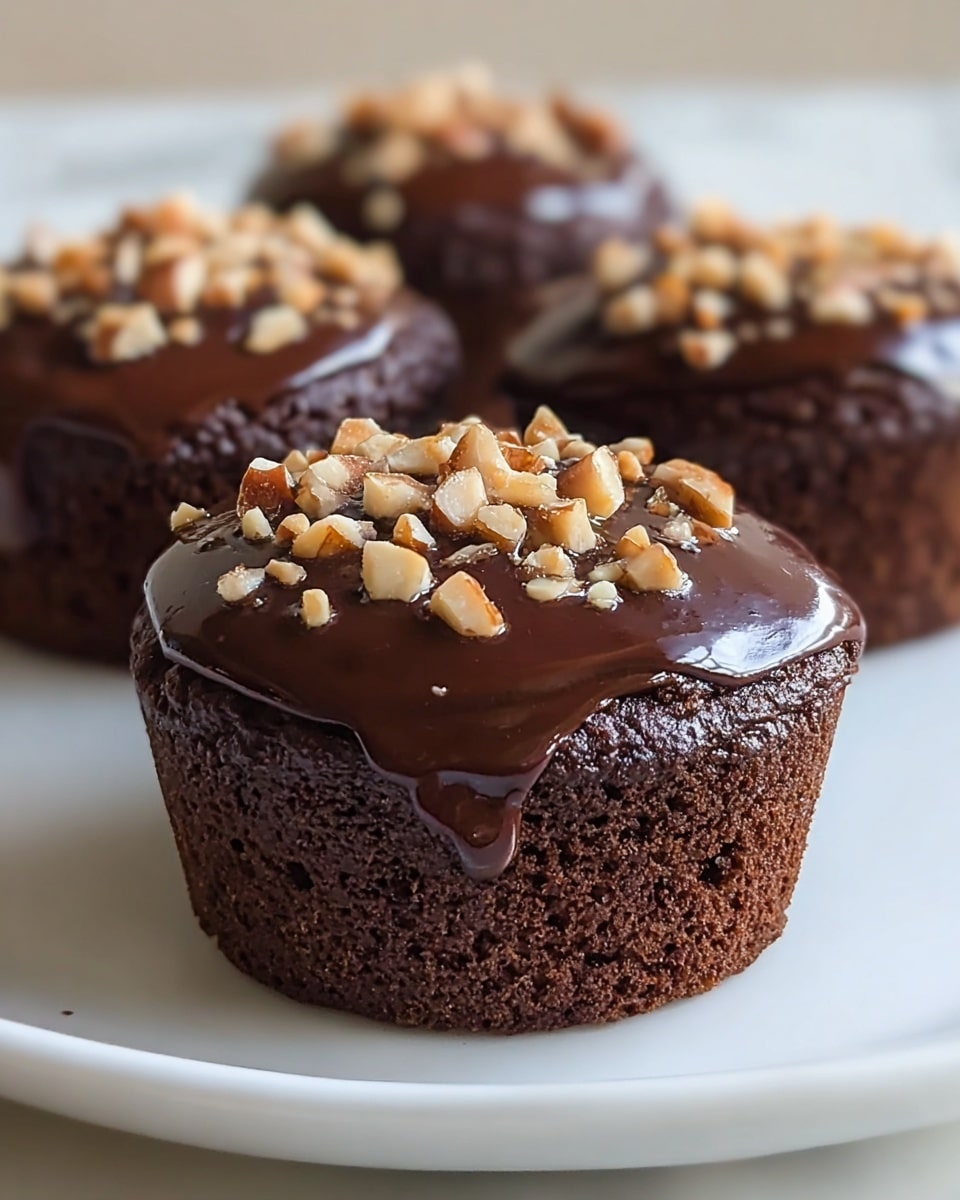
If you have a sweet tooth but want to keep things gluten-free and delightfully indulgent, this Mini Flourless Peanut Butter Chocolate Cakes Recipe is an absolute gem. These tiny cakes pack rich chocolatey flavor with a moist, fudgy texture and a luscious peanut butter twist, all without a single grain of flour. They’re perfect when you crave something sweet yet a little healthier, plus they’re easy to whip up with pantry staples you might already have. Once you try this recipe, these mini treats will quickly become your go-to dessert for surprising guests or cozy nights in.

Ingredients You’ll Need
Gathering your ingredients for this recipe is refreshingly simple, yet each one plays a crucial role in balancing flavor, moisture, and texture. The combination of black beans and pumpkin might surprise you, but they bring the perfect fudgy base and natural sweetness while keeping the cakes completely flourless.
- Black beans (1 15-oz can, drained and rinsed): These add moisture and a velvety texture without imparting a “bean flavor,” making your cakes naturally fudgy and dense.
- Unsweetened cocoa powder (½ cup): For intense chocolate richness that defines the whole cake.
- Egg whites or fat-free liquid egg substitute (½ cup or about 4 large): They help bind the ingredients while keeping the cake light and airy.
- Unsweetened applesauce (⅓ cup): A natural sweetener and moisture booster that keeps these mini cakes delightfully soft.
- Canned pure pumpkin (⅓ cup): Adds subtle earthiness and helps keep the batter moist without flour.
- Truvia spoonable sweetener (¼ cup): A no-calorie option that keeps sweetness in check without overwhelming the taste.
- Baking powder (1 ½ teaspoons): Ensures a slight rise and lighter crumb despite being flourless.
- Vanilla extract (1 teaspoon): Just a touch to enhance all the chocolate and peanut butter flavors.
- Salt (¼ teaspoon): Balances sweetness and deepens the chocolate notes perfectly.
- Peanut butter baking chips, chopped (3 tablespoons): These bring little bursts of peanut butter yumminess throughout each bite.
- Optional melted chocolate sauce: For drizzling, adding that extra layer of decadence right before serving.
How to Make Mini Flourless Peanut Butter Chocolate Cakes Recipe
Step 1: Preheat and Prep Your Pan
Start by preheating your oven to 350°F (175°C). Take a 12-cup muffin pan and generously spray 8 of the cups with nonstick spray. This ensures your mini cakes will pop right out easily without sticking, and you’ll avoid any stress at serving time.
Step 2: Blend the Batter
Into a food processor, add everything—except the peanut butter chips: black beans, cocoa powder, egg whites, applesauce, pumpkin, sweetener, baking powder, vanilla, and salt. Puree the mixture until it’s utterly smooth and uniform, making sure there are no bean chunks left behind. This step is so satisfying because the batter becomes thick, rich, and chocolatey, showing how deceptively simple this flourless recipe is.
Step 3: Fold in Peanut Butter Chips
Gently fold in one tablespoon of the chopped peanut butter chips. This way, the chips stay intact and add those delightful, melty pockets of peanut butter flavor throughout your cakes.
Step 4: Fill Muffin Cups and Add Toppings
Evenly divide the luscious batter among the prepared muffin cups. Use the back of a spoon or a small spatula to smooth out the tops. Then sprinkle the remaining two tablespoons of peanut butter chips over each cake, pressing lightly so they stick to the batter. This topping adds irresistible crunch and gooey bits once baked.
Step 5: Bake to Perfection
Pop your muffin pan into the oven and bake for about 35 to 40 minutes. You’re looking for a toothpick inserted into the center of a cake to come out mostly clean, with just a few moist crumbs attached. This ensures the cakes are thoroughly cooked but still deeply fudgy inside.
Step 6: Cool Completely
Once baked, allow the cakes to cool right in the pan for about ten minutes, then transfer them to a wire rack to cool completely—about an hour. Cooling completes the texture transformation, giving you the perfect balance between moistness and structure.
Step 7: Optional Drizzle and Serve
Before serving, consider drizzling melted chocolate sauce over each mini cake for an extra luxurious touch. This little step ups the wow factor and pairs beautifully with the peanut butter chips.
How to Serve Mini Flourless Peanut Butter Chocolate Cakes Recipe
Garnishes
A light dusting of cocoa powder or a few chopped roasted peanuts scattered on top enhances both presentation and texture. Fresh berries like raspberries or strawberries add a refreshing tartness that cuts through the richness beautifully.
Side Dishes
Serve these cakes alongside a scoop of vanilla bean ice cream or a dollop of whipped cream to balance the dense chocolate and peanut butter flavors with creamy coolness. A cold glass of milk or unsweetened almond milk is also a classic companion that complements the sweet and nutty richness perfectly.
Creative Ways to Present
Try serving these mini cakes in pretty dessert cups layered with your favorite fruit compote or a spoonful of peanut butter mousse. You can also stack two mini cakes with a smear of peanut butter or frosting between them, turning them into mini peanut butter chocolate cake sandwiches—so fun and indulgent!
Make Ahead and Storage
Storing Leftovers
Once completely cooled, keep your mini cakes tightly covered in an airtight container in the refrigerator. They will stay fresh and moist for up to 4 days, making them a perfect make-ahead dessert for busy days.
Freezing
You can freeze these mini cakes by wrapping each one individually in plastic wrap and placing them in a freezer-safe bag or container. Freeze for up to 3 months. When you want a treat, thaw them in the fridge overnight.
Reheating
For a freshly baked taste, warm individual cakes in the microwave for 15-20 seconds before serving. This little tip brings back that soft, freshly baked warmth, especially delightful with a drizzle of chocolate sauce or a scoop of ice cream.
FAQs
Are these cakes really flourless?
Absolutely! This Mini Flourless Peanut Butter Chocolate Cakes Recipe uses black beans and pumpkin to provide structure and moisture instead of traditional flour.
Will the black beans affect the flavor?
Not at all. The black beans blend smoothly and absorb the chocolate and peanut butter flavors, making the cakes fudgy without any noticeable bean taste.
Can I use natural peanut butter instead of peanut butter baking chips?
You can try folding in a couple of tablespoons of natural peanut butter, but it will affect the texture and sweetness. The baking chips add pockets of melty peanut butter goodness that natural peanut butter can’t quite replicate.
Can I make the batter ahead of time?
It’s best to bake the cakes right after making the batter for optimal texture, but you can refrigerate the batter for up to 24 hours and bake shortly after taking it out.
Is this recipe suitable for those with gluten intolerance?
Yes! Because it contains no flour, the Mini Flourless Peanut Butter Chocolate Cakes Recipe is naturally gluten-free, making it a safe and tasty option.
Final Thoughts
If you’re searching for a dessert that’s indulgent yet surprisingly wholesome, the Mini Flourless Peanut Butter Chocolate Cakes Recipe is a must-try. It’s a delightful way to enjoy chocolate and peanut butter together without flour, leaving you with moist, rich mini cakes that are sure to impress. Bake a batch, share them with friends, and enjoy every bite of this guilt-reduced treat.
Print
Mini Flourless Peanut Butter Chocolate Cakes Recipe
- Prep Time: 15 minutes
- Cook Time: 40 minutes
- Total Time: 55 minutes
- Yield: 8 servings
- Category: Dessert
- Method: Baking
- Cuisine: American
- Diet: Gluten Free
Description
These Mini Flourless Peanut Butter Chocolate Cakes are a decadent, guilt-free treat combining rich cocoa and creamy peanut butter chips with wholesome black beans for a gluten-free, protein-packed dessert. Perfect for a healthier indulgence, these moist and flavorful cakes are easy to make and ideal for sharing.
Ingredients
Main Ingredients
- 1 (15 oz) can black beans, drained and rinsed
- ½ cup unsweetened cocoa powder
- ½ cup (about 4 large) egg whites or fat-free liquid egg substitute
- ⅓ cup unsweetened applesauce
- ⅓ cup canned pure pumpkin
- ¼ cup Truvia spoonable calorie-free sweetener (or another no-calorie granulated sweetener)
- 1 ½ teaspoons baking powder
- 1 teaspoon vanilla extract
- ¼ teaspoon salt
- 3 tablespoons peanut butter baking chips, chopped
Optional
- Melted chocolate sauce for drizzling
Instructions
- Preheat the Oven: Preheat your oven to 350°F (175°C). Generously spray 8 cups of a 12-cup muffin pan with nonstick spray to prevent sticking.
- Make the Batter: Place black beans, cocoa powder, egg whites, applesauce, pure pumpkin, Truvia sweetener, baking powder, vanilla extract, and salt into a food processor. Puree the mixture until it is completely smooth and uniform in texture, ensuring no bean chunks remain.
- Fold in Peanut Butter Chips: Gently fold in 1 tablespoon of the chopped peanut butter chips into the smooth batter for bursts of peanut buttery goodness throughout the cakes.
- Prepare Muffin Cups: Evenly distribute the batter into the prepared 8 muffin cups, smoothing out the tops with a spoon or spatula. Then sprinkle the remaining 2 tablespoons of chopped peanut butter chips on top and press lightly to help them adhere.
- Bake: Place the muffin pan in the oven and bake for 35-40 minutes. Test doneness by inserting a toothpick into the center of the cakes; it should come out mostly clean with only a few moist crumbs.
- Cool: Remove the pan from the oven and allow the cakes to cool completely in the pan for about 1 hour. This cooling step helps them set and improves texture.
- Serve: For an extra decadent touch, drizzle the cooled cakes with melted chocolate sauce before serving. Store any leftovers in the refrigerator.
Notes
- Using black beans provides protein and fiber while keeping the cakes moist and flourless.
- If you prefer vegan, substitute egg whites with an appropriate egg replacement, but texture may slightly vary.
- Refrigerate leftovers to keep cakes fresh up to 3-4 days.
- Feel free to swap peanut butter chips with dark chocolate chips for different flavor variations.
- Ensure the batter is completely smooth to avoid bean lumps in the final cakes.


