

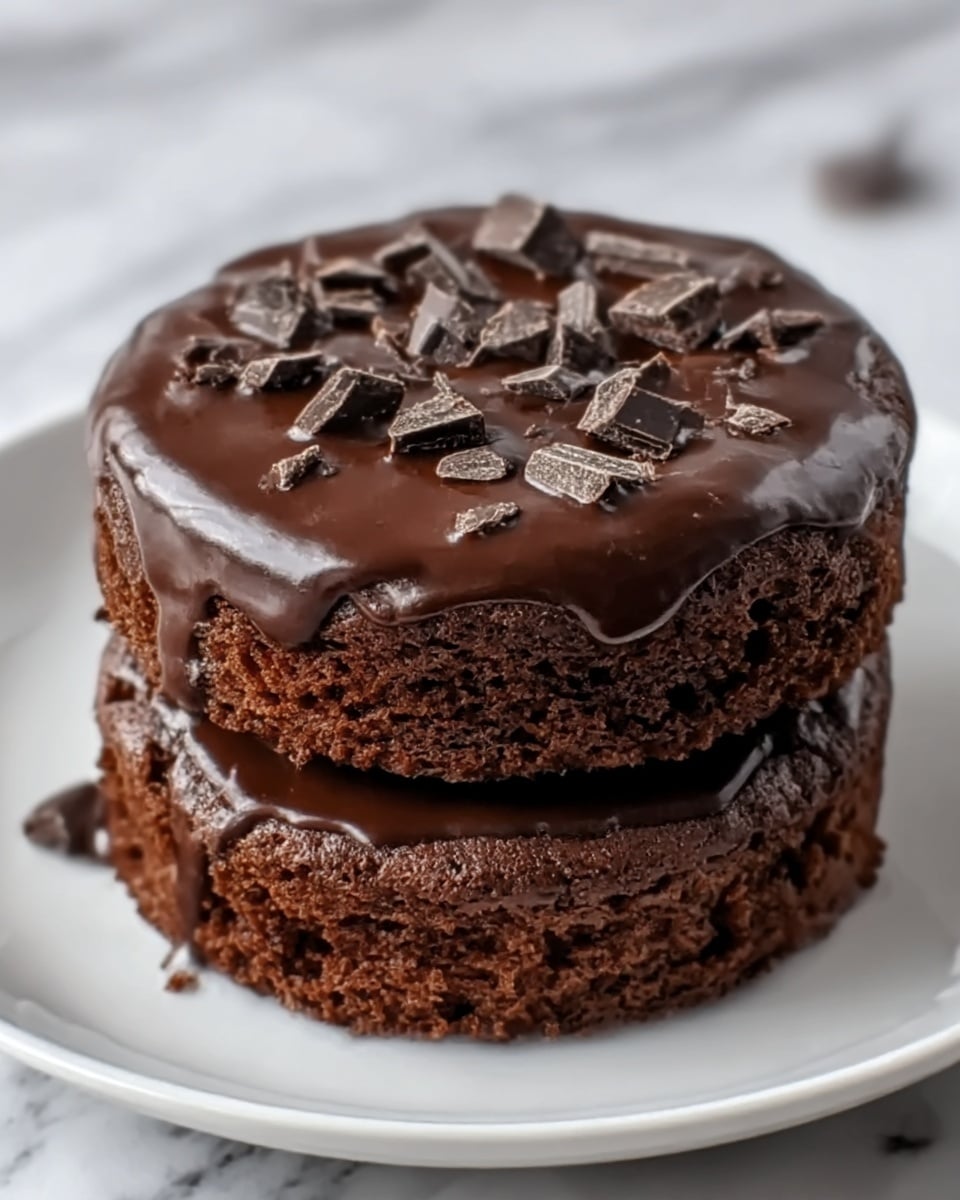
If you’re craving a dessert that feels like a warm hug in cake form, look no further than this Mini Chocolate Fudge Cakes Recipe. These little bundles of rich, molten chocolate goodness are incredibly satisfying and perfect for any occasion, from casual family dinners to dinner parties with friends. The fudgy centers, combined with just the right amount of sweetness and a hint of espresso to deepen the chocolate flavor, create a truly unforgettable treat that can be whipped up in under an hour. You’re going to love how indulgent and approachable these mini cakes are!

Ingredients You’ll Need
This Mini Chocolate Fudge Cakes Recipe keeps things simple but absolutely essential, so each ingredient delivers maximum flavor and texture. From the smooth melted chocolate and butter base to the fluffy whipped eggs, every component plays a vital role in creating that perfect fudgy interior with a slightly firm top crust.
- Semi-sweet chocolate chips (½ cup / 85g): Provides the rich chocolate flavor and smooth fudgy texture that’s the star of the show.
- Salted butter (4 tablespoons / 56g): Adds creaminess and enhances the chocolate depth while balancing the sweetness.
- Large eggs (2): Beaten until fluffy, they give the cakes their airy lift and structure without heaviness.
- All-purpose flour (¼ cup / 30g): Just enough to hold everything together while keeping the cake tender and moist.
- Espresso powder (½ teaspoon, optional): Elevates the chocolate taste by intensifying its richness without adding a coffee flavor.
- Vanilla extract (½ teaspoon): Adds a warm aroma and rounds out the flavor perfectly.
- Powdered sugar: For a delicate dusting that adds elegance and a touch of extra sweetness.
- Fresh berries: Provide a refreshing contrast with their natural tartness and vibrant color.
- Whipped cream: Brings a light, airy texture to balance the dense fudge cakes.
- Ice cream: The ultimate indulgent pairing for warm, fudgy chocolate.
How to Make Mini Chocolate Fudge Cakes Recipe
Step 1: Prepare the Tartlet Pans
Start by preheating your toaster oven to 400°F (200°C). Line the bottoms of four individual tartlet pans with parchment paper—this ensures easy removal later—and lightly spray the sides with non-stick baking spray to prevent any sticky situations. Place the pans on a quarter sheet pan or a tray that fits your toaster oven; this helps with even baking and portability.
Step 2: Melt the Chocolate and Butter
In a microwave-safe bowl, combine your semi-sweet chocolate chips and salted butter. Microwave the mixture in 20-second bursts, stirring in between to encourage smooth melting. After about two minutes, you should have a glossy, velvety chocolate batter ready to elevate your cakes.
Step 3: Whisk the Eggs to Perfection
In a clean bowl, beat the eggs on medium-low speed until frothy. Then crank up to high and continue whisking until they’re light, airy, and have tripled in volume. This fluffy egg base is your secret weapon for that wonderful, delicate crumb inside your Mini Chocolate Fudge Cakes Recipe.
Step 4: Combine Ingredients
Mix the flour and optional espresso powder into the melted chocolate mixture with care. Once incorporated, gently fold this luscious chocolate blend into the beaten eggs. Folding ensures you keep the airiness intact, resulting in tender yet fudgy cakes every time.
Step 5: Bake the Cakes
Distribute the batter evenly into your prepared tartlet pans. Pop them into the toaster oven and bake for 15 minutes. You’re looking for a firm top but a soft, fudgy center that gives that classic molten feel. Patience is key—let the cakes cool in their pans for at least 30 minutes to set before trying to remove them.
Step 6: Serve and Enjoy
Once cooled, dust the cakes with powdered sugar for a pretty finish or elevate them further with fresh berries, whipped cream, or a scoop of ice cream. Any way you choose, these mini delights are ready to impress!
How to Serve Mini Chocolate Fudge Cakes Recipe
Garnishes
Simple garnishes like a light dusting of powdered sugar or a handful of fresh berries add a stunning, colorful contrast to the rich chocolate. You can get creative with edible flowers or a drizzle of salted caramel sauce for extra flair that will wow your guests.
Side Dishes
Complement these decadent cakes with a scoop of vanilla or coffee ice cream to balance the richness. Fresh fruit salads or tangy citrus sorbets are terrific companions that refresh the palate after each fudgy bite.
Creative Ways to Present
Try serving these mini cakes in individual ramekins or atop vintage dessert plates for an elegant touch. Add a sprig of mint or a chocolate curl for a restaurant-quality presentation that elevates this Mini Chocolate Fudge Cakes Recipe from homemade to haute cuisine.
Make Ahead and Storage
Storing Leftovers
If you’re lucky enough to have leftovers, store them in an airtight container at room temperature for up to two days. You want to keep that fudgy texture intact without drying out the cakes.
Freezing
Mini Chocolate Fudge Cakes Recipe also freezes beautifully. Wrap each cake tightly in plastic wrap, then pop into a freezer-safe bag. They’ll stay delicious for up to three months, making them an excellent option for prepping ahead.
Reheating
When ready to enjoy again, thaw the cakes at room temperature and warm briefly in the microwave for about 15 seconds or so. The goal is to revive that warm, molten center without overcooking. Pair with fresh garnishes after reheating for the best experience.
FAQs
Can I make this recipe without espresso powder?
Absolutely! The espresso powder is optional and mainly serves to enhance the chocolate flavor. If you don’t have any on hand, your Mini Chocolate Fudge Cakes will still be rich and delicious without it.
What size are the tartlet pans for this recipe?
Individual tartlet pans about 3 to 4 inches in diameter work best. They help maintain the perfect portion size and ensure even baking for the ideal fudgy texture.
Can I use a regular oven instead of a toaster oven?
Yes, you can! Just preheat a conventional oven to 400°F (200°C) and bake the cakes for the same amount of time. Keep an eye on them as ovens may vary slightly.
How long do these cakes last after baking?
For the best texture and flavor, enjoy the Mini Chocolate Fudge Cakes within two days. Storing them properly at room temperature ensures they stay moist and delicious.
Is it possible to make these cakes gluten-free?
Yes! Simply substitute the all-purpose flour with a gluten-free flour blend that measures cup-for-cup to achieve similar results without sacrificing taste or texture.
Final Thoughts
There’s something incredibly satisfying about creating and sharing these Mini Chocolate Fudge Cakes Recipe with friends and family. They’re simple to make but deliver a rich and indulgent experience that’s hard to beat. Whether it’s a special occasion or a weeknight sweet treat, these mini cakes will quickly become a cherished favorite. Give them a try and watch smiles light up the room!
Print
Mini Chocolate Fudge Cakes Recipe
- Prep Time: 20 minutes
- Cook Time: 15 minutes
- Total Time: 1 hour
- Yield: 4 mini cakes
- Category: Dessert
- Method: Baking
- Cuisine: American
Description
These Mini Chocolate Fudge Cakes are rich, moist, and perfect for any occasion. Made with melted semi-sweet chocolate and butter, fluffy beaten eggs, and a hint of espresso powder to enhance the chocolate flavor, these individual-sized cakes bake to a soft, fudgy center with a firm top. Serve them dusted with powdered sugar or topped with fresh berries, whipped cream, or ice cream for an indulgent treat.
Ingredients
Chocolate Mixture
- ½ cup (85g) semi-sweet chocolate chips
- 4 tablespoons (56g) salted butter
Batter
- 2 large eggs
- ¼ cup (30g) all-purpose flour
- ½ teaspoon espresso powder (optional, enhances chocolate flavor)
- ½ teaspoon vanilla extract
Toppings (Optional)
- Powdered sugar
- Fresh berries
- Whipped cream
- Ice cream
Instructions
- Prepare the Tartlet Pans: Preheat your toaster oven to 400°F (200°C). Line the bottoms of four individual tartlet pans with parchment paper and lightly spray the sides with non-stick baking spray. Place the pans on a quarter sheet pan or any tray that fits your toaster oven for stability.
- Melt the Chocolate & Butter: In a microwave-safe bowl, combine the semi-sweet chocolate chips and salted butter. Microwave in 20-second intervals, stirring between each, until the mixture is melted and smooth, about 2 minutes. Set aside to cool slightly so it doesn’t cook the eggs when combined.
- Whisk the Eggs: In a separate bowl, beat the eggs on medium-low speed until frothy. Increase the speed to high and continue beating until the eggs become light, fluffy, and have tripled in volume. This aeration is key to the cake’s light texture.
- Combine Ingredients: Stir the all-purpose flour and optional espresso powder into the slightly cooled chocolate mixture. Then gently fold this chocolate mixture into the beaten eggs until fully combined, taking care not to deflate the eggs.
- Bake the Cakes: Divide the batter evenly among the prepared tartlet pans. Bake in the preheated toaster oven for 15 minutes, or until the tops are firm but the centers remain soft and fudgy to touch.
- Cool and Serve: Let the mini cakes cool in their pans for 30 minutes before removing. Dust with powdered sugar and top with fresh berries, whipped cream, or ice cream for extra indulgence. Serve immediately and enjoy your decadent treat.
Notes
- Using espresso powder is optional but recommended as it enhances the chocolate flavor without adding coffee taste.
- Beating the eggs until fluffy is crucial for light texture—do not skip this step.
- You can substitute salted butter with unsalted butter and add a pinch of salt if preferred.
- If you don’t have a toaster oven, a regular oven preheated to 400°F (200°C) works just as well.
- For a gluten-free version, substitute the all-purpose flour with a gluten-free flour blend.


