

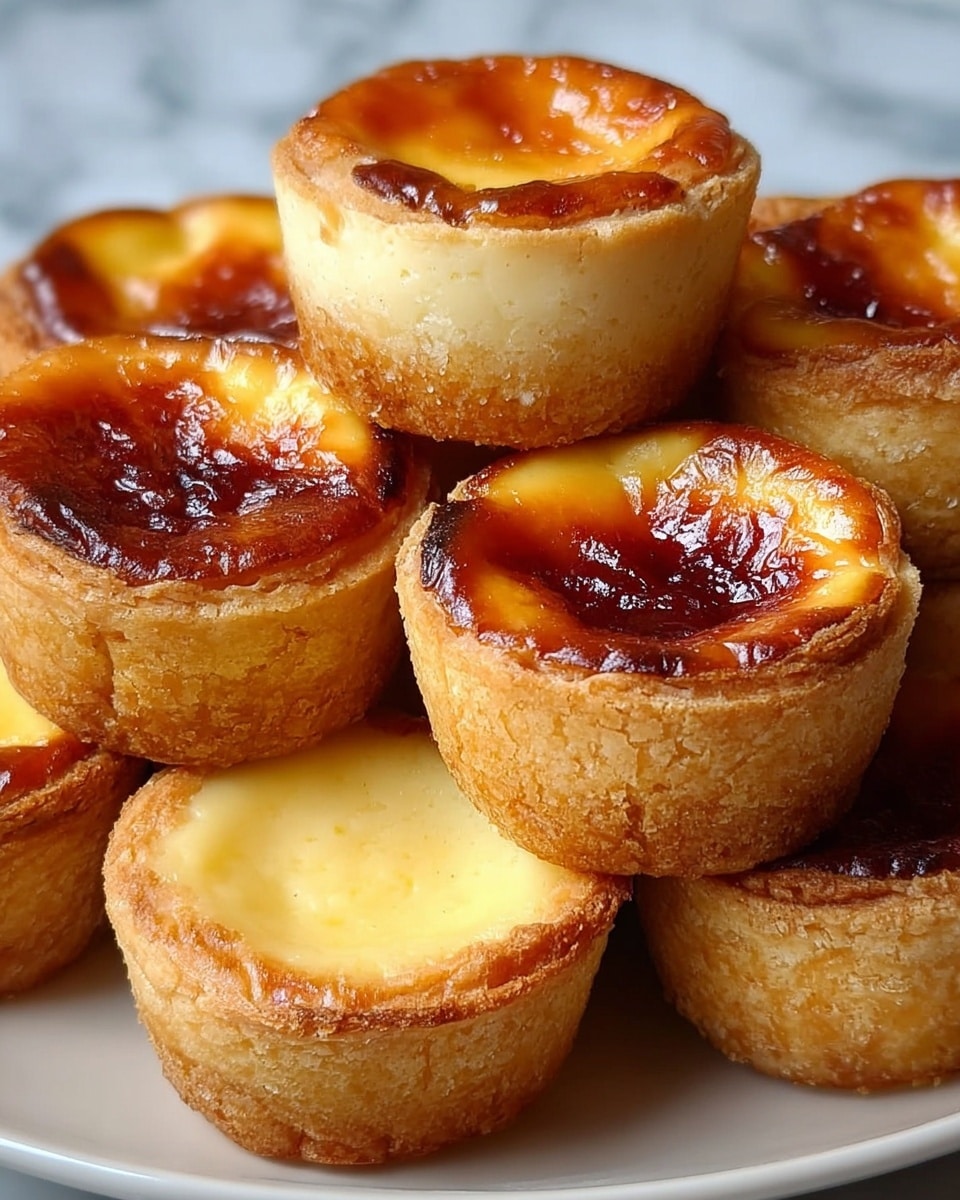
If you’ve been searching for a delightful dessert that’s both charming and irresistibly creamy, the Mini Cheesecake Tarts Recipe is here to become your new go-to favorite. These petite treats combine a buttery graham cracker crust with a luscious cream cheese filling, topped with fresh berries or decadent drizzles, creating a balance of textures and flavors that feels just like a warm hug in each bite. Perfect for parties, casual get-togethers, or even a cozy night in, these mini tarts bring sweetness and joy in a perfectly sized package you’ll want to make again and again.

Ingredients You’ll Need
Getting the ingredients right is the secret to these crowd-pleasing mini tarts. Each component plays a starring role—from the buttery crust that offers a satisfying crunch to the silky cheesecake filling and fresh, vibrant toppings that brighten every bite.
- Graham cracker crumbs: The foundation for our crust, these crumbs add a slight crunch and a hint of honeyed sweetness.
- Granulated sugar: Sweetens the crust just enough without overpowering.
- Unsalted butter: Melted to bind the crumbs together and create that rich, golden crust texture.
- Cream cheese: The heart of your cheesecake filling, softened for a smooth, velvety texture.
- Powdered sugar: Blended into the filling and whipped cream to add a silky sweetness that dissolves effortlessly.
- Vanilla extract: A touch of aromatic warmth that amplifies the cream cheese’s natural flavor.
- Heavy whipping cream: Whipped to fluffiness to lighten and enrich the filling.
- Fresh berries: Blueberries, strawberries, raspberries adds freshness, color, and a burst of juicy brightness.
- Chocolate shavings or drizzle: An optional decadent touch to elevate the visual and flavor appeal.
- Caramel sauce: Adds a rich, buttery sweetness that pairs beautifully with the tangy filling.
- Fruit preserves: Apricot or strawberry preserves bring an inviting, fruity layer that complements the cheese perfectly.
How to Make Mini Cheesecake Tarts Recipe
Step 1: Preheat and Prepare the Crust
Start by preheating your oven to 350°F (175°C). This is essential to bake the crust just enough to make it golden and crunchy without burning it.
Step 2: Mix Crust Ingredients
In a medium bowl, combine graham cracker crumbs, granulated sugar, and melted butter. Mixing these thoroughly ensures that the crust will hold together nicely and have that perfect balance of sweet and buttery.
Step 3: Form Tart Crusts
Divide the crust mixture, spooning about a tablespoon into each tart pan or muffin tin. Press firmly with your fingers or the back of a spoon to create an even, compact base that will bake evenly and hold the filling well.
Step 4: Bake and Cool the Crust
Bake for 5 to 7 minutes until the crusts turn golden brown. This brief baking step is crucial for a crust that isn’t soggy and has that delightful crunch. Once done, allow them to cool completely before adding the filling.
Step 5: Prepare the Cheesecake Filling
Using a hand mixer, beat softened cream cheese until it’s smooth and creamy. This creates the luscious base of your filling.
Step 6: Sweeten and Flavor the Filling
Add powdered sugar and vanilla extract to the cream cheese and blend them until fully incorporated. This sweetens the filling gently and adds aromatic depth.
Step 7: Whip the Cream
In a separate bowl, whip heavy cream with powdered sugar until stiff peaks form. This airy whipped cream will lighten the cheesecake mixture, lending it a smooth, fluffy texture.
Step 8: Fold Cream Into Filling
Gently fold the whipped cream into the cream cheese mix to combine without deflating the fluffiness. The result is a dreamy, smooth filling perfect for spooning into your crusts.
Step 9: Assemble the Tarts
Spoon the cheesecake filling evenly into each cooled crust, smoothing the tops with a spatula. Feel free to pile slightly over the edge for a mini tart that looks grand and inviting.
Step 10: Chill to Set
Refrigerate the tarts for at least two hours. This chilling step allows the filling to set firmly so every tart holds together beautifully when served.
Step 11: Add Toppings
After chilling, top each tart with your choice of fresh berries, chocolate shavings, caramel drizzle, or fruit preserves. These toppings not only make your mini cheesecake tarts visually stunning but add wonderful tastes and textures.
Step 12: Serve and Enjoy
Keep your mini tarts chilled and serve them fresh for maximum delight. Each bite offers a perfect harmony of creamy filling, buttery crunch, and sweet-tart toppings that will have everyone asking for seconds.
How to Serve Mini Cheesecake Tarts Recipe
Garnishes
Fresh berries are an unbeatable classic garnish, adding a burst of color and natural sweetness. Chocolate shavings provide an elegant touch, while drizzles of caramel or fruit preserves dress the tarts up with luxuriously sweet layers. Think about mixing and matching garnishes to suit the occasion or season—it’s the simplest way to keep your mini tarts exciting and personalized.
Side Dishes
Mini cheesecake tarts shine beautifully as the centerpiece dessert but also pair wonderfully with light, refreshing side dishes. Consider serving them alongside a chilled fruit salad or a scoop of sorbet to balance richness with refreshing notes. Hot beverages like coffee or tea create a perfect harmony, helping cleanse the palate between bites.
Creative Ways to Present
For parties, present your mini cheesecake tarts arranged on a tiered dessert stand for a wow factor that’s sure to impress. You can also place them on decorative plates interspersed with edible flowers or mint sprigs for a fresh and festive look. Another playful idea is to serve them in colorful mini tart pans or cupcake wrappers for an easy grab-and-go treat that’s as fun to eat as it is to look at.
Make Ahead and Storage
Storing Leftovers
Mini cheesecake tarts keep well in an airtight container in the refrigerator for up to three days. Storing them chilled helps maintain the perfect texture of the creamy filling and crisp crust. Make sure to add fresh toppings just before serving to keep them looking and tasting their best.
Freezing
You can freeze the mini cheesecake tarts before adding fresh toppings. Place them in an airtight container and freeze for up to one month. Thaw them in the refrigerator overnight before serving, then add berries, sauces, or chocolate to brighten them back up.
Reheating
These tarts are best served cold, so reheating is not recommended. If you prefer a softer crust, allow them to come to room temperature for about 15 minutes before serving. Otherwise, enjoy them straight from the fridge for that delightful chill and texture.
FAQs
Can I use a different crust instead of graham cracker crumbs?
Absolutely! While graham cracker crumbs are classic, you can use crushed digestive biscuits or even finely chopped nuts for a different texture and flavor. Just make sure to mix the crust ingredients so they hold together well when baked.
Is it necessary to bake the crust?
Baking the crust helps it set and gives it a satisfying crunch that complements the creamy filling. However, if you’re short on time, pressing and chilling the crust before filling can work, though the texture will be softer.
Can I make these tarts dairy-free?
Yes, by swapping cream cheese and heavy cream with dairy-free alternatives like vegan cream cheese and coconut cream, you can create a dairy-free version. Just be mindful of how the substitutions affect texture and sweetness.
How long do these mini cheesecake tarts last?
Stored properly in the fridge, they stay fresh for up to three days. Beyond that, the crust can become soggy and the filling may lose its ideal texture.
Can I prepare the Mini Cheesecake Tarts Recipe for a large crowd?
Definitely! The recipe doubles or triples well, and using multiple tart pans or muffin tins means you can bake a big batch at once. These tarts are perfect for gatherings because they’re easy to serve and loved by many.
Final Thoughts
Now that you have the perfect Mini Cheesecake Tarts Recipe in your culinary arsenal, I encourage you to dive in and make these little gems at home. They’re simple to create, incredibly versatile, and guaranteed to bring a smile to anyone who tastes them. Whether you’re indulging yourself or sharing with others, these mini tarts promise sweet moments and plenty of compliments!
Print
Mini Cheesecake Tarts Recipe
- Prep Time: 20 minutes
- Cook Time: 7 minutes
- Total Time: 2 hours 27 minutes
- Yield: 12 mini tarts
- Category: Dessert
- Method: Baking
- Cuisine: American
Description
These Mini Cheesecake Tarts are a delightful and elegant dessert perfect for any occasion. Featuring a crisp graham cracker crust, a smooth and creamy cheesecake filling made from cream cheese and whipped cream, and topped with fresh berries, chocolate shavings, caramel sauce, or fruit preserves, these bite-sized tarts offer a perfect balance of textures and flavors. Easy to prepare and chilled to perfection, they make a beautiful and delicious treat to impress your guests or indulge yourself.
Ingredients
For the Crust
- 1 ½ cups graham cracker crumbs
- ¼ cup granulated sugar
- 6 tablespoons unsalted butter, melted
For the Cheesecake Filling
- 8 oz cream cheese, softened
- ½ cup powdered sugar
- 1 teaspoon vanilla extract
- 1 cup heavy whipping cream
- 2 tablespoons powdered sugar (for whipped cream)
Toppings
- Fresh berries (blueberries, strawberries, raspberries, etc.)
- Chocolate shavings or drizzle
- Caramel sauce
- Fruit preserves (apricot, strawberry, etc.)
Instructions
- Make the crust: Preheat your oven to 350°F (175°C) to prepare for baking the crust.
- Mix crust ingredients: In a medium bowl, combine the graham cracker crumbs, granulated sugar, and melted butter until the mixture is well blended.
- Form crust bases: Spoon about 1 tablespoon of the crust mixture into the bottom of each tart pan or muffin tin. Press down firmly to create a compact crust base.
- Bake crusts: Bake the crusts in the preheated oven for 5-7 minutes until they turn golden brown. Allow them to cool completely before filling.
- Prepare cheesecake filling: Beat the softened cream cheese with a hand mixer on medium speed until smooth and creamy.
- Add sweetness and flavor: Incorporate the powdered sugar and vanilla extract into the cream cheese, mixing until fully combined.
- Whip cream: In a separate bowl, whip the heavy cream and 2 tablespoons powdered sugar until stiff peaks form, which usually takes 2-3 minutes.
- Combine mixtures: Gently fold the whipped cream into the cream cheese mixture until smooth and well combined, creating a light and creamy filling.
- Fill tart shells: Spoon the cheesecake filling into the cooled crusts, smoothing the tops with a spatula. For a taller tart, fill slightly over the edge.
- Chill tarts: Refrigerate the assembled tarts for at least 2 hours to allow the cheesecake filling to set properly.
- Add toppings: Once chilled, decorate the tarts with your choice of fresh berries, chocolate shavings, caramel drizzle, or fruit preserves for added flavor and visual appeal.
- Serve: Enjoy the mini cheesecake tarts chilled for the best creamy and refreshing taste experience.
Notes
- Make sure the cream cheese is fully softened to avoid lumps in the filling.
- Press the crust mixture firmly into the tart pans to prevent crumbling after baking.
- Use chilled heavy cream for best whipping results.
- Refrigerating the tarts for longer than 2 hours can improve firmness and flavor melding.
- These tarts can be made a day ahead and stored covered in the refrigerator.
- Substitute graham cracker crumbs with digestive biscuits if preferred.


