

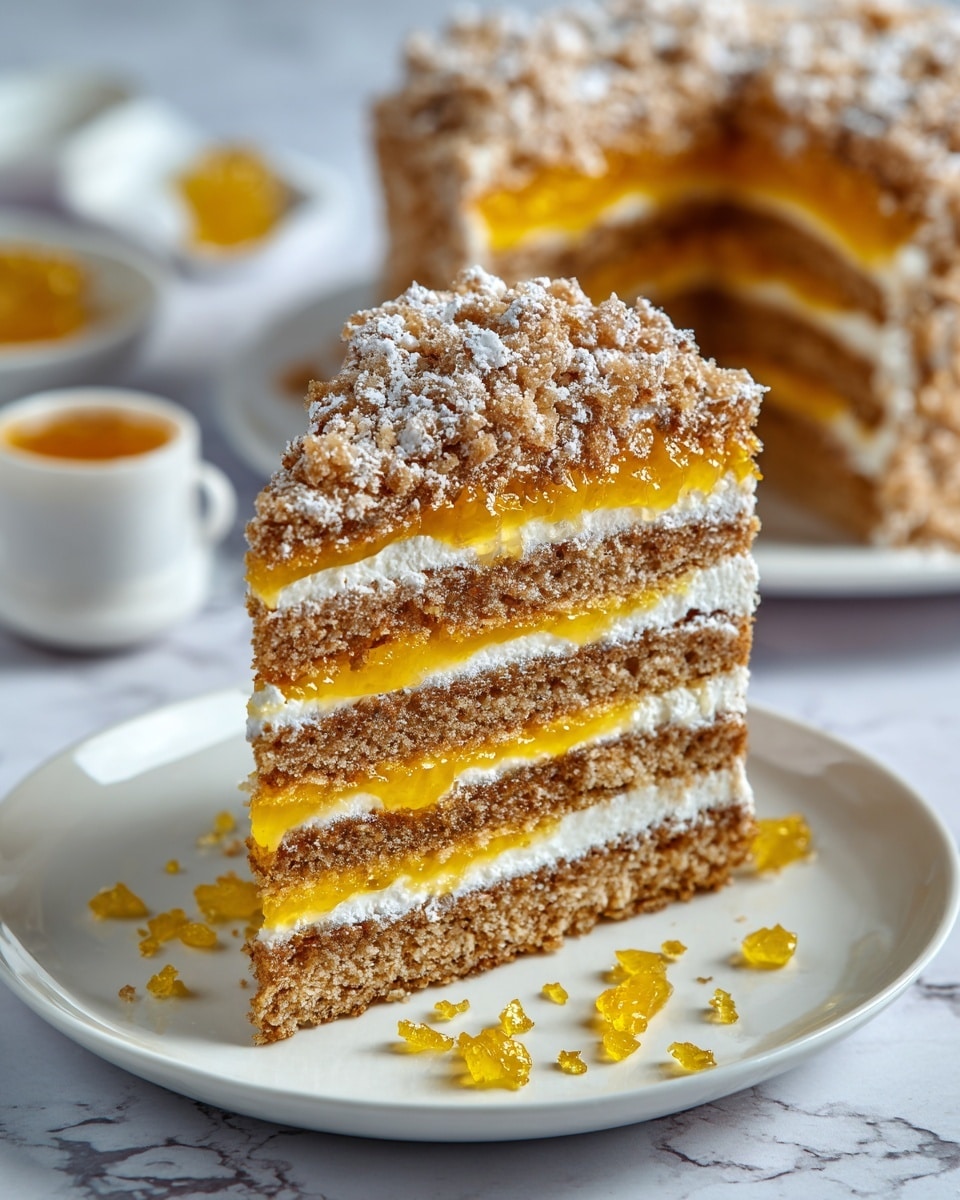
If you are seeking a dessert that feels like a warm hug on a plate, this Layered Honey Cake Recipe is exactly what you need. With its tender, golden honey-infused layers and luscious, tangy whipped cream filling, this cake offers a perfect balance of sweetness and subtle acidity that melts in your mouth. Often known as Medovik, this Eastern European delight transforms simple pantry ingredients into an extraordinary treat, making it a fantastic choice for gatherings or a cozy evening indulgence.

Ingredients You’ll Need
The beauty of this recipe lies in its simplicity. Each ingredient plays a vital role in crafting that signature tender crumb and rich, creamy filling. From fragrant honey to tangy sour cream, every component adds texture, flavor, or sweetness that makes this cake unforgettable.
- Honey: Provides natural sweetness and moisture, giving the cake its distinctive flavor and golden color.
- Granulated sugar: Sweetens the layers while caramelizing slightly during baking for extra depth.
- Unsalted butter: Adds richness and tenderness to the cake layers.
- Eggs: Bind the batter and help create a soft, pliable dough for rolling.
- Baking soda: Reacts with vinegar to give the cake a light, airy texture.
- White vinegar: Activates the baking soda while balancing the sweetness.
- All-purpose flour: The structural base for delicate yet sturdy cake layers.
- Sour cream: Brings a creamy tang that complements the honey layers beautifully.
- Powdered sugar: Sweetens the filling without graininess, ensuring smoothness.
- Vanilla extract: Adds a warm, aromatic note to the creamy filling.
- Heavy whipping cream: Whipped to soft peaks to give the filling lightness and volume.
How to Make Layered Honey Cake Recipe
Step 1: Prepare the Honey Cake Layers
Start by melting honey, granulated sugar, and butter together in a saucepan over medium heat until the mixture becomes smooth and bubbly. This step develops a rich, caramelized sweetness that defines the cake’s character. After removing it from heat and allowing it to cool slightly, mix baking soda with white vinegar separately; the fizzing reaction is key to tender layers. Stir this mixture quickly into the warm honey blend, then beat in eggs one at a time to incorporate air and create a smooth batter.
Step 2: Forming and Baking the Layers
Gradually add the flour and stir until a soft, pliable dough forms. Divide this dough into 6 to 8 equal portions. Rolling each piece into a thin circle on parchment paper might seem intimidating, but with a little patience, it’s easy and ensures even layers. Bake these rounds at 375°F (190°C) for 5 to 7 minutes until beautifully golden brown. Afterward, set them aside to cool completely; this cooling allows them to firm up just enough to handle during assembly.
Step 3: Whip Up the Filling
While the layers cool, beat the heavy whipping cream until soft peaks form—a fluffy texture is crucial here to lighten the filling. Separately, mix sour cream with powdered sugar and vanilla extract until smooth and silky. Finally, gently fold the whipped cream into the sour cream mixture. This combination creates a delightfully tangy and airy filling that cuts through the sweetness of the honey layers.
Step 4: Assemble the Cake
Now for the fun part! Spread a generous layer of cream filling between each honey cake round, carefully stacking as you go to build a stunning multi-layered masterpiece. Use any leftover filling to coat the top and sides evenly. For a flawless finish, chill the cake overnight—this resting time allows the layers to meld warmly, softening the cake and blending all those flavors beautifully.
How to Serve Layered Honey Cake Recipe
Garnishes
A simple dusting of finely crushed cake crumbs, chopped toasted nuts like walnuts or almonds, or even a gentle drizzle of honey elevates the cake’s appearance and adds subtle textural contrasts. These garnishes bring a personal flair that invites your guests to admire before diving in.
Side Dishes
Pairing your layered honey cake with fresh berries or a dollop of lightly sweetened whipped cream complements its sweetness and adds brightness. For a beverage, consider a cup of fragrant black tea or a rich, spiced coffee to echo the cake’s warm, inviting flavors.
Creative Ways to Present
Why not turn your Layered Honey Cake Recipe into individual servings by cutting it into neat squares and layering inside clear dessert glasses for a no-fuss presentation? Alternatively, adding edible flowers or gold leaf accents makes it perfect for festive occasions and impresses everyone at the table.
Make Ahead and Storage
Storing Leftovers
Store any leftover cake slices tightly covered in the refrigerator. The cake tastes even better after a day or two as the layers continue to soften, but be sure to consume within 3 to 4 days to enjoy freshness at its peak.
Freezing
If you want to save time for future celebrations, you can freeze the cake layers separately wrapped in plastic wrap. Defrost completely before assembling with the fresh cream filling. Avoid freezing the filled cake, as this can change the texture of the cream.
Reheating
This cake is best served chilled or at room temperature, so reheating is generally not recommended. However, if you prefer warming, let slices sit at room temperature for about 30 minutes to take the chill off without risking the delicate texture.
FAQs
Can I use jam instead of sour cream in the filling?
Yes! Swapping the sour cream for your favorite jam or dulce de leche creates a delicious variation, adding fruity or caramel flavors that pair beautifully with honey layers.
How thin should I roll the cake layers?
Try to roll each dough circle to about 1/8 inch thick. Thin layers bake quickly and evenly, giving you that perfect balance of crisp edges and tender centers.
Why does the recipe call for vinegar?
Vinegar reacts with baking soda to release carbon dioxide. This reaction helps the cake layers rise slightly and become tender instead of dense.
Is this cake suitable for vegetarians?
Absolutely. This Layered Honey Cake Recipe contains no animal meat products and is perfect for a vegetarian diet, making it a crowd-pleaser for many dietary preferences.
Can I make this cake gluten-free?
While the original recipe uses all-purpose flour, you can experiment by substituting a gluten-free flour blend. Keep in mind results may vary slightly in texture, so proceed with caution!
Final Thoughts
This Layered Honey Cake Recipe is truly a celebration of simple ingredients and rewarding flavors coming together in an unforgettable way. Whether you’re baking for a special occasion or just to brighten your day, this cake never fails to impress with its tender layers and luscious filling. Give it a try, and you’ll understand why it’s a treasured classic in countless kitchens around the world.
Print
Layered Honey Cake Recipe
- Prep Time: 30 minutes
- Cook Time: 40 minutes
- Total Time: 9 hours 10 minutes
- Yield: 10–12 servings
- Category: Dessert
- Method: Baking
- Cuisine: Eastern European
- Diet: Vegetarian
Description
Layered Honey Cake, also known as Medovik, is a classic Eastern European dessert characterized by multiple thin honey-flavored cake layers filled with a luscious, tangy sour cream and whipped cream filling. The cake is baked until golden brown, layered with a creamy mixture, and chilled overnight to allow the flavors to meld and the texture to soften. This honey-infused cake offers a perfect balance of sweetness and richness, ideal for special occasions or a delightful treat.
Ingredients
For the cake layers:
- 1/2 cup honey
- 3/4 cup granulated sugar
- 1/2 cup unsalted butter
- 3 large eggs
- 1 teaspoon baking soda
- 1 tablespoon white vinegar
- 3 cups all-purpose flour
For the filling:
- 2 cups sour cream
- 1/2 cup powdered sugar
- 1 teaspoon vanilla extract
- 1 1/2 cups heavy whipping cream
Instructions
- Prepare the honey mixture: In a medium saucepan over medium heat, melt together honey, sugar, and butter until the mixture is smooth and slightly bubbling. Remove the pan from heat and allow the mixture to cool slightly to avoid cooking the eggs prematurely.
- Activate baking soda: In a small bowl, combine the baking soda with white vinegar; this will cause a fizzing reaction. Quickly add this to the warm honey mixture, stirring to combine.
- Incorporate eggs: Beat in the eggs one at a time into the honey mixture, ensuring each egg is fully incorporated before adding the next, creating a smooth batter.
- Add flour: Gradually mix in the all-purpose flour, stirring continuously until a soft dough forms that is pliable yet not sticky.
- Divide and roll dough: Divide the dough into 6 to 8 equal portions. On parchment paper, roll each piece into a thin circle approximately 8 inches in diameter.
- Bake cake layers: Preheat the oven to 375°F (190°C). Bake each dough circle on parchment paper for 5 to 7 minutes, or until the edges are golden brown. Remove from oven and cool completely on wire racks.
- Prepare the filling: Beat the heavy whipping cream until soft peaks form. In a separate bowl, blend sour cream, powdered sugar, and vanilla extract until smooth. Gently fold the whipped cream into the sour cream mixture to create a fluffy and tangy filling.
- Assemble the cake: Place one cake layer on a serving plate and spread a layer of the cream filling evenly on top. Repeat this layering process with all cake rounds, stacking them neatly.
- Coat and chill: Use the remaining filling to coat the top and sides of the assembled cake. Optionally, decorate with cake crumbs, chopped nuts, or a drizzle of honey. Refrigerate the cake overnight for at least 8 hours to allow the layers to soften and the flavors to meld.
Notes
- This cake tastes best after chilling overnight as the layers soften and flavors meld more deeply.
- For variation, try replacing the sour cream filling with dulce de leche or your favorite fruit jam between the layers.
- Traditional Russian medovik sometimes uses cooked custard fillings instead of sour cream for a richer flavor.
- Be careful not to overbake the thin cake layers to maintain their tenderness.
- Use parchment paper to prevent sticking when rolling and baking the cake layers.


