

If you have ever craved that perfect crusty yet tender bread with a hint of rustic charm, this Italian Bread Recipe is exactly what your kitchen has been waiting for. With just a handful of perfectly balanced ingredients and a modest amount of time, you’ll create a loaf that fills your home with the heavenly aroma of freshly baked bread and delivers a satisfying chew with every bite. Whether you’re a seasoned baker or just stepping into the world of homemade bread, this recipe invites you to enjoy the warm tradition of Italian baking in a straightforward and approachable way.

Ingredients You’ll Need
The beauty of this Italian Bread Recipe lies in its simplicity and the quality of each ingredient. Each element plays a crucial role in building the bread’s flavor, texture, and golden hue, making this recipe as delightful to prepare as it is to eat.
- 3 1/2 cups all-purpose flour: The fundamental base that provides structure and chewiness to the bread.
- 1 tablespoon sugar: Feeds the yeast to help the dough rise and adds a slight sweetness to balance the flavors.
- 2 teaspoons salt: Enhances the overall taste and strengthens the gluten network for better texture.
- 1 tablespoon active dry yeast: The magical agent responsible for the bread’s airy, fluffy rise.
- 1 1/2 cups warm water (110°F/45°C): Activates the yeast and helps bring the dough together smoothly.
- 1 tablespoon olive oil: Adds moisture and a subtle richness characteristic of Italian breads.
- 1 tablespoon cornmeal (for dusting): Prevents sticking while adding a slight crunch and rustic appearance to the crust.
How to Make Italian Bread Recipe
Step 1: Activate the Yeast
Start by dissolving the sugar and active dry yeast in warm water. The warmth wakes the yeast up, encouraging it to become foamy and bubbly within 5 to 10 minutes—a sure sign your dough will rise beautifully.
Step 2: Mix Your Dry Ingredients
While your yeast is getting ready, combine the all-purpose flour and salt in a large bowl. These ingredients create the perfect environment for gluten development and flavor enhancement as you bring the dough to life.
Step 3: Combine Wet and Dry Ingredients
Pour the yeast mixture and olive oil into the flour and salt. Stir everything together just until the dough forms, which helps to keep it tender and prevents overworking early on.
Step 4: Knead the Dough
Turn your dough onto a floured surface and knead vigorously for 8 to 10 minutes. This step is essential; kneading develops the gluten, giving your bread that elastic texture and excellent crumb.
Step 5: Let the Dough Rise
Place the dough in a greased bowl, cover it with a damp cloth, and let it rise in a warm spot for 1 to 2 hours. You’ll know it’s ready when it has doubled in size, filling your kitchen with a lovely yeasty aroma.
Step 6: Prepare for Baking
Preheat your oven to 375°F (190°C). Punch down the dough to release the air, then shape it into a classic loaf. Place it on a baking sheet dusted with cornmeal to prevent sticking and add a bit of crunch to the crust.
Step 7: Final Rise and Scoring
Let the shaped dough rise uncovered for another 30 minutes—the final stretch for a beautiful, fluffy loaf. Before baking, slash the top with a sharp knife. This allows steam to escape and helps the bread expand evenly during baking.
Step 8: Bake to Golden Perfection
Bake your loaf for 25 to 30 minutes until the crust turns a deep golden brown and the bread sounds hollow when tapped on the bottom—this auditory cue is your best test for doneness.
Step 9: Cooling
Once baked, transfer your bread to a wire rack to cool completely before slicing. This step prevents the bread from becoming gummy inside and ensures the perfect texture.
How to Serve Italian Bread Recipe

Garnishes
Although this Italian Bread Recipe shines on its own, you can add fresh herbs like rosemary or oregano on top before baking for an aromatic twist. A light brushing of olive oil on freshly sliced bread enhances its lush, tender crumb.
Side Dishes
This bread is a fantastic companion to soups, stews, and pasta dishes. Its sturdy crust holds up beautifully to dipping in olive oil or rich tomato sauces, making each meal feel more authentic and hearty.
Creative Ways to Present
Sliced thick and toasted, it makes an incredible base for bruschetta topped with ripe tomatoes and basil. Or, transform it into a gourmet sandwich by layering with your favorite Italian cold cuts and fresh mozzarella. The versatility of this bread is simply endless.
Make Ahead and Storage
Storing Leftovers
Wrap your leftover Italian bread tightly in plastic wrap or place it in a bread bag at room temperature. It will stay fresh for up to two days, maintaining its delightful crust and soft inside.
Freezing
If you want to preserve your homemade bread longer, slice it and freeze the slices in an airtight bag. This way, you can take out just what you need without any hassle, keeping the rest fresh for weeks.
Reheating
To enjoy your bread as if freshly baked, reheat slices in a toaster or warm the whole loaf in a preheated oven at 350°F (175°C) for about 10 minutes. This revives the crust’s crunch and softens the inside beautifully.
FAQs
Can I use bread flour instead of all-purpose flour in this Italian Bread Recipe?
Absolutely! Bread flour can give your loaf a chewier texture and a higher rise because of its increased protein content, which can enhance the gluten development for a more substantial crumb.
What is the ideal temperature for the water when activating the yeast?
The water should be warm, around 110°F (45°C). Too hot and it can kill the yeast; too cold and the yeast won’t activate properly. Lukewarm water creates the perfect environment for the yeast to bloom.
Can I add herbs or flavorings directly to the dough?
Yes! Adding chopped fresh herbs like rosemary or garlic powder will infuse the bread with extra flavor—but keep additions moderate to avoid disrupting the dough structure.
How do I know when the bread is fully baked?
Listen for a hollow sound when tapping the bottom of the loaf and look for a deep golden brown crust. These are surefire signs that your Italian Bread Recipe has baked perfectly.
Can this recipe be made with a stand mixer?
Definitely! Use the dough hook attachment to mix and knead, which can simplify the process and works great for those who want to save a bit of elbow grease.
Final Thoughts
There’s something truly special about pulling a warm, crusty loaf from your own oven, especially when it’s crafted from a classic Italian Bread Recipe like this one. It brings a wonderful sense of accomplishment and a delicious centerpiece to any meal. So, get your flour dusted hands ready and dive in—your kitchen and taste buds will thank you for it!
Print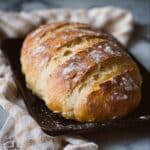
Italian Bread Recipe
- Prep Time: 15 minutes
- Cook Time: 30 minutes
- Total Time: 1 hour 45 minutes
- Yield: 12 servings
- Category: Bread
- Method: Baking
- Cuisine: Italian
Description
This classic Italian bread recipe yields a crusty, golden loaf with a soft and airy interior, perfect for sandwiches or as a side for soups and pasta. Made from simple pantry staples, the dough requires a little time to rise and develop its flavor, resulting in a homemade bread that’s both delicious and satisfying.
Ingredients
Dry Ingredients
- 3 1/2 cups all-purpose flour
- 1 tablespoon sugar
- 2 teaspoons salt
- 1 tablespoon active dry yeast
Wet Ingredients
- 1 1/2 cups warm water (110°F / 45°C)
- 1 tablespoon olive oil
For Dusting
- 1 tablespoon cornmeal
Instructions
- Activate yeast: In a small bowl, dissolve the sugar and active dry yeast in warm water (110°F / 45°C). Let the mixture sit for 5 to 10 minutes until it becomes foamy, indicating the yeast is active.
- Mix dough: In a large bowl, combine the all-purpose flour and salt. Add in the yeast mixture and olive oil, stirring until the dough begins to form.
- Knead dough: Turn the dough onto a floured surface and knead it for 8 to 10 minutes until it is smooth and elastic, ensuring proper gluten development.
- First rise: Place the kneaded dough in a greased bowl, cover it with a damp cloth, and allow it to rise in a warm place for 1 to 2 hours, or until it has doubled in size.
- Preheat oven: Set your oven to preheat at 375°F (190°C) to prepare for baking the bread.
- Shape loaf: Punch down the risen dough to release air, shape it into a loaf, and place it on a baking sheet dusted with cornmeal to prevent sticking and add texture.
- Second rise: Let the dough rise again for 30 minutes on the baking sheet to achieve a light texture. Before baking, slash the top of the loaf with a sharp knife to allow steam to escape and encourage a beautiful crust.
- Bake: Bake in the preheated oven for 25 to 30 minutes until the crust is golden brown and the loaf sounds hollow when tapped on the bottom, indicating it is fully baked.
- Cool: Remove the bread from the oven and transfer it to a wire rack to cool completely before slicing, which helps set the crumb texture.
Notes
- Ensure water temperature is not too hot to avoid killing the yeast.
- Kneading the dough properly is essential for good texture and gluten development.
- Allowing the dough to rise fully will yield a light and airy bread.
- Slashing the loaf before baking helps control the expansion and creates an attractive crust.
- Cool the bread completely before slicing to prevent a gummy texture inside.
- Cornmeal dusting on the baking sheet prevents sticking and adds a slight crunch to the bread’s bottom crust.


