
“`html
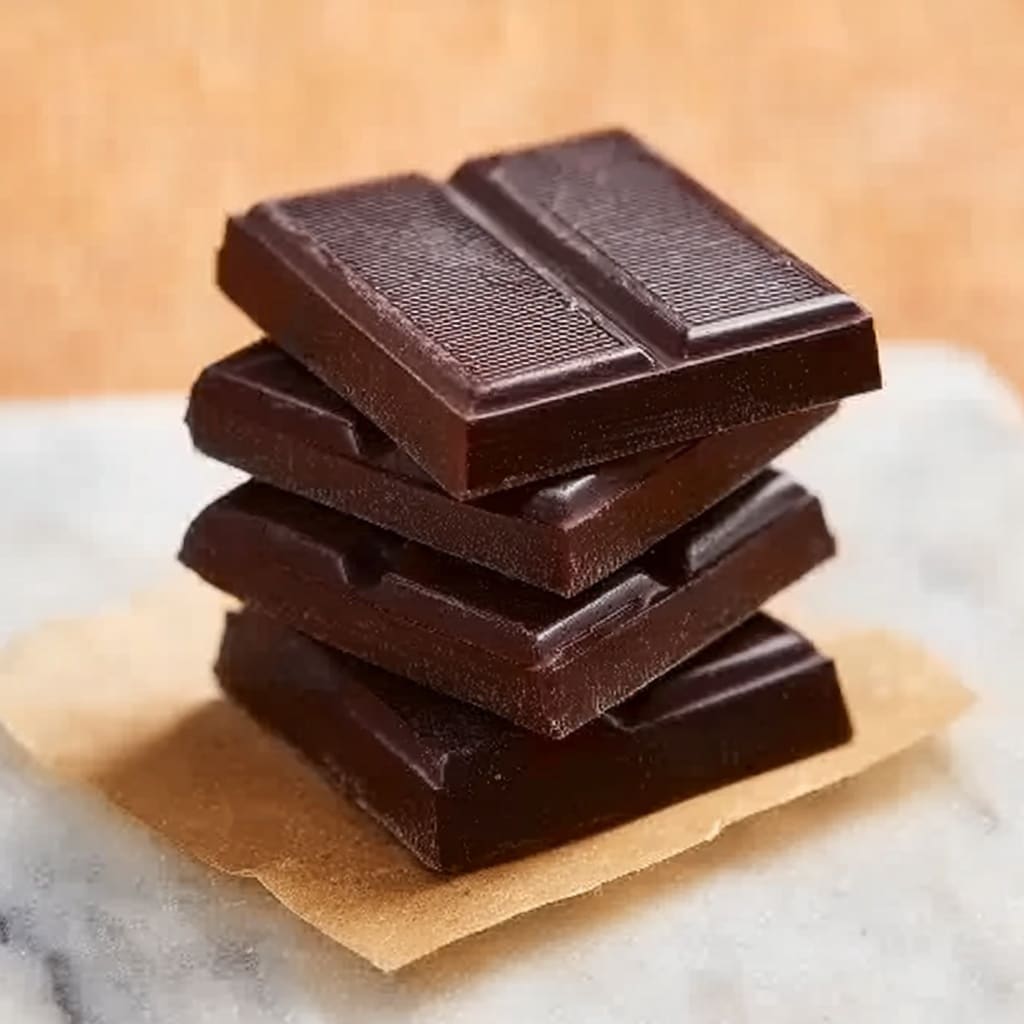
If you have a sweet tooth and love a rich, melt-in-your-mouth treat, this Irresistible Homemade Chocolate Bars Recipe is just the thing to brighten your day. The silky smoothness of dark chocolate melts beautifully with just a hint of sea salt and vanilla, while the optional nuts or dried fruits add delightful bursts of texture and flavor. Making these chocolate bars at home not only brings out the freshest, most vibrant chocolate taste but also gives you the joy of customizing your treat exactly the way you love it. Whether it’s for a cozy night in or a thoughtful homemade gift, this recipe is a deliciously simple way to impress.

Ingredients You’ll Need
Each ingredient in this recipe plays a key role in creating chocolate bars that are lush, flavorful, and perfectly textured. The simplicity of the list means no complicated shopping trips, just pure chocolate bliss made easy.
- Dark chocolate chips (1 cup, 70% cocoa): Provides the rich, intense chocolate flavor and smooth texture that forms the base of your bars.
- Coconut oil (2 tbsp): Adds a silky finish and helps the chocolate set with a lovely snap.
- Pure vanilla extract (1 tsp): Enhances the chocolate’s depth with warm, fragrant notes.
- Sea salt (1/2 tsp): A small pinch balances sweetness and elevates all the flavors beautifully.
- Optional nuts or dried fruits (1/4 cup): Introduce crunch and bursts of natural sweetness, making each bite exciting and unique.
How to Make Irresistible Homemade Chocolate Bars Recipe
Step 1: Prepare Your Workspace
Start by clearing your countertop so you have a clean, organized space to work in. This simple step helps you move smoothly through the recipe without any distractions, and gathering all ingredients in advance ensures you’re ready to create your chocolate masterpiece.
Step 2: Melt the Chocolate and Coconut Oil
Place the dark chocolate chips and coconut oil into a microwave-safe bowl. Heat in 30-second intervals, stirring gently between each to combine until the mixture is completely melted and silky smooth. This gradual melting method prevents burning and keeps the chocolate glossy and luscious.
Step 3: Stir in Vanilla and Sea Salt
Once melted, add the vanilla extract and sea salt. Stir these in thoroughly to infuse your chocolate with subtle layers of flavor—a little vanilla warmth and a touch of saltiness that perfectly complement the chocolate’s richness.
Step 4: Pour into Molds and Remove Air Bubbles
Carefully pour the chocolate mixture into silicone molds or a baking tray lined with parchment paper. Gently tap the mold on the counter to release any trapped air bubbles so your bars set smoothly and evenly.
Step 5: Add Nuts or Dried Fruits (Optional)
If you love a bit of variety, sprinkle your chosen nuts or dried fruits over the chocolate before it fully sets. This adds extra texture and bursts of flavor that make each bite delightfully different.
Step 6: Refrigerate to Set
Place your filled molds in the refrigerator for 1 to 2 hours. This step is essential for the chocolate bars to harden to a perfect snap and thickness, creating that satisfying homemade finish you’ll adore.
How to Serve Irresistible Homemade Chocolate Bars Recipe

Garnishes
Try adding a delicate dusting of cocoa powder or a sprinkle of flaky sea salt right before serving for an elegant touch. A few whole nuts or dried fruits arranged on top make for a beautiful, inviting look that will wow friends and family.
Side Dishes
Pair these chocolate bars with a cup of freshly brewed coffee, tea, or even a glass of cold milk to balance their richness. They also make a delightful finish to a light dessert plate featuring fresh fruits or a scoop of vanilla ice cream.
Creative Ways to Present
Present homemade chocolate bars on a decorative platter lined with parchment paper, or wrap each bar individually in wax paper tied with twine for charming homemade gifts. You can also cut them into fun shapes using cookie cutters—perfect for parties or special occasions.
Make Ahead and Storage
Storing Leftovers
Keep any leftover chocolate bars in an airtight container in the refrigerator. Stored this way, they will stay fresh and maintain their perfect texture for up to two weeks, allowing you to savor them slowly or share with others.
Freezing
If you want to keep your homemade bars longer, freezing is the way to go. Wrap them tightly in plastic wrap and place in a freezer-safe container or bag. Frozen chocolate bars can last up to three months and thaw quickly at room temperature without losing their deliciousness.
Reheating
Chocolate bars are best enjoyed chilled or at room temperature, but if you prefer them slightly soft, let them sit out for a few minutes before eating. Avoid microwaving as it can cause the chocolate to seize or melt unevenly.
FAQs
Can I use milk chocolate instead of dark chocolate?
Absolutely! Milk chocolate will make the bars sweeter and creamier, but keep in mind the melt point is lower, so they might be softer when set. Adjust sweetness and salt accordingly to balance flavors.
Are there alternatives to coconut oil?
Yes, you can use cacao butter or even butter as substitutes. Each will change the texture slightly, with cacao butter giving a firmer snap and butter creating a softer bar with a rich flavor.
How long do the homemade chocolate bars take to set?
The bars should be refrigerated for at least 1 to 2 hours to ensure they harden properly. Leaving them longer is fine and can help achieve a firmer texture.
Can I add other flavors to this recipe?
Definitely! Try adding a pinch of cinnamon, a drop of peppermint extract, or even a bit of chili powder for a spicy kick. Just add these flavorings after melting for a personalized twist.
What is the best way to remove the chocolate bars from molds?
Silicone molds work best because they flex and release the bars easily. Simply push from the bottom of each cavity, and the bars should come out cleanly without breaking.
Final Thoughts
This Irresistible Homemade Chocolate Bars Recipe is an absolute gem—quick, simple, and endlessly satisfying. Whether you’re a chocolate aficionado or a casual snack lover, making these bars at home brings a sense of joy and accomplishment that’s hard to beat. So gather your ingredients, get melting, and treat yourself and your loved ones to homemade chocolate bliss!
“`
Print
Irresistible Homemade Chocolate Bars Recipe
- Prep Time: 5 minutes
- Cook Time: 7 minutes
- Total Time: 12 minutes + 1-2 hours chilling
- Yield: 8 servings
- Category: Dessert
- Method: No-Cook
- Cuisine: International
- Diet: Gluten Free
Description
These irresistible homemade chocolate bars are a simple and delicious treat made with rich dark chocolate, coconut oil, and a hint of vanilla and sea salt. Optional nuts or dried fruits add a delightful texture and flavor. Perfect for a quick, no-bake dessert or snack, they require minimal ingredients and come together in just a few minutes.
Ingredients
Main Ingredients
- 1 cup dark chocolate chips (70% cocoa)
- 2 tbsp coconut oil
- 1 tsp pure vanilla extract
- 1/2 tsp sea salt
Optional Toppings
- 1/4 cup nuts or dried fruits (e.g., almonds, cranberries)
Instructions
- Prepare ingredients and workspace: Clear your counter space and gather all ingredients to ensure a smooth workflow.
- Melt the chocolate and coconut oil: Place the dark chocolate chips and coconut oil in a microwave-safe bowl. Microwave in 30-second intervals, stirring well between each interval until the mixture is completely melted and smooth.
- Add flavorings: Stir the pure vanilla extract and sea salt into the melted chocolate mixture to enhance the overall flavor profile of the bars.
- Pour into molds: Carefully pour the chocolate mixture into silicone molds or a lined baking tray. Tap the molds gently to release any trapped air bubbles for a smooth finish.
- Add optional toppings: If desired, sprinkle nuts or dried fruits on top of the chocolate before it sets to add texture and flavor.
- Refrigerate to set: Place the molds or tray in the refrigerator for 1 to 2 hours, or until the chocolate bars are fully set and firm.
Notes
- Use high-quality dark chocolate with at least 70% cocoa for best flavor and health benefits.
- You can substitute coconut oil with cocoa butter for a different texture and flavor.
- Feel free to customize the bars by adding other toppings such as sea salt flakes, shredded coconut, or chili flakes.
- Store the bars in an airtight container in the refrigerator to keep them fresh and prevent melting.
- Allow the bars to come to room temperature for a few minutes before eating to enjoy a softer texture.


