

If you have ever dreamed of creating something truly special in your own kitchen, this Incredibly Delicious Homemade Cheese Recipe will blow your mind. It’s charmingly simple, unbelievably fresh, and full of creamy, savory goodness that you just can’t find in store-bought cheese. Making cheese at home is not only rewarding but also lets you control every element of flavor and texture, resulting in a product that feels both artisanal and comforting. Whether you’re new to cheesemaking or looking to impress friends with a homemade delight, this recipe is your perfect starting point.

Ingredients You’ll Need
Gathering just a handful of straightforward but essential ingredients is all it takes to make this Incredibly Delicious Homemade Cheese Recipe. Each component plays a crucial role—milk provides the rich base, vinegar curdles it, butter adds silkiness, herbs bring aromatic magic, and salt sharpens the flavors.
- 1.5 liters of milk (6 1/3 cups): Use whole milk for the creamiest texture and best flavor.
- Salt, to taste: Enhances depth and balances the creaminess perfectly.
- 2 tablespoons apple cider vinegar (30 ml): The natural acid that separates milk into curds and whey, a vital step in cheesemaking.
- 50 grams melted butter (1/4 cup): Adds a luscious richness that makes every bite melt in your mouth.
- 1 tablespoon Provencal herbs (15 ml): Infuses your cheese with a fragrant, earthy Mediterranean twist that’s simply irresistible.
How to Make Incredibly Delicious Homemade Cheese Recipe
Step 1: Warm the Milk
Start by pouring 1.5 liters of milk into a large saucepan and gently heat it over medium heat. Keep a close eye as you stir occasionally, watching for tiny bubbles forming at the edges—this indicates the milk is nearly boiling. Avoid letting it boil over because it needs just enough heat to prepare for the next step.
Step 2: Add the Apple Cider Vinegar
Slowly stir in 2 tablespoons of apple cider vinegar into the hot milk. You’ll witness a magical transformation as the milk begins to curdle and separate into thick curds and clear whey. This is the moment your homemade cheese starts to take shape.
Step 3: Let the Curds Set
Remove the pan from the heat and let the mixture rest undisturbed for 10 to 15 minutes. This gives the curds time to fully form and settle, making the next step smooth and mess-free.
Step 4: Strain the Curds
Use a fine-mesh strainer or cheesecloth to carefully drain away the whey, leaving you with soft, tender curds. Don’t throw the whey away; it can be used in smoothies, baking, or even as a nutritious soup base.
Step 5: Incorporate Butter and Herbs
Transfer the curds to a mixing bowl and add the melted butter plus the Provencal herbs. Stir thoroughly to combine, letting the butter create a decadent silkiness while the herbs infuse every bite with fragrant warmth.
Step 6: Season with Salt
Salt is a key player in cheesemaking, so add it slowly to taste. Stir well and adjust until the seasoning perfectly complements the creaminess and herbaceous notes.
Step 7: Mold and Chill
Press the curds gently into a mold or small dish, smoothing the surface for a clean finish. Refrigerate for at least one hour, allowing the cheese to firm up into a delightful, sliceable texture.
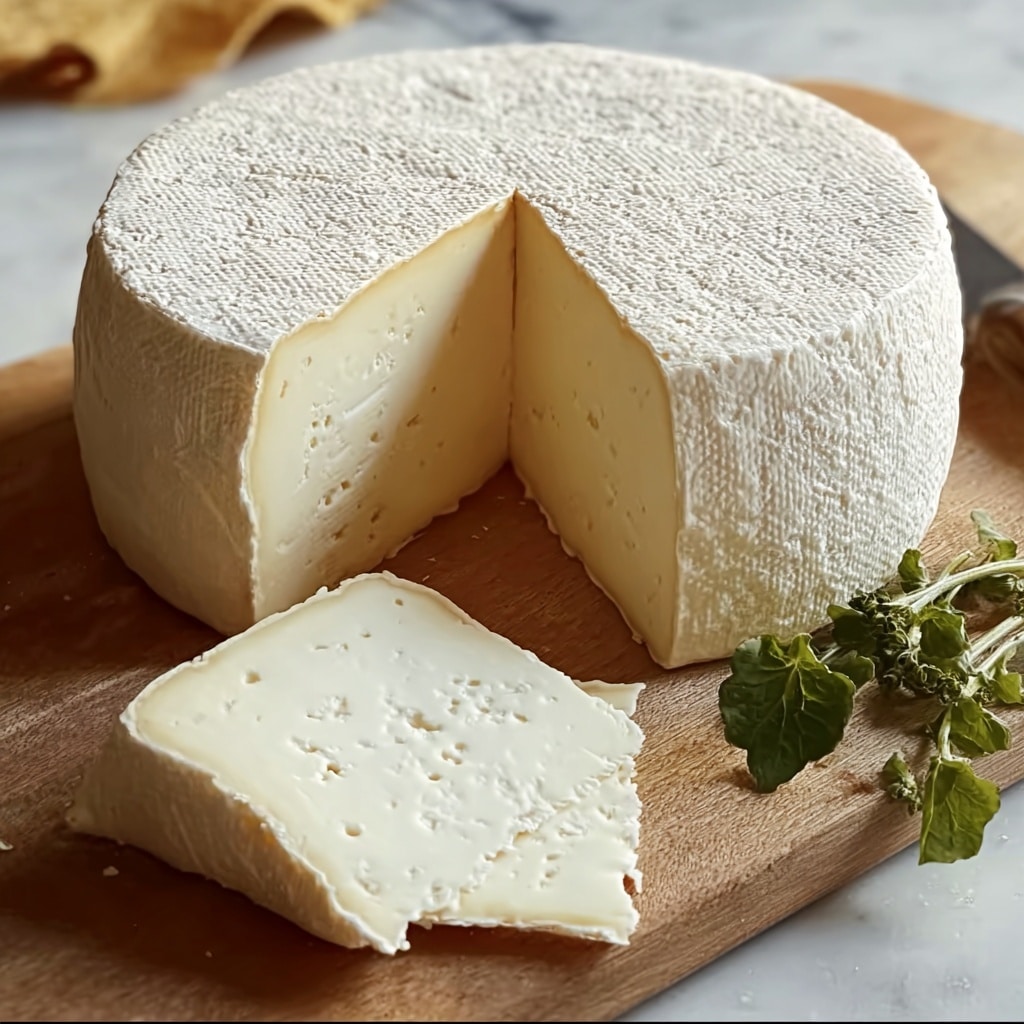
Step 8: Ready to Enjoy
Once chilled and set, your Incredibly Delicious Homemade Cheese Recipe is ready to be savored. Whether you slice it, spread it, or melt it, this cheese is sure to be a star on your table.
How to Serve Incredibly Delicious Homemade Cheese Recipe
Garnishes
Fresh garnishes like a sprinkle of cracked black pepper, a drizzle of extra virgin olive oil, or a few cherry tomatoes complement the herbal flavors beautifully. Adding a touch of warmth with fresh basil or a scattering of chopped nuts adds texture and color to your presentation.
Side Dishes
This cheese pairs wonderfully with crisp crusty bread, buttery crackers, or even roasted vegetables. A fresh green salad with tangy vinaigrette or some olives and pickled veggies can also elevate the overall experience and balance the richness.
Creative Ways to Present
Try layering your homemade cheese on a charcuterie board alongside cured meats, fruits, and honey for an impressive party platter. Or dollop it onto warm baked potatoes and scatter herbs on top for a soul-warming snack. The versatility of this cheese means you can get creative in so many fun ways.
Make Ahead and Storage
Storing Leftovers
Keep any leftover cheese covered tightly in the refrigerator. It stays fresh and flavorful for up to 5 days, making it easy to enjoy throughout the week. Store it in an airtight container or wrapped in parchment paper to maintain the best texture and aroma.
Freezing
Although fresh cheese is best enjoyed fresh, you can freeze it if needed. Wrap the cheese well in plastic wrap and place it inside a freezer bag. Note that freezing may slightly change the texture, making it a bit crumbly once thawed, but it will still retain plenty of its flavor for cooking purposes.
Reheating
If you want to soften chilled cheese or incorporate it warm into dishes, reheat gently over low heat or in the microwave in short bursts. Stir occasionally to keep it creamy and prevent overheating that can lead to separation.
FAQs
Can I use a different type of vinegar?
Yes! While apple cider vinegar is preferred for its mild flavor, white vinegar or lemon juice can also work. Just be sure to use the right amount so the milk curdles properly without tasting too sharp.
What if I don’t have Provencal herbs?
You can substitute with any dried herb blend you love, such as Italian seasoning, thyme, or rosemary. Fresh herbs can also be used but chop them finely to distribute flavor evenly.
Is this cheese suitable for vegetarians?
Absolutely! This recipe uses no animal rennet, relying solely on vinegar to curdle the milk, making it a great vegetarian-friendly option.
How long can I keep the cheese in the fridge?
Stored properly, it stays fresh for up to five days. Always check for any off odors or mold before eating leftovers and discard if unsure.
Can I double or halve the recipe?
Definitely! This recipe is very flexible. Just keep the proportions of milk, vinegar, and other ingredients balanced to ensure proper curdling and flavor.
Final Thoughts
There’s something truly magical about turning basic ingredients into a delicious homemade treasure, and this Incredibly Delicious Homemade Cheese Recipe is a shining example. It’s perfect for anyone wanting to bring a little extra love and creativity into their kitchen. So go ahead, give it a try, and watch how this fresh, flavorful cheese becomes an instant favorite in your home.
Print
Incredibly Delicious Homemade Cheese Recipe
- Prep Time: 15 minutes
- Cook Time: 15 minutes
- Total Time: 30 minutes plus chilling time
- Yield: 10 servings
- Category: Cheese
- Method: Stovetop
- Cuisine: European
- Diet: Vegetarian
Description
This incredibly delicious homemade cheese recipe is a simple and satisfying way to create fresh cheese using basic ingredients like milk, apple cider vinegar, and herbs. With easy steps involving heating, curdling, and straining, you can enjoy a creamy, flavorful cheese perfect for snacking or enhancing your favorite meals.
Ingredients
Ingredients
- 1.5 liters of milk (6 1/3 cups)
- Salt, to taste
- 2 tablespoons apple cider vinegar (30 ml)
- 50 grams melted butter (1/4 cup)
- 1 tablespoon Provencal herbs (15 ml)
Instructions
- Heat the Milk: Pour 1.5 liters of milk into a large saucepan and heat over medium heat, stirring occasionally, until the milk is just about to boil. You’ll see small bubbles form around the edges of the milk but don’t let it boil over.
- Add Vinegar to Curdle: Once the milk is heated, stir in 2 tablespoons of apple cider vinegar. Stir gently to combine. The milk will begin to curdle and separate into curds and whey.
- Let Curds Form: Remove the pan from the heat and let the mixture sit for about 10-15 minutes to allow the curds to fully form.
- Strain Curds: After the curds have formed, use a fine-mesh strainer or cheesecloth to strain the curds from the whey. You can save the whey for other uses or discard it.
- Mix in Butter and Herbs: Place the curds into a bowl and add the melted butter and Provencal herbs. Stir well to incorporate the butter and herbs evenly into the curds.
- Season with Salt: Add salt to taste, mixing thoroughly. This is the stage where you can adjust the flavor to your liking.
- Mold and Chill: Transfer the curd mixture into a mold or a small dish and smooth out the top. Refrigerate for at least 1 hour to allow the cheese to firm up.
- Serve: Once the cheese is chilled and firm, it’s ready to be served. Enjoy it on crackers, bread, or as part of your favorite dishes!
Notes
- Be careful not to let the milk boil over to avoid scorching.
- You can save the whey for smoothies, soups, or baking recipes to reduce waste.
- Adjust the amount of Provencal herbs or salt according to your preference.
- Use fresh milk for the best texture and flavor.
- Chilling time can be extended to make the cheese firmer.


