
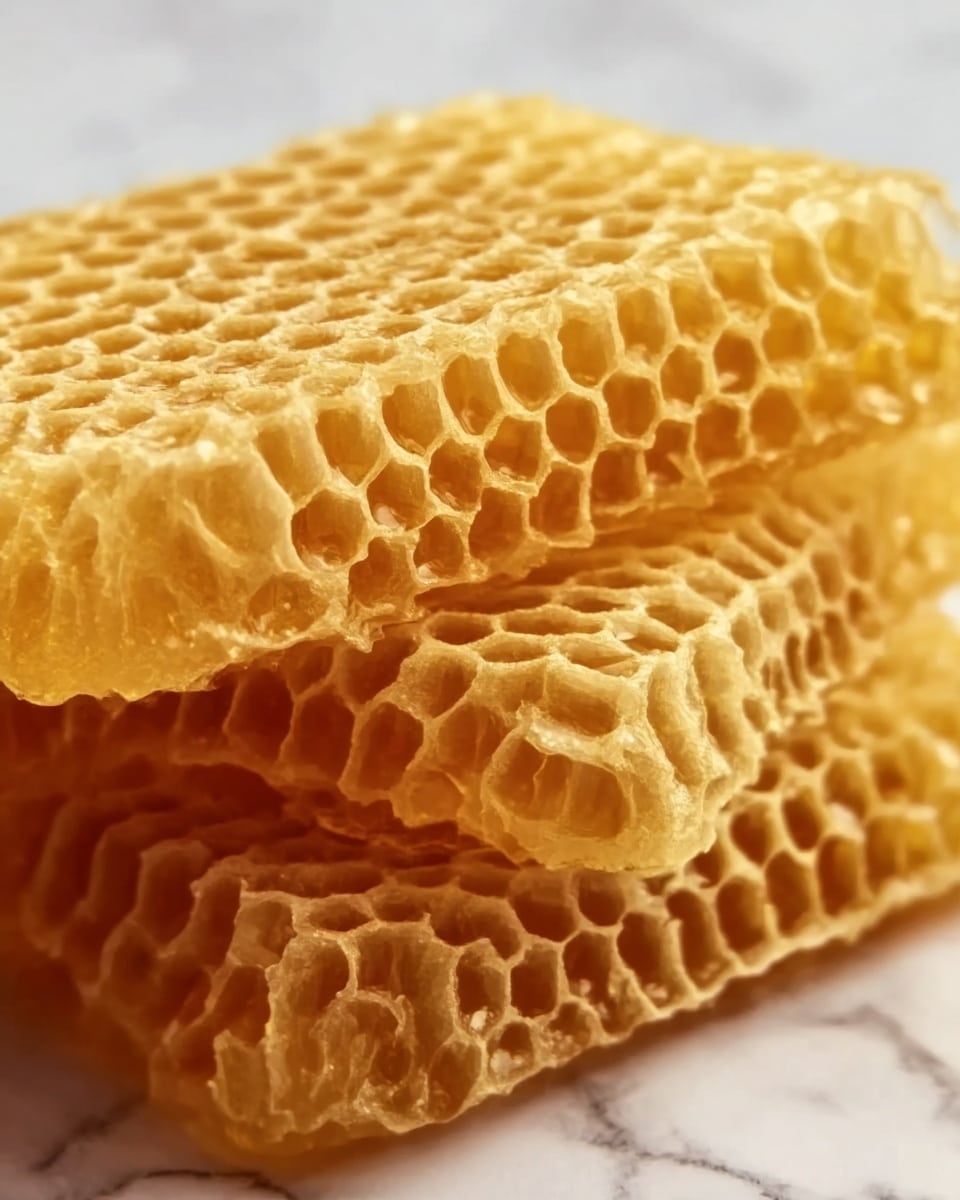
If you’ve ever craved a sweet treat that’s delightfully crunchy, airy, and simply irresistible, then this Honeycomb Candy Recipe is your new best friend in the kitchen. It combines the perfect crunch with a light, golden hue and a touch of sweetness that melts on your tongue, making it hard to stop at just one piece. Whether you’re sharing it at a party or sneaking a bite whenever you need a pick-me-up, this homemade honeycomb candy has a magic all its own.

Ingredients You’ll Need
Creating the perfect honeycomb candy starts with a handful of straightforward, pantry-friendly ingredients. Each one plays an essential role, from the sweetness and color to that famous bubbly texture.
- Granulated sugar: The foundation of your candy’s sweetness and structure, make sure to use pure white sugar for the best results.
- Light corn syrup or golden syrup: Adds smoothness to prevent crystallization and lends a subtle richness to the flavor.
- Honey (optional): A small touch of honey deepens the aroma and layers in a natural floral sweetness that enhances the candy’s complexity.
- Water: Helps dissolve the sugar mixture evenly and controls the consistency as it cooks.
- Baking soda (sifted): The secret to creating those signature airy bubbles and that irresistible light texture.
- Melted chocolate (optional): For dipping, if you want to add a decadent twist to your honeycomb candy.
How to Make Honeycomb Candy Recipe
Step 1: Prep Your Equipment
Before starting, line an 8×8-inch baking pan with parchment paper and lightly grease it so your candy won’t stick. Have your sifted baking soda measured and ready to go — timing is everything when making honeycomb candy, and things will move fast at the foaming stage.
Step 2: Cook the Sugar Mixture
In a deep, heavy-bottomed saucepan, combine granulated sugar, corn syrup (or golden syrup), honey if you’re using it, and water. Stir gently over medium heat until the sugar dissolves completely. This stage sets the foundation for a smooth, well-textured honeycomb, so patience here pays off big time.
Step 3: Boil Without Stirring
Once the sugar has dissolved, stop stirring. Let the mixture come to a boil and cook until it reaches 300°F, also called the hard crack stage, which usually takes 5 to 8 minutes. You’ll watch the color shift to a gorgeous light amber—this is where the depth of flavor develops and your candy really starts to shine.
Step 4: Add the Baking Soda
Remove the pan from heat immediately, then whisk in the sifted baking soda quickly but gently. The mixture will foam up energetically, creating those famous honeycomb bubbles. Pour it straight into the prepared pan without spreading it around; letting it settle naturally keeps the airy texture intact.
Step 5: Cool Completely
Allow your honeycomb candy to cool and harden at room temperature for about an hour. This slow cooling lets it develop the perfect delicate crunch. Once set, simply break it into rustic, golden pieces — each one is a little treasure of sweet, bubbly delight.
Step 6: Optional Chocolate Dip
If you want to turn your honeycomb candy into a show-stopper, dip pieces in melted chocolate and let them set on parchment paper. This adds a glossy, rich layer that contrasts beautifully with the brittle candy. It’s a little extra effort for a seriously impressive treat.
How to Serve Honeycomb Candy Recipe

Garnishes
Honeycomb candy is stunning on its own, but you can sprinkle crushed sea salt over chocolate-dipped pieces to highlight the sweetness and add a bit of crunch. A dusting of cocoa powder or a drizzle of dark chocolate also makes for an elegant presentation that’s perfect for gifting or special occasions.
Side Dishes
This candy pairs wonderfully with a scoop of vanilla ice cream, adding sweet crunch to creamy textures. It also makes a festive topping for cakes or cupcakes, lending both flavor and visual appeal. Serving it alongside coffee or tea adds a lovely sweet contrast to the warm beverage.
Creative Ways to Present
Try layering honeycomb candy pieces in clear glass jars tied with twine for charming homemade gifts. Use them as edible decorations on dessert platters, or break chunks into crushed crumbs and sprinkle over yogurt or pudding for texture and sweetness. Their golden glow adds instant appetite-appeal wherever they go.
Make Ahead and Storage
Storing Leftovers
Honeycomb candy loves a dry environment, so store leftovers in an airtight container at room temperature. This will keep the candy crisp and prevent it from absorbing moisture that could make it sticky or soggy.
Freezing
Freezing honeycomb candy is not recommended because the moisture in the freezer can cause it to lose its crunch. It’s best enjoyed fresh or stored in a sealed container at room temperature for up to two weeks.
Reheating
This honeycomb candy is best eaten as is — reheating will cause it to melt or lose its delicate texture. If you want to soften it slightly for use in other recipes, warm it gently and briefly, but expect that it won’t retain the original crispiness.
FAQs
What makes honeycomb candy bubbly?
The magic comes from the reaction between baking soda and the hot sugar syrup. When baking soda is added, it releases carbon dioxide bubbles, which get trapped in the cooling candy, creating the airy texture.
Can I use regular syrup instead of corn syrup?
Golden syrup is a great substitute for corn syrup and adds a lovely depth of flavor. Avoid using regular syrups like maple or simple syrup, as these can alter the flavor and texture unpredictably.
Why is my honeycomb candy sticky?
Humidity is usually the culprit. Honeycomb candy is highly sensitive to moisture, so be sure to store it in an airtight container away from heat and humidity to keep it crisp and dry.
Can I use baking powder instead of baking soda?
Baking powder is not recommended because it contains acids that can affect the candy’s flavor and texture. Baking soda is key to creating the light, aerated structure of honeycomb candy.
How do I know when to add the baking soda?
Once your sugar mixture reaches 300°F and turns a light amber, remove it from the heat immediately and whisk in the sifted baking soda quickly. Timing is crucial because adding it too early or too late can change the texture dramatically.
Final Thoughts
There’s something truly special about making your own honeycomb candy recipe at home — the way it fills the kitchen with a warm, sweet aroma and the satisfaction of breaking off those crunchy golden pieces to enjoy. It’s simple, yet impressive, and once you make it, I guarantee it’ll become a beloved treat to share with friends and family whenever you want to add a little sparkle to your day.
Print
Honeycomb Candy Recipe
- Prep Time: 5 minutes
- Cook Time: 10 minutes
- Total Time: 15 minutes
- Yield: 20 servings
- Category: Candy
- Method: Stovetop
- Cuisine: British
Description
This classic Honeycomb Candy recipe creates a light, airy, and crunchy treat with a delightful caramel flavor and bubbly texture. Made by boiling sugar and syrup to the hard crack stage, then adding baking soda to create the characteristic foam, this candy is perfect for snacking or dipping in chocolate for extra indulgence.
Ingredients
Honeycomb Candy
- 1 cup granulated sugar
- 1/4 cup light corn syrup or golden syrup
- 2 tablespoons honey (optional for flavor)
- 1/4 cup water
- 2 teaspoons baking soda (sifted)
Optional
- Melted chocolate for dipping
Instructions
- Prep your equipment: Line an 8×8-inch baking pan with parchment paper and lightly grease it. Measure out the baking soda and have it ready since timing is crucial for the candy’s texture.
- Cook the sugar mixture: In a deep, heavy-bottomed saucepan, combine granulated sugar, corn syrup (or golden syrup), optional honey, and water. Stir over medium heat until the sugar dissolves completely.
- Boil without stirring: Stop stirring once the sugar is dissolved and let the mixture come to a boil. Cook until it reaches 300°F (hard crack stage) on a candy thermometer, about 5 to 8 minutes, achieving a light amber color.
- Add the baking soda: Remove the pan from heat and quickly whisk in the sifted baking soda. The mixture will foam up rapidly; immediately pour it into the prepared pan without spreading it out to preserve the bubbles.
- Cool completely: Allow the candy to cool and harden at room temperature for about 1 hour. Once set, break the honeycomb into pieces.
- Optional chocolate dip: For an extra decadent treat, dip the honeycomb pieces into melted chocolate and place them on parchment paper to set.
Notes
- Use a candy thermometer to ensure the sugar mixture reaches the hard crack stage for perfect texture.
- Do not stir the sugar mixture once boiling to prevent crystallization.
- Work quickly after adding baking soda to capture the airy foam before it settles.
- Store honeycomb candy in an airtight container to keep it crisp.
- Honey is optional but adds a richer flavor to the candy.


