

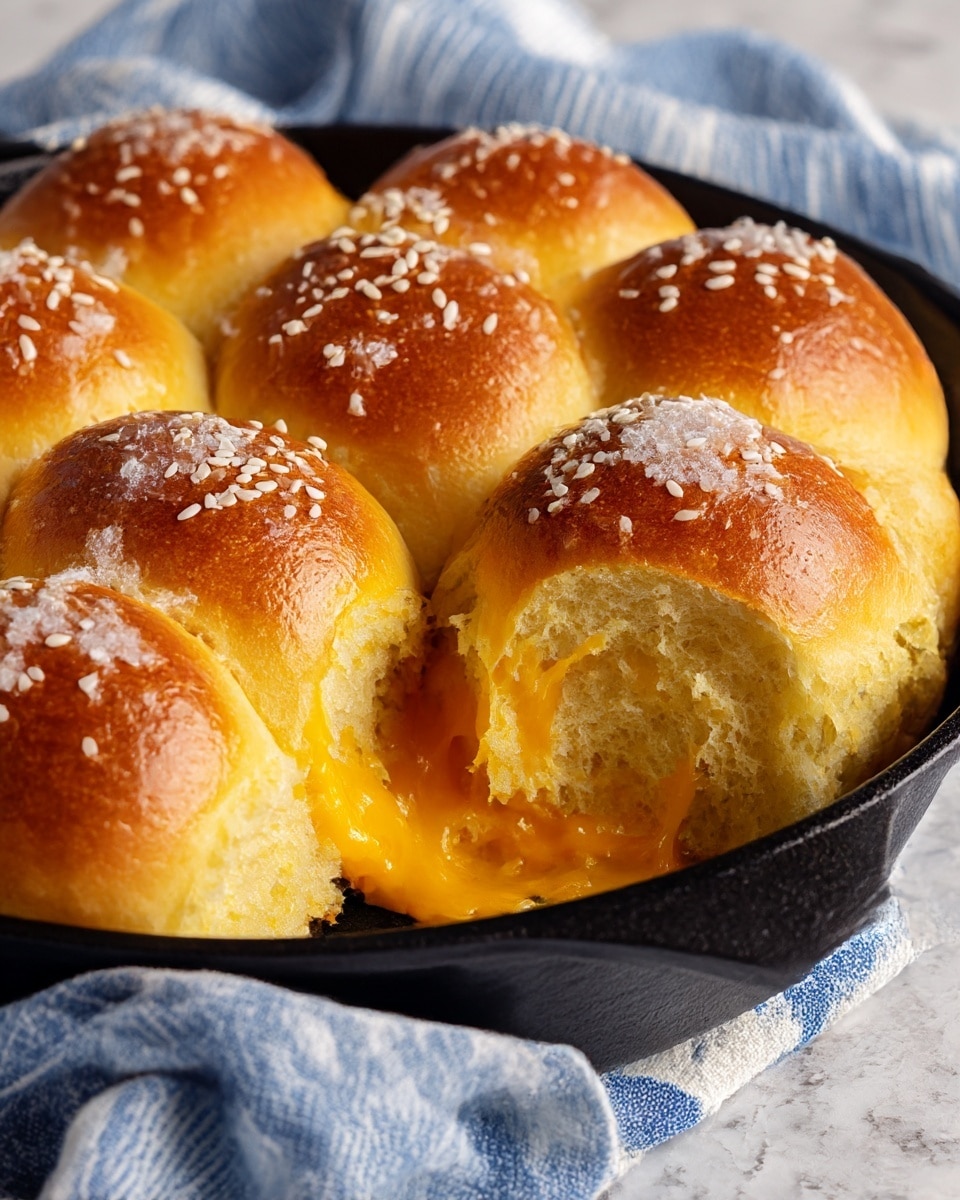
There is something wonderfully comforting about homemade bread, and these soft, fluffy Honey-Squash Dinner Rolls are no exception. The blend of sweet honey and creamy winter squash lends a subtle richness and natural moisture that makes these rolls perfect for any dinner table. Whether you’re serving a holiday feast, a cozy family meal, or just looking to elevate your everyday bread, this Honey-Squash Dinner Rolls Recipe promises a golden crust, tender crumb, and delightful aroma that will fill your kitchen with warmth and joy. Trust me, once you try these rolls, they’ll quickly become a crowd favorite.

Ingredients You’ll Need
This recipe uses simple, wholesome ingredients that work together to create tender rolls bursting with flavor and moisture. Every component, from the yeast that lifts the dough to the nutmeg that adds a delicate hint of spice, plays an essential role in the texture and taste of these rolls.
- Active dry yeast: The rising agent that gives your rolls their soft, airy texture.
- Salt: Balances flavor and enhances the sweetness of the honey and squash.
- Ground nutmeg: Adds a lovely warm spice that complements the squash beautifully.
- All-purpose flour: Forms the base of your dough; use fresh for best results.
- 2% milk: Provides moisture and enriches the dough for tender rolls.
- Butter, cubed: Adds richness and a buttery flavor that melts in your mouth.
- Honey: Sweetens naturally and enhances the golden hue of the rolls.
- Frozen mashed winter squash, thawed: Keeps the dough moist and adds subtle sweetness and color.
- Large egg, lightly beaten: Used to brush on top for a shiny, inviting finish.
- Poppy seeds, salted pumpkin seeds or pepitas, sesame seeds: Optional toppings that add crunch and visual appeal.
How to Make Honey-Squash Dinner Rolls Recipe
Step 1: Prepare the Dry Mixture
Start by combining the active dry yeast, salt, ground nutmeg, and half of the flour (about 3 cups) in a large bowl. Mixing these ingredients well at this stage ensures the flavors are evenly distributed, giving each roll a consistent taste and texture once baked.
Step 2: Heat the Wet Ingredients
In a small saucepan, gently warm the milk, butter, and honey until the mixture reaches between 120° and 130°F. It’s crucial that the mixture is warm but not hot to activate the yeast properly without killing it, setting the stage for a perfect rise.
Step 3: Mix the Dough
Pour the warm milk mixture into the bowl with the dry ingredients and beat on medium speed for 2 minutes to combine everything thoroughly. Then add the thawed mashed winter squash and increase the beating speed to high for another 2 minutes. Gradually stir in more flour until the dough forms a soft, slightly sticky ball. This mix of ingredients creates that tender crumb and subtle sweetness that makes these rolls unforgettable.
Step 4: Knead the Dough
Turn the dough onto a floured surface and knead until smooth and elastic, about 6 to 8 minutes. Kneading develops the gluten, which is key to creating the light, fluffy texture that you want in dinner rolls.
Step 5: First Rise
Place the kneaded dough in a greased bowl, turning it once so the top is coated in oil. Cover the bowl and let the dough rise in a warm spot until doubled in size, approximately 1 hour. This step allows the yeast to work its magic, making the dough airy and ready to shape.
Step 6: Shape the Rolls
After the first rise, punch down the dough gently to release the trapped air. Turn it out onto a lightly floured surface and divide into 24 equal portions. Shape each piece into a smooth ball and place them evenly spaced in two greased 9-inch cast-iron skillets or round pans. The shaping is what gives the rolls their perfect form and delicate crumb.
Step 7: Second Rise
Cover the rolls with a kitchen towel and let them rise again in a warm area until doubled, about 45 minutes. This final rise is crucial for achieving that soft, fluffy interior and golden exterior.
Step 8: Preheat Oven and Prepare Topping
Preheat your oven to 375°F. Before baking, brush the tops of the rolls with the lightly beaten egg to get that gorgeous glossy finish. Sprinkle liberally with your choice of poppy seeds, salted pumpkin seeds or pepitas, and sesame seeds. These toppings add a delightful contrast in texture and a beautiful visual touch.
Step 9: Bake the Rolls
Bake the rolls for 20 to 25 minutes until deep golden brown. Keep an eye on them toward the end of baking—you might need to tent them with foil in the last few minutes to prevent overbrowning. The aroma at this point is absolutely irresistible!
Step 10: Cool and Serve
Remove the rolls from the pans and transfer them to wire racks to cool slightly. They are best enjoyed warm when the crumb is tender and the butter in the dough is still melty. These rolls stay soft even as they cool, making them a perfect addition to your mealtime spread.
How to Serve Honey-Squash Dinner Rolls Recipe
Garnishes
Sprinkling seeds like poppy, sesame, or pepitas not only adds a lovely crunch but also boosts the visual appeal of your rolls. You can also brush a little melted honey or butter on top right as they come out of the oven to add a sweet, shiny finish that will have everyone reaching for seconds.
Side Dishes
These rolls are wonderful alongside hearty soups, creamy stews, or roasted meats. The subtle sweetness of the squash and honey pairs especially well with savory dishes, balancing flavors beautifully and adding a touch of homely comfort to any plate.
Creative Ways to Present
Try placing the rolls in a rustic basket lined with a linen napkin for a charming presentation. For holiday meals, you can arrange them in a circular pattern on a serving platter for a festive look. Alternatively, split them open and fill with a pat of herbed butter or a slice of cheese for a quick and delicious snack.
Make Ahead and Storage
Storing Leftovers
Once completely cooled, store your leftover Honey-Squash Dinner Rolls in an airtight container or resealable plastic bag at room temperature. They will stay soft and fresh for up to 2 days, making it easy to enjoy them the next day without losing any of their charm.
Freezing
If you want to keep these rolls longer, freezing is a great option. Wrap each roll tightly in plastic wrap, then place them in a freezer-safe bag. They freeze beautifully for up to 3 months without any loss of flavor or texture.
Reheating
To bring your rolls back to life, thaw them at room temperature and warm briefly in a 350°F oven for 5 to 10 minutes. You can also microwave a roll wrapped in a damp paper towel for about 20 seconds for a quick, soft treat that tastes like freshly baked.
FAQs
Can I substitute fresh squash for the frozen mashed winter squash?
Absolutely! You can roast and mash fresh winter squash such as butternut or acorn squash. Just be sure it’s well mashed and cooled before adding to the dough to maintain the right texture and moisture level.
Do I need to use all the flour stated in the recipe?
The amount of flour can vary depending on humidity and other factors, so start with the minimum amount and add more gradually until the dough reaches the right soft but manageable consistency. Too much flour can make the rolls dense, so be careful not to overdo it.
Is there a way to make these rolls gluten-free?
While this recipe relies on gluten development for its texture, you can experiment with a gluten-free flour blend designed for yeast breads. Keep in mind that texture and rise might differ, so adjust expectations accordingly.
Can I use a different type of sweetener instead of honey?
Yes, you can substitute maple syrup or agave nectar if you prefer, but honey gives these rolls their signature flavor and color, so it’s worth using if you can.
How do I know if the yeast is still active?
To test your yeast, dissolve it in warm water with a little sugar and wait 5 to 10 minutes. If it becomes frothy and bubbly, the yeast is active and ready to use. If not, it’s best to get fresh yeast for the best rise.
Final Thoughts
Making the Honey-Squash Dinner Rolls Recipe is such a rewarding experience, and the results speak for themselves. With their tender crumb, warm spice hints, and golden crust, these rolls will become a favorite for any occasion. So go ahead, bake a batch, and share the joy of homemade bread with everyone around your table—you’ll be so glad you did!
Print
Honey-Squash Dinner Rolls Recipe
- Prep Time: 25 minutes
- Cook Time: 25 minutes
- Total Time: 1 hour 50 minutes
- Yield: 24 rolls
- Category: Bread
- Method: Baking
- Cuisine: American
Description
These Honey-Squash Dinner Rolls combine the natural sweetness of honey and mashed winter squash with a soft, tender crumb. Perfectly soft and slightly sweet, these rolls are topped with a mix of seeds for added texture and flavor. They make an ideal accompaniment for dinner or a delightful snack on their own.
Ingredients
Dry Ingredients
- 2 packages (1/4 ounce each) active dry yeast
- 2 teaspoons salt
- 1/4 teaspoon ground nutmeg
- 6 to 6-1/2 cups all-purpose flour
Wet Ingredients
- 1–1/4 cups 2% milk
- 1/2 cup butter, cubed
- 1/2 cup honey
- 1 package (12 ounces) frozen mashed winter squash, thawed (about 1–1/3 cups)
- 1 large egg, lightly beaten
Toppings
- Poppy seeds, salted pumpkin seeds or pepitas, and sesame seeds (as desired)
Instructions
- Prepare Dry Mixture: In a large bowl, combine the active dry yeast, salt, ground nutmeg, and 3 cups of all-purpose flour. Mix well to evenly distribute the ingredients.
- Heat Wet Ingredients: In a small saucepan, heat the 2% milk, cubed butter, and honey until the mixture reaches 120°-130°F, warm but not hot, to activate the yeast without killing it.
- Mix Dough: Pour the warm milk mixture into the dry ingredients. Beat on medium speed for 2 minutes to combine. Add the thawed mashed winter squash and beat on high speed for an additional 2 minutes. Gradually stir in enough of the remaining flour to form a soft, sticky dough.
- Knead Dough: Turn the dough onto a floured surface and knead until smooth and elastic, about 6 to 8 minutes, developing the gluten structure for a good rise.
- First Rise: Place the kneaded dough into a greased bowl, turning once to grease the top. Cover and let rise in a warm place until doubled in size, approximately 1 hour.
- Shape Rolls: Punch down the dough to release air. On a lightly floured surface, divide dough into 24 equal pieces. Shape each into a ball and arrange evenly between two greased 9-inch cast-iron skillets or round baking pans.
- Second Rise: Cover the dough balls with kitchen towels and let rise until doubled, about 45 minutes.
- Preheat Oven and Prepare Topping: Preheat the oven to 375°F. Brush tops of the risen rolls with lightly beaten egg and sprinkle generously with your choice of poppy seeds, salted pumpkin seeds or pepitas, and sesame seeds.
- Bake Rolls: Bake the rolls for 20 to 25 minutes until dark golden brown. If they start to overbrown during the last 5 to 7 minutes, cover loosely with foil to prevent burning.
- Cool and Serve: Remove rolls from pans and transfer to wire racks to cool slightly. Serve warm for best flavor and texture.
Notes
- Use a thermometer to ensure the milk mixture is between 120°-130°F to properly activate the yeast.
- If rolls brown too quickly in the oven, cover with foil to avoid burning.
- Rolls can be stored in an airtight container for up to 3 days or frozen for longer storage.
- Additional flavor variations can be achieved by adding cinnamon or pumpkin pie spice with the dry ingredients.
- Make sure the mashed winter squash is fully thawed and drained of excess moisture to avoid overly wet dough.


