

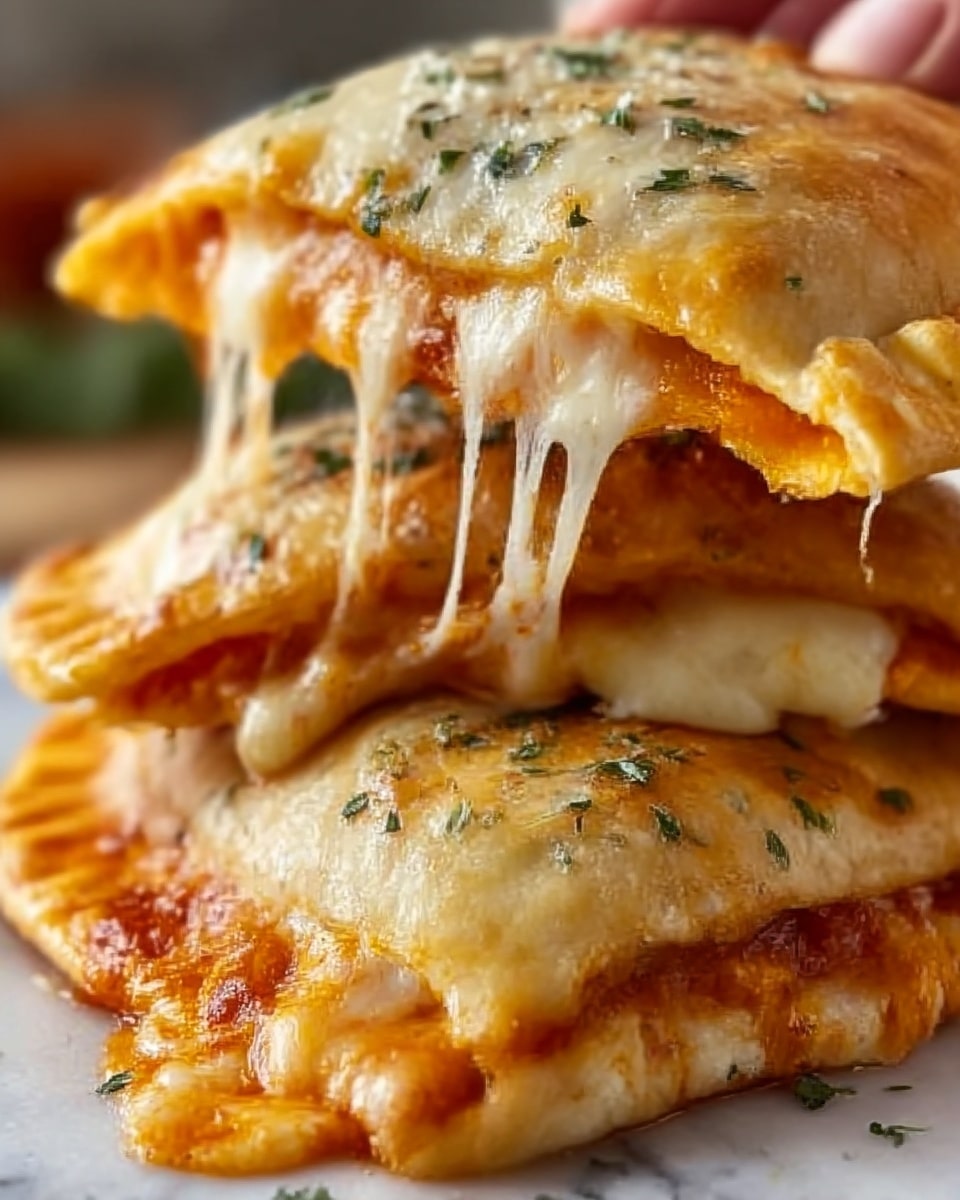
If you’ve ever wished for a quick, satisfying, and handheld meal that feels like a warm hug, then these Homemade Pizza Pockets: A Delightful Quick Meal or Snack Recipe is exactly what you need. Imagine biting into a golden crust, bursting with melty cheese, savory pepperoni, or even a vibrant broccoli and cheddar filling. These pizza pockets combine simplicity, flavor, and convenience all in one package, making them perfect for a cozy dinner, a fun snack, or even a party treat that everyone will rave about. Trust me, once you try these, they’ll become your go-to comfort food whenever hunger strikes.

Ingredients You’ll Need
Gathering the right ingredients is the first step to nailing this recipe. Each component brings a unique flavor, a comforting texture, or a pop of color to the final dish, ensuring every bite is just right.
- Classic pizza crust: Using refrigerated dough saves time and creates a soft yet crispy base.
- Pizza sauce: Adds tangy richness and keeps the filling moist.
- Mozzarella cheese: Provides that irresistible gooey, stretchy texture.
- Pepperoni slices: Classic, spicy, and perfectly salty, these pack a punch.
- Black olives: Add a briny depth and a lovely contrast in color.
- Sharp cheddar cheese: Brings a bold, tangy flavor for the veggie variation.
- Olive oil: Used for brushing, it helps the crust turn beautifully golden and fragrant.
- Italian seasoning: A blend of herbs that infuses the pockets with that classic Italian aroma.
- Broccoli: Adds freshness, a bit of crunch, and balances the rich cheese beautifully.
How to Make Homemade Pizza Pockets: A Delightful Quick Meal or Snack Recipe
Step 1: Prepare Your Oven and Baking Surfaces
Start by preheating your oven to 375°F (190°C) ensuring it’s nice and hot for baking. Set your racks to the middle for even heat distribution, then grease two baking trays or line them with parchment paper to prevent sticking and make cleanup effortless.
Step 2: Shape the Pizza Dough
On a lightly floured surface, divide your pizza dough into two equal halves. Roll each half gently into a round circle about 6 to 8 inches in diameter. This size is just perfect for a single serving pizza pocket. Transfer these dough rounds onto your prepared baking trays to make filling and folding easy.
Step 3: Layer the Classic Pizza Filling
Spread a generous 1/2 cup of pizza sauce over one half of each dough circle as your base layer. This ensures your pockets stay juicy and flavorful without becoming soggy. Top the sauce with the shredded mozzarella, pepperoni slices, and a few drained black olives to create that classic pizza magic.
Step 4: Seal the Classic Pockets
Fold your dough carefully over the filling to create a pocket, and press the edges firmly with your fingers or a fork to seal them tight. Don’t forget to cut small slits on the top of each pocket; this allows steam to escape and prevents soggy filling.
Step 5: Prepare the Broccoli and Cheddar Filling
In a bowl, toss finely chopped broccoli with sharp cheddar and a little mozzarella for extra cheese pull. This combination offers a delicious veggie twist, balancing creaminess and freshness with every mouthful.
Step 6: Fill and Seal the Broccoli Pockets
Repeat the filling and folding process with the broccoli mix on the remaining dough halves. Make sure to seal the edges securely and cut slits for steam release. These pockets will delight anyone looking for a tasty veggie-packed option.
Step 7: Add Oil and Italian Seasoning
Brush the tops of all your pockets with olive oil to achieve a golden-brown crust during baking. Sprinkle a generous amount of Italian seasoning over them to infuse an authentic, herbaceous flavor that makes these pockets truly mouthwatering.
Step 8: Bake to Perfection
Place both trays in the oven and bake for about 25 to 30 minutes. To ensure even browning, swap the trays halfway through. When the crusts are crispy and golden, and the cheese is bubbling inside, your pizza pockets are ready.
Step 9: Cool and Serve
Let the pockets cool for a few minutes to prevent burning your tongue and to allow the filling to set slightly. Then get ready to enjoy your satisfying, warm, and bursting-with-flavor homemade pockets!
How to Serve Homemade Pizza Pockets: A Delightful Quick Meal or Snack Recipe
Garnishes
Fresh garnishes can elevate your pizza pockets from delicious to absolutely irresistible. Try sprinkling some freshly chopped basil or parsley on top for a pop of green freshness and a hint of herbal aroma. A light dusting of Parmesan or a drizzle of balsamic glaze adds a sophisticated twist as well.
Side Dishes
Complement your pizza pockets with sides that balance and enhance the flavors. A crisp green salad with lemon vinaigrette brings a refreshing contrast, while a bowl of tomato soup makes for cozy dipping that both kids and adults adore. Roasted vegetables or a simple garlic breadstick also pair beautifully.
Creative Ways to Present
Serving pizza pockets at a party? Arrange them on a large wooden board along with bowls of marinara, ranch, or pesto dips for guests to enjoy. You can slice them into smaller bite-sized portions for appetizers or lunchbox treats. Wrapping them individually in parchment paper makes for charming gift-like servings, perfect for picnics or grab-and-go snacks.
Make Ahead and Storage
Storing Leftovers
Once cooled, leftover pizza pockets can be stored in an airtight container in the refrigerator for up to 3 days. Reheating maintains their deliciousness and convenience, so you always have a ready meal within reach.
Freezing
If you want to keep these tasty pockets for longer, wrap each one tightly in plastic wrap and then place them in a freezer-safe bag or container. Frozen pizza pockets can last up to 2 months without losing flavor or texture, making them perfect for future busy days or unexpected guests.
Reheating
For best results, reheat your pizza pockets in a preheated oven at 350°F (175°C) for about 10 to 15 minutes until heated through and the crust regains its crispness. Avoid microwaving if possible, as that can lead to a soggy crust, robbing you of the delightful texture that makes this recipe so special.
FAQs
Can I use homemade pizza dough instead of refrigerated dough?
Absolutely! Homemade dough will add a personalized touch and can be customized which makes your pizza pockets even more special. Just be sure to roll it out to the same size for even baking.
What other fillings can I try for these pizza pockets?
The possibilities are endless! Try cooked sausage and bell peppers, spinach and feta, or even barbecue chicken and red onions to customize the pockets to your favorite flavors.
How do I prevent the pockets from getting soggy?
Sealing the edges tightly and cutting slits on top allows steam to escape, keeping the crust crisp. Also, don’t overload the filling with sauce that might make them too wet.
Can I freeze the dough before assembling the pockets?
Yes, you can freeze dough before use. Just thaw it completely in the fridge and bring it to room temperature before rolling and filling to ensure it’s pliable.
What’s the best way to make these pockets kid-friendly?
Stick to classic fillings like cheese and pepperoni, and involve the kids in assembling. Smaller pockets or bite-sized versions are also great for little hands and lunchboxes.
Final Thoughts
Making Homemade Pizza Pockets: A Delightful Quick Meal or Snack Recipe is an absolute joy and guarantees a warm, comforting bite every time. Whether you’re feeding the family on a busy weeknight or looking for a fantastic snack to share with friends, these pockets deliver flavor, fun, and convenience all rolled into one. Give them a try—you might just discover your new favorite homemade treat!
Print
Homemade Pizza Pockets: A Delightful Quick Meal or Snack Recipe
- Prep Time: 15 minutes
- Cook Time: 30 minutes
- Total Time: 45 minutes
- Yield: 4 pizza pockets (2 classic, 2 broccoli & cheddar)
- Category: Baking
- Method: Baking
- Cuisine: Italian-American
Description
These Homemade Pizza Pockets are a delightful and convenient meal or snack option, featuring classic Italian calzone recipes with two delicious variations: Classic Pizza Calzone with pepperoni and olives, and a Broccoli & Cheddar Calzone for a veggie-rich alternative. Perfectly baked to golden brown perfection, these pockets are crispy on the outside and bursting with flavorful fillings inside.
Ingredients
For Classic Pizza Calzone:
- 1 refrigerated classic pizza crust
- 1/2 cup pizza sauce
- 1 cup shredded mozzarella cheese
- 2 oz pepperoni slices
- 4 oz can sliced black olives, drained
For Broccoli & Cheddar Calzone:
- 1 refrigerated classic pizza crust
- 3/4 cup shredded sharp cheddar cheese
- 1/4 cup shredded mozzarella cheese
- 3 tbsp olive oil
- 1 tbsp Italian seasoning
- 1 1/2 cups finely chopped broccoli (from a 12 oz frozen bag, thawed)
Instructions
- Preheat Oven: Preheat your oven to 375°F (190°C) and position the racks in the middle. Grease two baking trays or line them with parchment paper to prevent sticking.
- Prepare Dough: On a lightly floured surface, divide the pizza dough into two halves. Roll each half into a circle about 6-8 inches in diameter and transfer these dough circles to the baking trays.
- Spread Sauce: Spread pizza sauce on one half of each dough circle, preparing the base for the classic calzone.
- Add Classic Calzone Fillings: Top the sauced side with shredded mozzarella cheese, pepperoni slices, and drained black olives to build flavor layers.
- Seal Classic Calzone: Fold the dough over the filling to form a pocket. Press edges together using your fingers or a fork to seal and cut small slits on top to allow steam release during baking.
- Brush & Season Classic Calzone: Brush the sealed dough with olive oil and sprinkle Italian seasoning evenly for enhanced flavor and a golden crust.
- Mix Broccoli Filling: In a bowl, combine finely chopped broccoli with shredded sharp cheddar and mozzarella cheese to prepare the second calzone filling.
- Assemble Broccoli & Cheddar Calzone: Spoon the broccoli-cheese mixture onto one half of the second dough circle, then fold and seal as before. Cut slits on top for steam.
- Bake Calzones: Place both calzones in the preheated oven and bake for 25-30 minutes, swapping trays halfway through to ensure even cooking, until crusts turn golden brown and crispy.
- Cool & Serve: Allow the calzones to cool slightly before serving so the filling sets and avoids burns.
Notes
- Using refrigerated pizza crust speeds up preparation but fresh dough can be substituted if preferred.
- Make sure to cut slits on the calzone tops to prevent steam buildup which can cause bursting in the oven.
- Feel free to customize fillings with your favorite ingredients like mushrooms, bell peppers, or different cheeses.
- Let calzones rest for a few minutes after baking to allow fillings to settle for better eating experience.
- Serve with extra pizza sauce or marinara for dipping.


