

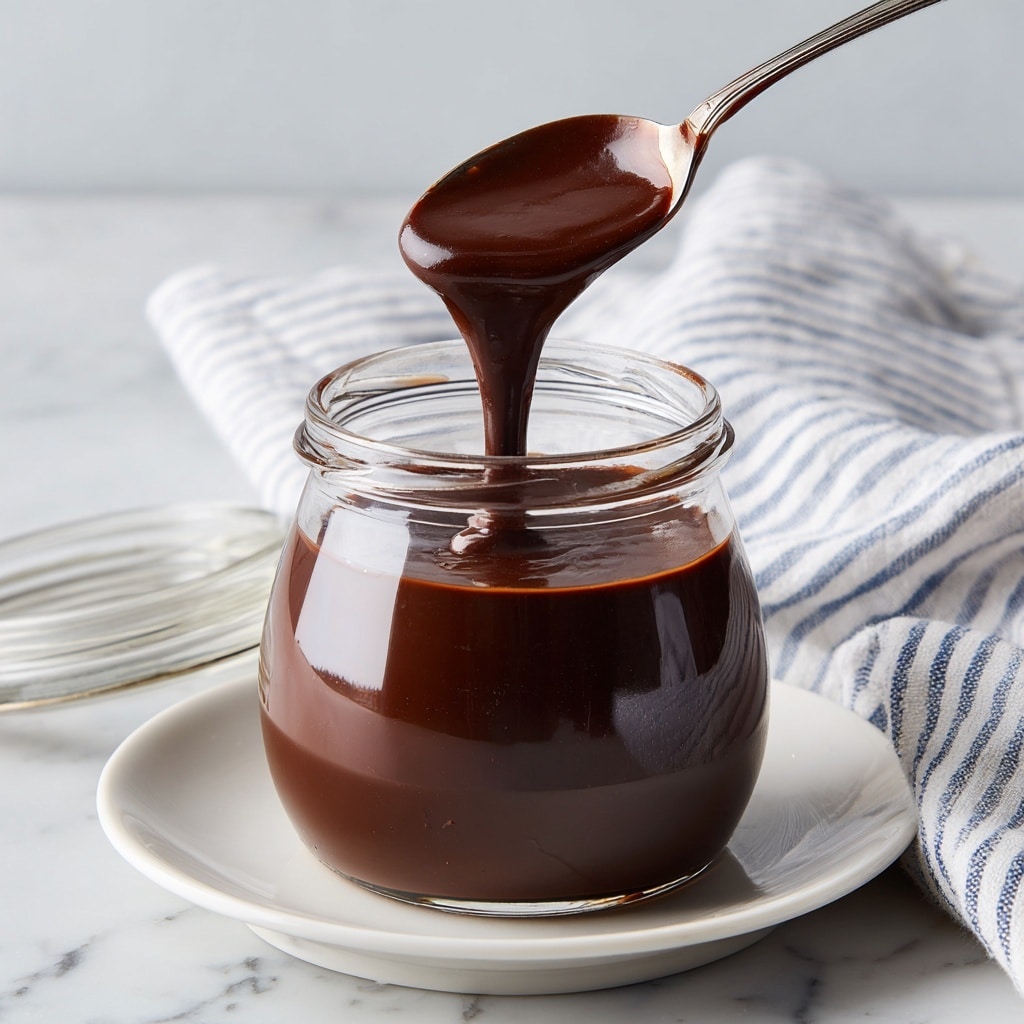
If you’ve ever wished for a rich, silky chocolate drizzle that’s free from preservatives and tailor-made to your taste, this Homemade Chocolate Syrup Recipe is going to be your new best friend in the kitchen. With just a handful of pantry staples, you can whip up a luscious, versatile syrup that’s perfect for elevating everything from your morning coffee to a scoop of vanilla ice cream. There’s something so satisfying about knowing exactly what goes into your chocolate syrup, and trust me, once you make this recipe, store-bought versions won’t ever cut it again.

Ingredients You’ll Need
Every ingredient here plays a starring role, making this homemade syrup not only delicious but perfectly balanced in flavor and texture. You’ll find that simplicity in these few essentials creates a complex, satisfying chocolate experience.
- 1 cup granulated sugar: The sweet foundation that picks up the cocoa’s richness and helps create a syrupy texture.
- 1 cup unsweetened cocoa powder: Pure, deep chocolate flavor without any added sugar; choose a high-quality cocoa for the best taste.
- 1 cup water: Goes beyond just thinning the mixture—helps dissolve sugar and cocoa, creating that perfect syrup consistency.
- ¼ teaspoon salt: A tiny pinch to enhance and balance the chocolate flavors, bringing out the syrup’s depth.
- 1 teaspoon vanilla extract: Adds a warm, fragrant note that rounds out the chocolate beautifully.
How to Make Homemade Chocolate Syrup Recipe
Step 1: Combine the Dry Ingredients
Start by whisking together the sugar, cocoa powder, and salt in a medium saucepan. This step ensures that all the dry components are evenly mixed without lumps, setting the stage for a smooth syrup.
Step 2: Add Water and Mix
Pour in the water and whisk everything until completely smooth. This mixture will look thin and soupy now, but don’t worry—magic happens on the stove.
Step 3: Heat and Thicken
Set the saucepan over medium heat. Stir the mixture constantly as it comes to a gentle boil. Once boiling, reduce the heat and let it simmer for about 4 to 5 minutes. You’ll notice the syrup gradually thickens—this is the texture that turns ordinary chocolate flavor into something truly indulgent.
Step 4: Add Vanilla and Cool
Remove the pan from the heat and stir in the vanilla extract. This final addition brightens the chocolate, giving it that irresistible homemade warmth. Let the syrup cool completely before transferring it into a jar or bottle for storage.
How to Serve Homemade Chocolate Syrup Recipe
Garnishes
Drizzle this syrup generously over ice cream, pancakes, or even fresh fruit for a quick and delightful treat. A little goes a long way in adding a glossy, chocolatey finish that’s guaranteed to impress.
Side Dishes
Think beyond desserts—try mixing the syrup into milk for a rich chocolate drink or swirl it into coffee for an indulgent mocha twist. It also pairs beautifully with baked goods like brownies or waffles, boosting their chocolate factor instantly.
Creative Ways to Present
For a fun presentation, drizzle the syrup in artistic swirls over whipped cream-topped hot chocolate or use it to decorate the edges of dessert plates. You could even freeze small portions in an ice cube tray to add chocolaty bursts to cold beverages.
Make Ahead and Storage
Storing Leftovers
This homemade syrup keeps wonderfully in the refrigerator for up to two weeks. Just make sure the jar or bottle is airtight to maintain freshness and prevent any flavors from mingling with other fridge items.
Freezing
While refrigerating is ideal, you can freeze the syrup for longer storage. Use a freezer-safe container, leaving some headroom as the syrup may expand. Thaw it gently in the fridge before use to keep the silky texture intact.
Reheating
If your syrup thickens too much in the fridge or after freezing, gently warm it in a saucepan over low heat. Stir frequently to return it to a pourable consistency without scorching.
FAQs
Can I use brown sugar instead of granulated sugar?
Absolutely! Brown sugar adds a subtle molasses flavor, making the syrup a bit richer. Just keep in mind the syrup might be a little darker and thicker.
Is this recipe vegan and gluten-free?
Yes, it’s naturally vegan and gluten-free because it uses basic plant-based ingredients without any animal products or gluten-containing additives.
How do I adjust the sweetness?
You can reduce the sugar slightly if you prefer a less sweet syrup. Start by cutting it down by a quarter and adjust to your taste in future batches.
Can I use this syrup for baking?
While delicious on its own, this syrup isn’t ideal as a baking ingredient since it’s liquid and contains sugar already. For baking, cocoa powder or melted chocolate is a better choice.
Why does the syrup thicken more after cooling?
The natural sugars and cocoa solids solidify slightly as the syrup cools, giving it a thicker texture that’s perfect for drizzling. If it becomes too thick, just warm gently before using.
Final Thoughts
There’s nothing quite like enjoying a luscious splash of homemade chocolate syrup made from scratch. This Homemade Chocolate Syrup Recipe is incredibly easy, incredibly delicious, and incredibly versatile—whether you’re jazzing up your coffee, licking it straight from a spoon, or drizzling it over your favorite treats. Give it a try and watch it become a staple in your kitchen, just like it has in mine!
Print
Homemade Chocolate Syrup Recipe
- Prep Time: 5 minutes
- Cook Time: 5 minutes
- Total Time: 10 minutes
- Yield: 1½ cups
- Category: Condiment, Dessert
- Method: Stovetop
- Cuisine: American
- Diet: Vegan, Gluten Free
Description
This Homemade Chocolate Syrup is a rich, velvety sauce made from simple pantry ingredients. Perfect for drizzling over ice cream, pancakes, or stirring into your favorite beverages, this easy-to-make syrup offers a delicious indulgence without any artificial additives. With a smooth texture and balanced sweetness, it’s a versatile condiment that elevates any dessert or drink.
Ingredients
Ingredients
- 1 cup granulated sugar
- 1 cup unsweetened cocoa powder
- 1 cup water
- ¼ teaspoon salt
- 1 teaspoon vanilla extract
Instructions
- Combine Dry Ingredients: In a medium saucepan, whisk together the granulated sugar, unsweetened cocoa powder, and salt until evenly blended.
- Add Water: Pour in the water and whisk the mixture until smooth and free of lumps.
- Heat Mixture: Place the saucepan over medium heat and bring the mixture to a gentle boil, stirring constantly to prevent burning.
- Simmer: Reduce the heat to low and let the syrup simmer for 4 to 5 minutes, stirring occasionally, until it slightly thickens.
- Finish with Vanilla: Remove the saucepan from heat and stir in the vanilla extract for added flavor.
- Cool and Store: Allow the syrup to cool completely before transferring it to a jar or bottle. Store in the refrigerator for up to 2 weeks.
Notes
- The syrup will thicken more as it cools, so don’t worry if it seems a little thin while hot.
- Use this syrup for chocolate milk, as a topping on ice cream, pancakes, or stirred into coffee drinks.
- You can adjust the sweetness by reducing the amount of sugar slightly if preferred.


