

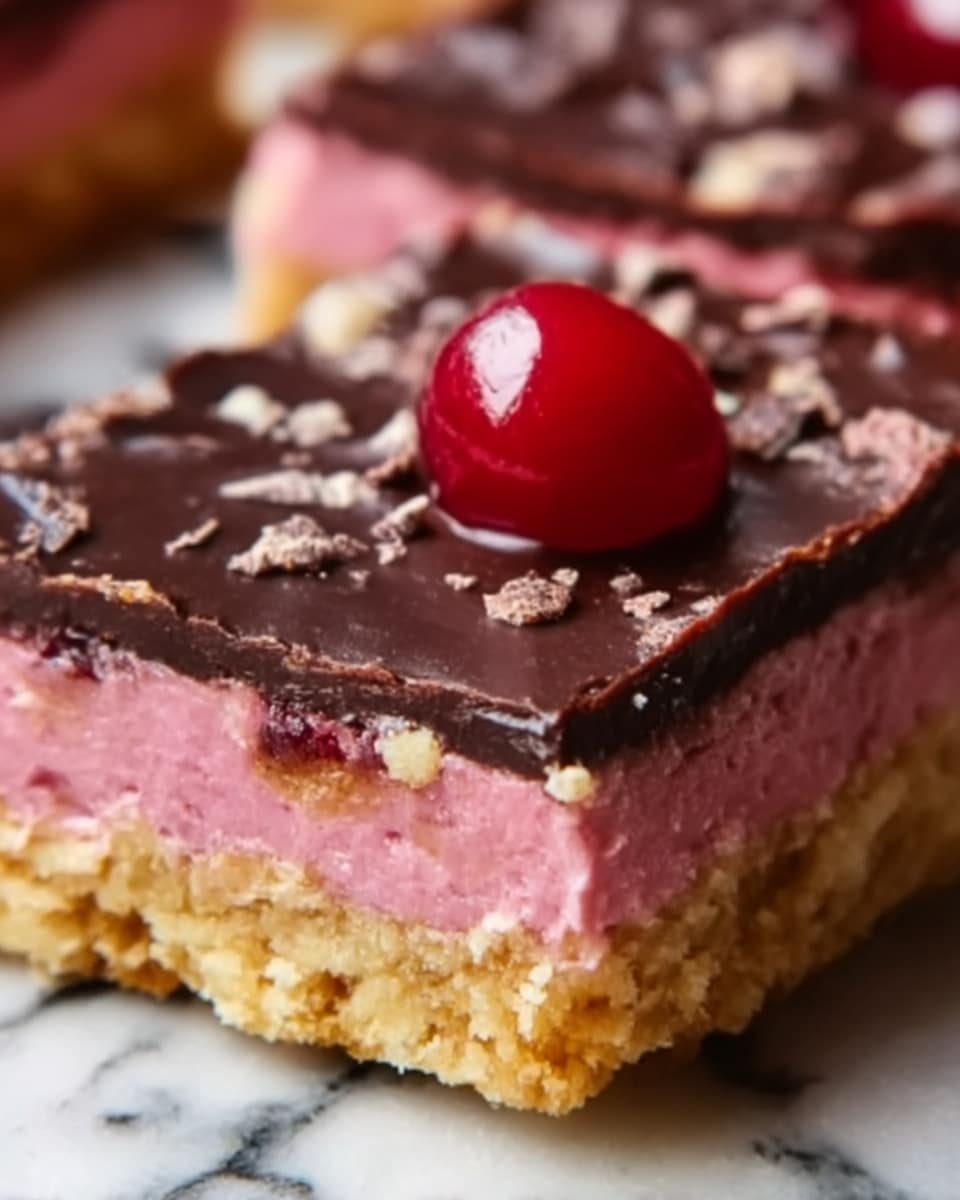
If you’re craving something that perfectly balances fruity sweetness with rich, nutty chocolate, you’re in for a real treat with this Homemade Cherry Mash Bars Recipe. These bars are a deliciously nostalgic dessert that combines a luscious cherry layer with a creamy chocolate-peanut topping, resulting in a perfect harmony of flavors and textures that will quickly become a favorite in your recipe collection. Once you try making these bars, you’ll see why they’re such a beloved classic!

Ingredients You’ll Need
The beauty of this Homemade Cherry Mash Bars Recipe lies in its simple yet purposeful ingredients, each bringing its own magic to the final dessert. From the vibrant cherry chips that give the bars their signature fruity punch to the salted peanuts that add satisfying crunch, every component plays a vital role in delivering an irresistible treat.
- Granulated sugar (2 cups): Provides the essential sweetness and structure for the cherry layer.
- Evaporated milk (⅔ cup): Adds creaminess and helps create a smooth fudge-like texture.
- Salt (¼ teaspoon): Enhances all the flavors, balancing the sweetness perfectly.
- Large marshmallows (12): Melt down for that wonderfully gooey, soft consistency.
- Unsalted butter (½ cup): Adds richness and helps bind the cherry mixture.
- Cherry chips (6 ounces): The star ingredient that brings a delightful cherry flavor and color; you can substitute with white almond bark, cherry extract, and red food coloring.
- Vanilla extract (1 teaspoon): Contributes subtle depth—skip this if you’re using cherry extract instead.
- Semi-sweet chocolate chips (12 ounces): Melts into a rich chocolate base for the top layer.
- Creamy peanut butter (¾ cup): Provides that luscious, nutty creaminess paired perfectly with chocolate.
- Salted peanuts, crushed (1 cup): Adds texture and a salty crunch that contrasts beautifully with the sweet layers.
How to Make Homemade Cherry Mash Bars Recipe
Step 1: Prepare the Pan
Start off by giving your 9×13-inch baking dish a good greasing with butter or non-stick spray. This simple prep step ensures your Cherry Mash Bars will lift out cleanly after setting, making serving a breeze and keeping those gorgeous layers intact.
Step 2: Make the Cherry Layer
Next, combine the granulated sugar, evaporated milk, salt, marshmallows, and unsalted butter in a medium saucepan over medium heat. Stir continuously as everything melts together, patiently bringing the mixture to a gentle boil. This stage takes a little attention because you want the texture to become smooth and fudge-like without scorching. Keep stirring for 5 minutes as it bubbles gently, then remove it from the heat. Once off the stove, stir in your cherry chips and vanilla extract until everything melds into a silky, vibrant cherry layer.
Step 3: Let the Cherry Layer Set
Pour this luscious cherry mixture into your prepared pan, spreading it evenly into the corners. Patience is a virtue here because allowing this layer to cool and set properly creates the perfect foundation for the decadent chocolate-peanut topping that follows.
Step 4: Prepare the Chocolate-Peanut Layer
While the cherry layer is setting, melt the semi-sweet chocolate chips in a double boiler or a heatproof bowl set over simmering water, stirring gently until smooth and glossy. Then mix in the creamy peanut butter, blending thoroughly until you have a rich, velvety mixture. Finally, fold in the crushed salted peanuts, distributing them evenly to introduce that delightful texture contrast in every bite.
Step 5: Assemble and Chill
Carefully pour the chocolate-peanut mixture over the set cherry layer, using a spatula to spread it out evenly and fully cover the surface. Pop the entire pan into the refrigerator for at least 2 hours to firm up completely, allowing the layers to meld beautifully into one irresistible bar.
Step 6: Serve Your Cherry Mash Bars
Once chilled and set, slice into generous squares and get ready to enjoy a dessert that brings together juicy cherry sweetness, creamy peanut butter, and rich chocolate in perfect harmony. Store any leftovers in an airtight container in the fridge to keep them fresh and indulgent.
How to Serve Homemade Cherry Mash Bars Recipe
Garnishes
Adding a few finishing touches elevates these bars beyond ordinary. Sprinkle extra crushed salted peanuts on top right after pouring the chocolate-peanut layer to add a bit of crunch and visual appeal. Alternatively, a few whole cherries or a drizzle of white chocolate can make these bars look extra special for guests.
Side Dishes
Serve these bars with a scoop of vanilla ice cream or a dollop of whipped cream to play up the rich, sweet flavors. Fresh berries on the side add a refreshing lift, creating a dessert plate that’s inviting and perfectly balanced.
Creative Ways to Present
For a show-stopping dessert tray, cut the bars into mini bite-sized squares and serve on a decorative platter with toothpicks. Or layer them into individual clear cups with whipped cream and a cherry on top for a portable, party-friendly treat that dazzles visually and delights every palate.
Make Ahead and Storage
Storing Leftovers
Homemade Cherry Mash Bars keep beautifully in an airtight container in the refrigerator for up to one week. The flavors meld even more over time, making leftovers just as irresistible as when freshly made. Just be sure to keep them chilled to preserve the chocolate and cherry layers.
Freezing
If you want to prepare these bars ahead for a special occasion, they freeze wonderfully. Wrap them tightly in plastic wrap and store in a freezer-safe container for up to 2 months. When you’re ready to enjoy, thaw them overnight in the fridge for best texture and flavor.
Reheating
These bars are best eaten chilled, so reheating isn’t usually necessary. But if you prefer a softer texture, briefly warm individual squares in the microwave for about 10 seconds. Just be careful not to melt the layers—warm gently and enjoy immediately.
FAQs
Can I use fresh cherries instead of cherry chips?
Fresh cherries have a very different moisture content and texture, so while you could try experimenting with them, cherry chips provide the ideal balance of flavor and stability for this recipe. Using fresh cherries may result in a runnier layer.
Is there a substitute for the evaporated milk?
You can use whole milk or cream, but evaporated milk gives the cherry mixture a richer, creamier texture. If you substitute, expect a slight change in the fudge consistency and be sure to adjust cooking times accordingly.
Can I make this recipe nut-free?
Absolutely! Simply omit the peanut butter and salted peanuts, or replace peanuts with toasted sunflower seeds or pretzel pieces for a nut-free crunch. However, the peanut butter adds a lot of flavor, so consider adding a little extra chocolate or a nut-free butter flavor alternative.
How do I achieve the perfect cherry color?
If you don’t have cherry chips, use white almond bark combined with cherry extract and a few drops of red food coloring. This combo replicates the distinctive cherry flavor and the vibrant color that makes these bars so eye-catching.
Can I make these bars vegan?
This recipe relies on dairy products and marshmallows that usually contain gelatin, so it would need some modifications to be vegan-friendly. You could try vegan marshmallows, plant-based butter, and dairy-free chocolate, but the final texture and flavor will differ from the classic.
Final Thoughts
I hope you’re as excited as I am to whip up this Homemade Cherry Mash Bars Recipe. It’s truly a dessert that’s bursting with nostalgia and vibrant flavors, perfect for sharing with family and friends or simply savoring during a quiet moment. Once you taste that perfect blend of cherry, chocolate, and peanut butter, you’ll understand why these bars have stood the test of time. Give them a try, and I promise you’ll keep coming back for more!
Print
Homemade Cherry Mash Bars Recipe
- Prep Time: 10 minutes
- Cook Time: 15 minutes
- Total Time: 25 minutes
- Yield: 24 servings
- Category: Dessert
- Method: Stovetop
- Cuisine: American
Description
Homemade Cherry Mash Bars combine a rich, gooey cherry-flavored base with a decadent chocolate and peanut topping. This nostalgic treat features layers of melted cherry chips and marshmallows topped with a smooth peanut butter-chocolate mixture studded with crunchy salted peanuts, all set in a 9×13-inch pan and chilled to perfection.
Ingredients
Cherry Layer
- 2 cups granulated sugar
- ⅔ cup evaporated milk
- ¼ teaspoon salt
- 12 large marshmallows
- ½ cup unsalted butter
- 6 ounces cherry chips (or substitute with 6 ounces white almond bark, 1 teaspoon cherry extract, and red food coloring)
- 1 teaspoon vanilla extract (omit if using cherry extract)
Chocolate-Peanut Layer
- 12 ounces semi-sweet chocolate chips
- ¾ cup creamy peanut butter
- 1 cup salted peanuts, crushed
Instructions
- Prepare the Pan: Grease a 9×13-inch baking dish generously with butter or non-stick spray to ensure the bars release easily once set.
- Make the Cherry Layer: In a medium saucepan over medium heat, combine the granulated sugar, evaporated milk, salt, marshmallows, and unsalted butter. Stir continuously until the mixture reaches a gentle boil. Continue cooking, stirring frequently, for 5 minutes to achieve the right consistency without burning.
- Add Cherry Flavor: Remove the pan from heat and add the cherry chips (or the almond bark substitute with cherry extract and red food coloring). Stir thoroughly until fully melted and smooth. Add vanilla extract if not using cherry extract, mixing well.
- Set the Cherry Layer: Pour the warm cherry mixture into the prepared baking dish, spreading it evenly with a spatula. Allow it to cool completely at room temperature to set firmly.
- Prepare the Chocolate-Peanut Layer: Using a double boiler or heatproof bowl over simmering water, melt the semi-sweet chocolate chips, stirring occasionally until smooth. Stir in the creamy peanut butter until fully blended.
- Add Peanuts: Fold in the crushed salted peanuts, ensuring they are evenly distributed throughout the chocolate-peanut mixture.
- Assemble the Bars: Once the cherry layer has completely set, pour the chocolate-peanut mixture over it and spread evenly to cover the entire surface of the pan.
- Chill to Set: Refrigerate the assembled bars for at least 2 hours or until the top layer is firm and well set.
- Serve: After chilling, cut the bars into squares and serve chilled. Store leftovers tightly covered in the refrigerator.
Notes
- The cherry chips can be replaced with a white almond bark and cherry extract combination for similar flavor and color.
- Be careful not to burn the sugar mixture; stir constantly while boiling.
- Use salted peanuts for added flavor contrast; unsalted can be substituted if preferred.
- Bars are best stored refrigerated and consumed within 5 days.
- For easier cleanup, line the baking pan with parchment paper or foil before greasing.


