
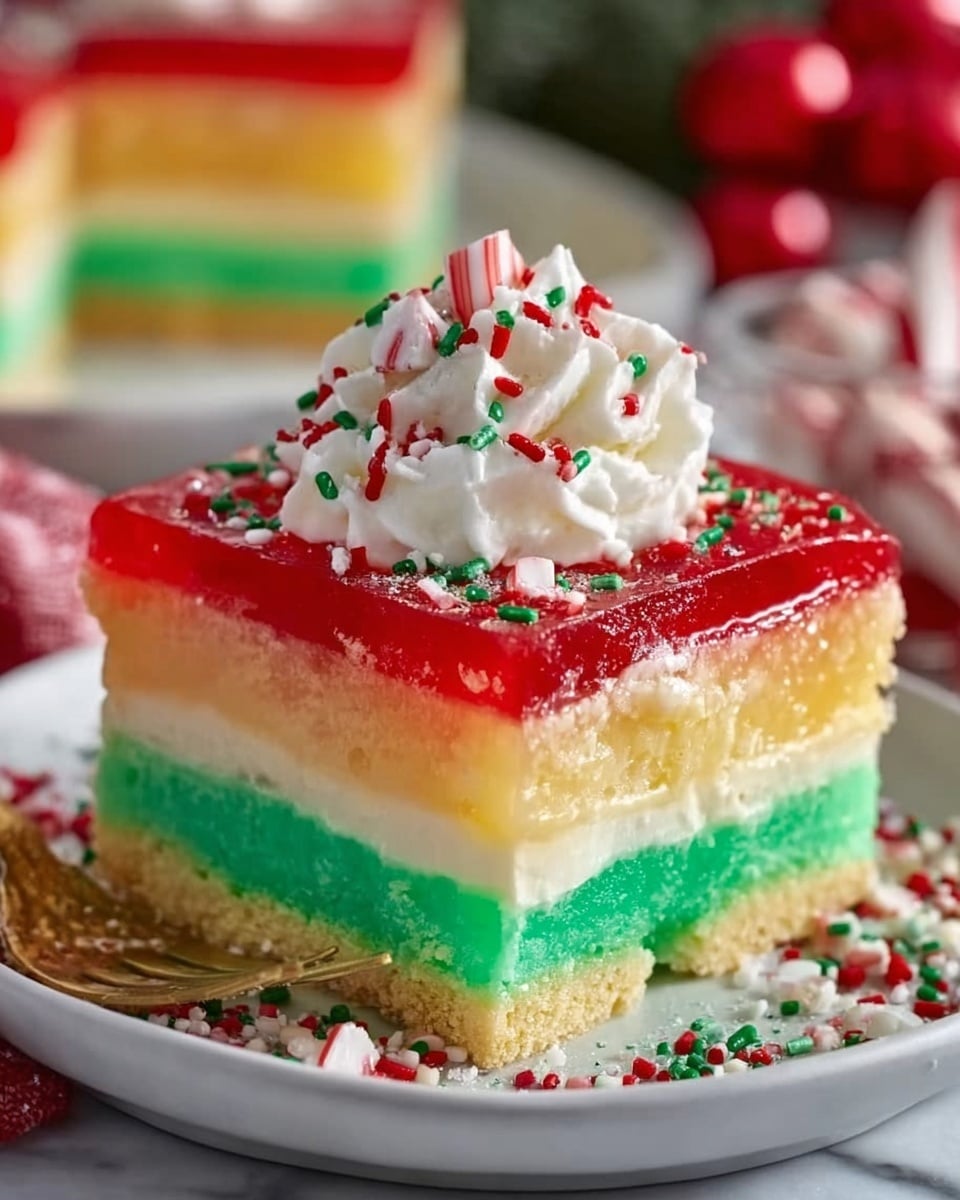
There is something truly magical about a Holiday-Inspired Poke Cake Recipe that transforms a simple cake into a festive celebration of flavors and colors with every bite. This delightful dessert combines the light, fluffy texture of white cake with shimmering pockets of bright red and green gelatin that capture the holiday spirit perfectly. It’s not just a cake; it’s a joyful centerpiece that brightens the table, sparkles with vibrant hues, and brings smiles around any festive gathering.
Ingredients You’ll Need

Ingredients You’ll Need
The secret to making this Holiday-Inspired Poke Cake Recipe so irresistibly delicious lies in its straightforward ingredients. Each one plays a vital role in creating the perfect balance of softness, sweetness, and that iconic jiggly burst of color and flavor that poke cakes are famous for.
- 1 box white cake mix: The base of your cake, it ensures a tender, moist crumb that soaks up the gelatin beautifully.
- Ingredients listed on the cake box: Usually eggs, oil, and water or milk, these bring the cake mix to life.
- 1 teaspoon vanilla extract (optional): Adds warmth and depth to the cake’s flavor, making it even more inviting.
- 1 (3 oz) box red gelatin: Choose cherry or strawberry for that iconic holiday red pop.
- 1 (3 oz) box green gelatin: Lime gelatin adds a refreshing green burst that complements the red perfectly.
- 2 cups boiling water: Needed to dissolve the gelatin so it sets beautifully in the cake pockets.
- 1 (8 oz) container whipped topping: Creamy and light, it finishes the cake with a luscious blanket of softness.
- Holiday sprinkles, crushed candy canes, or festive decorations: These add sparkle, texture, and a final cheerful touch to your masterpiece.
How to Make Holiday-Inspired Poke Cake Recipe
Step 1: Bake the Cake
Start by preheating your oven to 350°F (175°C) and greasing a 9×13-inch baking dish to ensure the cake bakes evenly without sticking. Prepare the white cake mix according to the package instructions, adding vanilla extract if you like for that extra aromatic touch. Pour the batter into the pan and bake it for 25 to 30 minutes or until a toothpick inserted in the center comes out clean. Cooling the cake completely is crucial before moving to the next step, so be patient and let the magic set.
Step 2: Poke the Cake
Once the cake is completely cool, it’s time to create the signature holes that make this poke cake so festive and fun. Using the handle of a wooden spoon or a skewer, carefully poke holes about 1 inch apart, covering the entire surface. This step is where the cake begins to take on its colorful character and promises to amaze everyone who slices into it.
Step 3: Prepare the Gelatin Filling
In two separate bowls, dissolve each box of gelatin, red and green, in 1 cup of boiling water respectively. Stir well until fully dissolved. This step should be done immediately before pouring to ensure the gelatin is fluid enough to seep into the holes yet will set nicely once chilled.
Step 4: Pour the Gelatin into the Poked Holes
Carefully spoon or pour the red gelatin into half of the holes and the green gelatin into the other half. The effect will be a brilliant mosaic of holiday colors sparkling through the cake. Take your time, and try to be as precise as possible for the best visual impact.
Step 5: Chill the Cake
Cover the cake tightly with plastic wrap and refrigerate it for at least 2 hours. This chilling time allows the gelatin to fully set inside the cake, giving you those delightful bursts of flavor and color that elevate this dessert into something truly festive.
Step 6: Add the Whipped Topping
Once chilled and the gelatin is firm, gently spread the whipped topping evenly over the entire cake surface. This creamy layer not only contrasts beautifully in texture and color but also adds a light sweetness that balances the tangy gelatin.
Step 7: Garnish the Cake
Finish your Holiday-Inspired Poke Cake Recipe with a sprinkle of holiday sprinkles, crushed candy canes, or any festive decorations you love. These final touches add a bit of crunch and a lot of holiday cheer, making this dessert truly irresistible both to the eye and the palate.
How to Serve Holiday-Inspired Poke Cake Recipe
Garnishes
Choosing the right garnishes can turn your Holiday-Inspired Poke Cake Recipe from charming to unforgettable. Consider crushed peppermint candy canes for a minty crunch, edible glitter for sparkle, or a scattering of mini red and green sprinkles to echo the gelatin’s colors. These additions make every slice feel like a festive gift.
Side Dishes
This cake pairs wonderfully with a cup of hot cocoa or spiced eggnog to keep the holiday vibes flowing. For a lighter contrast, serve alongside fresh fruit or a simple scoop of vanilla ice cream, which complements the cake’s creamy and fruity elements perfectly.
Creative Ways to Present
For a stunning presentation, serve this poke cake on a decorative holiday platter, or cut it into individual cupcake-sized portions using a square cutter for easy serving at parties. Layering slices with fresh mint leaves or fresh cranberries can add a sophisticated touch that makes your dessert table shine.
Make Ahead and Storage
Storing Leftovers
You can store any leftover Holiday-Inspired Poke Cake Recipe covered in the refrigerator for up to 3 days. Keeping it chilled maintains the gelatin’s delicate texture and the whipped topping’s softness, ensuring every bite stays just as delightful as the first.
Freezing
While freezing poke cake is possible, it’s best done if you want to prepare the cake base in advance without the gelatin or whipped topping. Freeze the plain baked cake wrapped tightly in plastic wrap and foil for up to 2 months. When ready to serve, thaw completely before poking holes and adding gelatin and toppings for optimal texture.
Reheating
This dessert is best enjoyed chilled and does not require reheating. In fact, warming it can cause the gelatin to melt and the whipped topping to deflate. Simply serve straight from the fridge for a refreshing, cool treat.
FAQs
Can I use different flavors of gelatin?
Absolutely! Feel free to experiment with other red and green gelatin flavors to suit your preferences or dietary needs. Just be mindful of color contrasts to keep that festive look.
Is it necessary to use a cake mix?
No, you can bake your favorite homemade white cake from scratch if you prefer. The key is a light, moist cake that soaks up the gelatin well.
How far in advance can I make this poke cake?
You can prepare and refrigerate the cake fully assembled up to 24 hours before serving, which makes it perfect for holiday entertaining.
Can this cake be made gluten-free?
Yes! Use a gluten-free white cake mix, and be sure your gelatin and any decorations are gluten-free as well to keep everyone safe and satisfied.
What can I use instead of whipped topping?
Freshly whipped cream is a great alternative that adds a homemade touch and fluffy texture similar to the tubbed whipped topping.
Final Thoughts
There’s something undeniably joyful about the Holiday-Inspired Poke Cake Recipe that makes it a must-make dessert for the season. Its vibrant colors, playful texture, and easy preparation make it a crowd-pleaser that will have everyone asking for seconds. Whether you’re serving it at a family gathering or a festive party, this poke cake promises to bring a little extra sparkle and sweetness to your holiday celebrations. Give it a try and watch everyone’s faces light up with the first delicious slice!
Print
Holiday-Inspired Poke Cake Recipe
- Prep Time: 30 minutes
- Cook Time: 30 minutes
- Total Time: 2 hours 50 minutes
- Yield: 12 servings
- Category: Dessert
- Method: Baking
- Cuisine: American
- Diet: Vegetarian
Description
This festive Holiday-Inspired Poke Cake is a delightful dessert featuring moist white cake punctuated with vibrant red and green gelatin filling. Perfect for celebrations, this easy-to-make cake is topped with whipped cream and garnished with holiday sprinkles or crushed candy canes, bringing a colorful and flavorful treat to your holiday table.
Ingredients
Cake
- 1 box white cake mix (plus ingredients listed on the box)
- 1 teaspoon vanilla extract (optional)
Gelatin Filling
- 1 (3 oz) box red gelatin (e.g., cherry or strawberry)
- 1 (3 oz) box green gelatin (e.g., lime)
- 2 cups boiling water (1 cup per gelatin flavor)
Topping and Garnish
- 1 (8 oz) container whipped topping (e.g., Cool Whip), thawed
- Holiday sprinkles, crushed candy canes, or other festive decorations
Instructions
- Bake the Cake: Preheat your oven to 350°F (175°C) and grease a 9×13-inch baking dish. Prepare the white cake mix according to the package instructions, adding the optional vanilla extract if desired. Pour the batter into the prepared pan and bake for 25-30 minutes, or until a toothpick inserted into the center comes out clean. Allow the cake to cool completely in the pan.
- Poke the Cake: Once cooled, use the handle of a wooden spoon or a skewer to poke holes about 1 inch apart all over the surface of the cake. This will allow the gelatin to seep inside for a colorful, flavorful surprise.
- Prepare Gelatin Filling: In two separate bowls, dissolve the red and green gelatin powders each in 1 cup of boiling water. Stir well until fully dissolved.
- Fill the Holes: Carefully pour the red gelatin into half of the holes and the green gelatin into the remaining holes, distributing the colors evenly across the cake surface.
- Chill the Cake: Cover the cake and refrigerate it for at least 2 hours to let the gelatin fillings set firmly inside the cake.
- Add Topping: After the gelatin has set, spread the thawed whipped topping evenly over the entire cake surface.
- Garnish and Serve: Decorate the cake with holiday sprinkles, crushed candy canes, or other festive decorations of your choice. Slice and serve the cake chilled for the best flavor and texture.
Notes
- Ensure the cake is completely cooled before poking holes to prevent the cake from crumbling.
- You can substitute the white cake mix with yellow cake mix if preferred.
- For extra flavor, consider adding a teaspoon of vanilla extract to the gelatin mixtures.
- Use a toothpick or skewer to poke holes evenly for the best visual effect when the gelatin sets.
- Keep the cake refrigerated until serving to maintain the gelatin texture and whipped topping freshness.


