

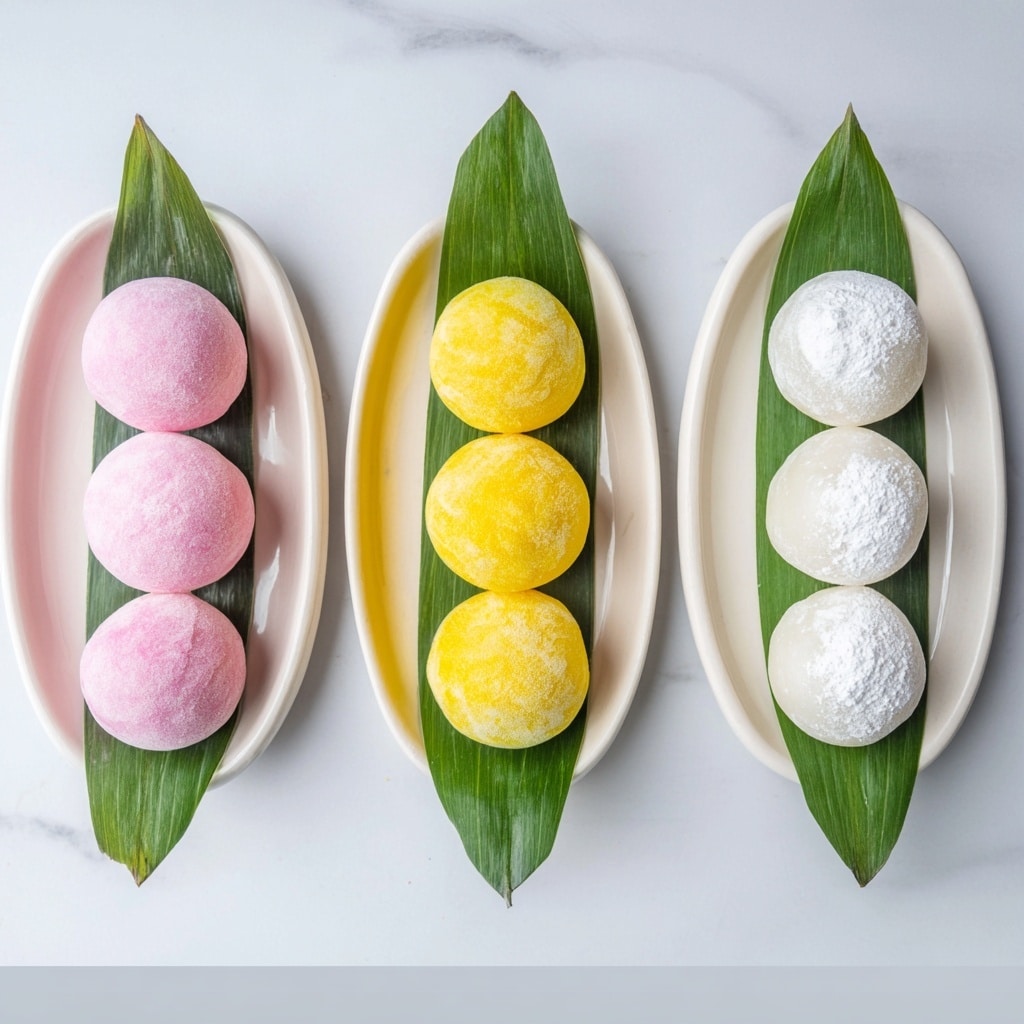
If you have a sweet tooth but want to keep things light and nourishing, this Healthy Microwave Mochi Recipe is an absolute game changer. Mochi, the delightfully chewy and soft Japanese treat, is reimagined here with wholesome ingredients and a quick microwave method that anyone can master. This recipe is perfect for those moments when you crave something comforting, gluten-free, and vegan without spending ages in the kitchen. Plus, it’s naturally sweet and subtly flavored with vanilla, making it a versatile snack you’ll want to share with everyone you know.

Ingredients You’ll Need
The ingredients for this Healthy Microwave Mochi Recipe are wonderfully simple but essential to achieving the perfect texture and flavor. Each component plays a vital role, from the chewy mochiko flour to the natural sweetness of maple syrup, creating a beautifully balanced treat.
- Mochiko (sweet rice flour): This is the foundation of mochi, giving it that iconic chewy texture only glutinous rice flour can provide.
- Unsweetened almond milk (or any plant-based milk): Keeps the recipe dairy-free while adding moisture for a smooth, tender mochi dough.
- Maple syrup or honey: A natural sweetener that adds a subtle sweetness without overpowering the delicate flavor.
- Vanilla extract: Brings warmth and aroma, elevating the overall flavor profile to something truly comforting.
- Salt: Balances the sweetness and enhances the natural flavors.
- Cornstarch or potato starch (for dusting): Prevents sticking and makes handling those sticky little mochi pieces a breeze.
How to Make Healthy Microwave Mochi Recipe
Step 1: Mix the Ingredients
Start by combining the mochiko, almond milk, maple syrup, vanilla extract, and salt in a microwave-safe bowl. Use a whisk to blend everything until the mixture is perfectly smooth with no lumps. This step ensures that the final mochi will have a silky, even texture.
Step 2: Microwave the Mixture
Cover the bowl loosely with plastic wrap or a microwave-safe plate and microwave on high for 1 minute. After the first minute, stir thoroughly with a wet spatula to prevent sticking and encourage even cooking.
Step 3: Continue Cooking in Intervals
Microwave the mixture again in 30-second bursts, stirring after each one. Repeat this for a total of 2 to 3 minutes, until the mochi thickens, becomes glossy, and slightly translucent. This transformation signals that it’s perfectly cooked.
Step 4: Cool and Shape
Dust a clean surface or parchment paper generously with cornstarch to prevent sticking. Transfer the hot mochi dough onto this surface and let it cool for a few minutes until manageable. Then, flatten it gently using dusted hands or utensils.
Step 5: Cut and Coat
Cut the flattened mochi into bite-sized pieces, about 12 in total. Immediately coat each piece lightly with cornstarch to keep them from sticking together. Now, your healthy microwave mochi pieces are ready to enjoy or store!
How to Serve Healthy Microwave Mochi Recipe
Garnishes
While mochi is delicious on its own, a sprinkle of toasted sesame seeds or a dusting of matcha powder can add an exciting layer of flavor and visual appeal. You can also try rolling the pieces in finely chopped nuts or shredded coconut for extra texture.
Side Dishes
This mochi pairs beautifully with a cup of hot green tea or jasmine tea, balancing the sweet chewiness with soothing warmth. For a more substantial snack, serve alongside fresh fruit slices or a dollop of nut butter to highlight the dessert’s subtle sweetness.
Creative Ways to Present
Try stuffing your mochi pieces with fresh berries or a spoonful of almond butter before cooking for a fun surprise inside. You can also shape them into small balls and place them on colorful skewers for an eye-catching party presentation. This recipe really lends itself to playfulness and personalization.
Make Ahead and Storage
Storing Leftovers
If you have any mochi left over, storing it at room temperature in an airtight container is best. It will keep its soft, chewy texture for up to one day before it starts getting too firm or hard. Avoid refrigeration as it can toughen the mochi.
Freezing
For longer storage, you can freeze individual pieces by placing them on a baking sheet lined with parchment paper, then transferring them to a freezer-safe container once frozen. Frozen mochi can last for up to 2 weeks and thaw quickly at room temperature when you’re ready for a snack.
Reheating
Reheat mochi gently in the microwave for 10-15 seconds to restore that signature chewy softness. Be careful not to overheat, or it will become tough. You can also steam the mochi briefly to warm it without drying it out.
FAQs
Can I use regular milk instead of almond milk?
Absolutely! While almond milk keeps this recipe dairy-free and light, regular milk can be used if you don’t have dietary restrictions. Just expect a slightly richer flavor.
What if I don’t have mochiko flour?
Mochiko is sweet rice flour and is essential for authentic mochi’s stretchy texture. If you can’t find it, look for glutinous rice flour at an Asian market or online, but avoid substituting with regular rice flour.
Is this recipe gluten-free?
Yes, this Healthy Microwave Mochi Recipe uses mochiko, which is naturally gluten-free, and all other ingredients are free from gluten, making it safe for those with gluten sensitivities.
Can I add flavors or mix-ins?
Definitely! Stir in a tablespoon of matcha powder, chia seeds, or cocoa powder before cooking for extra nutrition and flavor. You can also press in small pieces of fruit or nuts before setting the mochi.
How long does it take to make this mochi?
This recipe takes less than 10 minutes from start to finish, making it an incredibly quick treat to satisfy sudden cravings without sacrificing healthfulness.
Final Thoughts
This Healthy Microwave Mochi Recipe is one of those delightful discoveries that makes you wonder why you never tried it sooner. It’s quick, nourishing, and wonderfully adaptable, perfect for any season or mood. Whether you enjoy it with tea, as a fun dessert, or a simple snack, this recipe invites you to experience mochi in a wholesome, homemade way that’s surprisingly easy. I truly hope you give it a try and make it your own little kitchen secret to share and savor!
Print
Healthy Microwave Mochi Recipe
- Prep Time: 5 minutes
- Cook Time: 3 minutes
- Total Time: 8 minutes
- Yield: 12 pieces
- Category: Snack
- Method: Microwave
- Cuisine: Japanese
- Diet: Gluten Free
Description
This healthy mochi recipe offers a simple, gluten-free, and dairy-free treat made using sweet rice flour and plant-based milk. It’s lightly sweetened with maple syrup or honey and quickly cooked in the microwave, making it an easy and nutritious snack inspired by traditional Japanese mochi.
Ingredients
Ingredients
- 1 cup mochiko (sweet rice flour)
- 3/4 cup unsweetened almond milk (or any plant-based milk)
- 1/4 cup maple syrup or honey
- 1/2 teaspoon vanilla extract
- 1/4 teaspoon salt
- Cornstarch or potato starch, for dusting
Instructions
- Mix Ingredients: In a microwave-safe bowl, whisk together the mochiko, almond milk, maple syrup, vanilla extract, and salt until you achieve a smooth, lump-free batter.
- Initial Microwave Cooking: Cover the bowl loosely with plastic wrap or a microwave-safe plate and microwave on high for 1 minute to start cooking the mochi.
- Stir and Continue Cooking: Stir the mixture thoroughly with a wet spatula to prevent sticking. Return it to the microwave and heat in 30-second intervals, stirring between each, for a total of 2 to 3 minutes or until the mochi turns thick, glossy, and slightly translucent.
- Prepare Surface and Cool: Dust a clean surface or parchment paper generously with cornstarch to avoid sticking. Transfer the cooked mochi onto this surface and allow it to cool slightly to handle safely.
- Shape and Cut: Using dusted hands or utensils, flatten the mochi dough and cut it into bite-sized pieces. Lightly coat each piece with more cornstarch to prevent them from sticking to each other.
- Serve or Store: Enjoy the mochi immediately as a snack or store it in an airtight container at room temperature for up to one day.
Notes
- For extra nutrition, mix in 1 tablespoon of chia seeds or matcha powder before cooking.
- This recipe is lightly sweetened and naturally gluten-free, making it a guilt-free treat.
- You can customize by filling the mochi with fresh fruit or nut butter for additional flavor and texture.


