

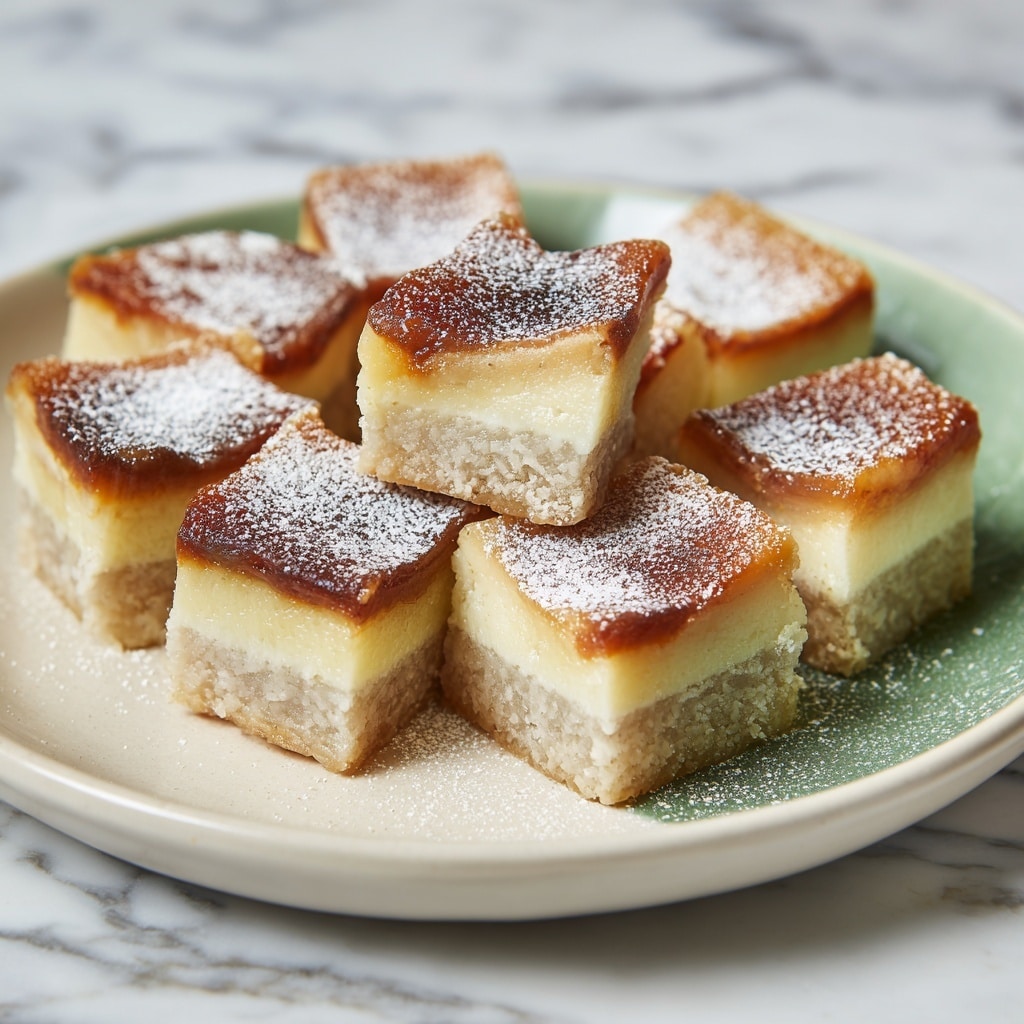
If you have a soft spot for chewy, buttery treats that feel like a warm hug in every bite, then this Hawaiian Butter Mochi Recipe is about to become your new obsession. This dessert beautifully combines the unique texture of sweet rice flour with the rich flavors of coconut milk and butter, resulting in a luscious, golden-brown mochi that’s perfectly moist and tender. Whether you’re familiar with mochi or trying it for the first time, this recipe offers a delightful tropical twist that’s both comforting and irresistibly delicious.

Ingredients You’ll Need
Getting the ingredients right is the first step toward the perfect Hawaiian Butter Mochi. Each simple, pantry-friendly item plays a crucial role in building the soft texture, sweet flavor, and rich aroma that this cake is loved for.
- Sweet rice flour (mochiko): This is the backbone of the chewy texture unique to mochi, making it soft yet satisfying.
- Sugar: Provides just the right amount of sweetness to balance the coconut and butter flavors.
- Baking powder: Helps the mochi rise slightly, giving it a tender crumb without sacrificing chewiness.
- Salt: Enhances all the flavors, making sure the sweetness isn’t one-dimensional.
- Unsalted butter, melted: Brings rich, luscious flavor and adds moisture for that melt-in-your-mouth feel.
- Coconut milk: Infuses the mochi with a tropical creaminess that’s wildly comforting and authentic.
- Eggs: Bind the ingredients together and contribute to the cake’s structure and fluffiness.
- Vanilla extract: Adds warmth and depth, rounding out the coconut and buttery notes beautifully.
- Whole milk: Balances the batter’s consistency and adds extra creaminess.
How to Make Hawaiian Butter Mochi Recipe
Step 1: Prepare Your Pan and Oven
Start by preheating your oven to 350°F (175°C) and greasing a 9×9-inch baking pan or lining it with parchment paper. This simple prep ensures your mochi won’t stick, making it easy to slice and serve later.
Step 2: Mix the Dry Ingredients
In a medium bowl, whisk together the sweet rice flour, sugar, baking powder, and salt. Combining these dry ingredients well is key to ensuring an even texture and flavor throughout your mochi.
Step 3: Combine the Wet Ingredients
In another bowl, beat the eggs thoroughly. Then stir in the melted butter, coconut milk, vanilla extract, and whole milk. This creamy mixture is where the magic begins—it gives the mochi its signature tender crumb and tropical flavor.
Step 4: Bring It All Together
Gradually add the wet ingredients to the dry mix, stirring gently until the batter is smooth and creamy. Avoid overmixing, as that could affect the chewy texture we love in this classic treat.
Step 5: Pour and Bake
Pour the batter into your prepared pan and smooth out the top with a spatula. Place it in the oven and bake for 50 to 55 minutes until the top turns a gorgeous golden brown, and a toothpick inserted in the center comes out clean. The aroma filling your kitchen will be absolutely irresistible.
Step 6: Cool and Slice
Once baked, let your mochi cool completely before slicing it into squares. This step helps the mochi set, so the texture finishes perfect—soft, rich, and just a little chewy.
How to Serve Hawaiian Butter Mochi Recipe
Garnishes
Sprinkle a light dusting of powdered sugar or toast some coconut flakes on top for an extra layer of texture and flavor. Fresh tropical fruits like pineapple or mango also pair beautifully as a garnish, enhancing the Hawaiian vibes of this dessert.
Side Dishes
This mochi shines best on its own as a sweet treat, but if you want to create a full dessert spread, pair it with a scoop of vanilla or coconut ice cream. A cup of strong, dark coffee or a creamy latte is also the perfect foil for the mochi’s sweetness.
Creative Ways to Present
Cut your mochi squares into bite-sized pieces and serve them on a beautiful platter for sharing at parties. For a modern twist, layer little cubes of mochi with fresh fruit and whipped cream in dessert glasses to create a deconstructed Hawaiian Butter Mochi parfait.
Make Ahead and Storage
Storing Leftovers
Wrap any leftover mochi tightly in plastic wrap or store it in an airtight container at room temperature. It keeps well for up to three days, maintaining that pleasing chew and buttery flavor.
Freezing
If you want to save it for longer, Hawaiian Butter Mochi freezes wonderfully. Place the mochi pieces in a freezer-safe container or zip-top bag with parchment paper layers to prevent sticking. Frozen mochi will stay fresh for up to 2 months.
Reheating
When you’re ready to enjoy your leftover or frozen mochi, let it thaw at room temperature, then warm it gently in the oven or microwave. A quick 10-15 seconds in the microwave or 5 minutes at a low oven temperature will refresh the softness without drying it out.
FAQs
Can I use regular rice flour instead of sweet rice flour?
Regular rice flour won’t give you the chewy texture characteristic of mochi. Sweet rice flour (mochiko) is essential for that unique, chewy, and soft consistency, so it’s best not to substitute.
Is coconut milk necessary for this recipe?
Coconut milk is a crucial ingredient for authentic flavor and moisture. You could try substituting it with regular milk, but you’ll lose that signature tropical richness that makes this Hawaiian Butter Mochi Recipe so special.
Can I make this recipe gluten-free?
Absolutely! Because this recipe uses sweet rice flour, it’s naturally gluten-free. Just be sure all your baking ingredients, like baking powder, are labeled gluten-free to avoid any cross-contamination.
Why does my mochi turn out too dense?
If your mochi feels too dense, check that you’ve added the correct amount of leavening and that you’re mixing wet and dry ingredients gently but thoroughly. Overmixing can also affect texture, so stir just until combined.
How do I know when the mochi is done baking?
Baking time can vary slightly based on your oven, but you want a golden brown top and a toothpick inserted in the center to come out clean. The mochi should feel set and spring back lightly to the touch.
Final Thoughts
There is something truly comforting and joyous about making and sharing Hawaiian Butter Mochi Recipe. It’s a lovely blend of rich, tropical flavors wrapped in a uniquely chewy, buttery texture that makes every bite feel like a special occasion. Whether you’re serving it up for family, friends, or just treating yourself, I wholeheartedly encourage you to give this recipe a try—you might just find your new favorite dessert.
Print
Hawaiian Butter Mochi Recipe
- Prep Time: 15 minutes
- Cook Time: 50 minutes
- Total Time: 1 hour 5 minutes
- Yield: 16 servings
- Category: Dessert
- Method: Baking
- Cuisine: Hawaiian
- Diet: Vegetarian
Description
Hawaiian Butter Mochi is a chewy, rich, and buttery dessert made from sweet rice flour and coconut milk, delivering a perfect balance of sweetness and a unique texture. This traditional Hawaiian treat is baked to golden perfection, making it a delightful snack or dessert for any occasion.
Ingredients
Dry Ingredients
- 1 cup sweet rice flour (mochiko)
- 1 cup sugar
- 1 1/2 teaspoons baking powder
- 1/4 teaspoon salt
Wet Ingredients
- 1/2 cup unsalted butter, melted
- 1 cup coconut milk
- 2 large eggs
- 1 teaspoon vanilla extract
- 1/2 cup whole milk
Instructions
- Preheat Oven: Preheat the oven to 350°F (175°C). Grease a 9×9-inch baking pan or line it with parchment paper to prevent sticking and for easier removal of the mochi after baking.
- Mix Dry Ingredients: In a medium-sized bowl, whisk together the sweet rice flour, sugar, baking powder, and salt until well combined to ensure even distribution of leavening agents and flavors.
- Prepare Wet Ingredients: In a separate bowl, beat the eggs thoroughly. Then stir in the melted butter, coconut milk, vanilla extract, and whole milk until the mixture is smooth and cohesive.
- Combine Mixtures: Gradually add the wet ingredient mixture to the dry ingredients, stirring continuously until the batter is smooth without lumps, making sure everything is well incorporated.
- Transfer Batter: Pour the prepared batter into the greased or parchment-lined baking pan. Use a spatula to smooth the top evenly to promote uniform baking.
- Bake: Bake in the preheated oven for 50-55 minutes, or until the top is golden brown and a toothpick inserted into the center comes out clean, indicating the mochi is set and cooked through.
- Cool and Serve: Allow the mochi to cool completely in the pan to set its texture. Once cooled, slice into squares and enjoy the chewy, buttery treat.
Notes
- Make sure to use sweet rice flour (mochiko) for the authentic chewy texture.
- Cooling completely before slicing helps the mochi hold together better.
- You can line the pan with parchment paper for easier removal and cleanup.
- This mochi can be stored in an airtight container at room temperature for up to 3 days.
- For a coconut lover twist, you can garnish with shredded coconut before baking.


