

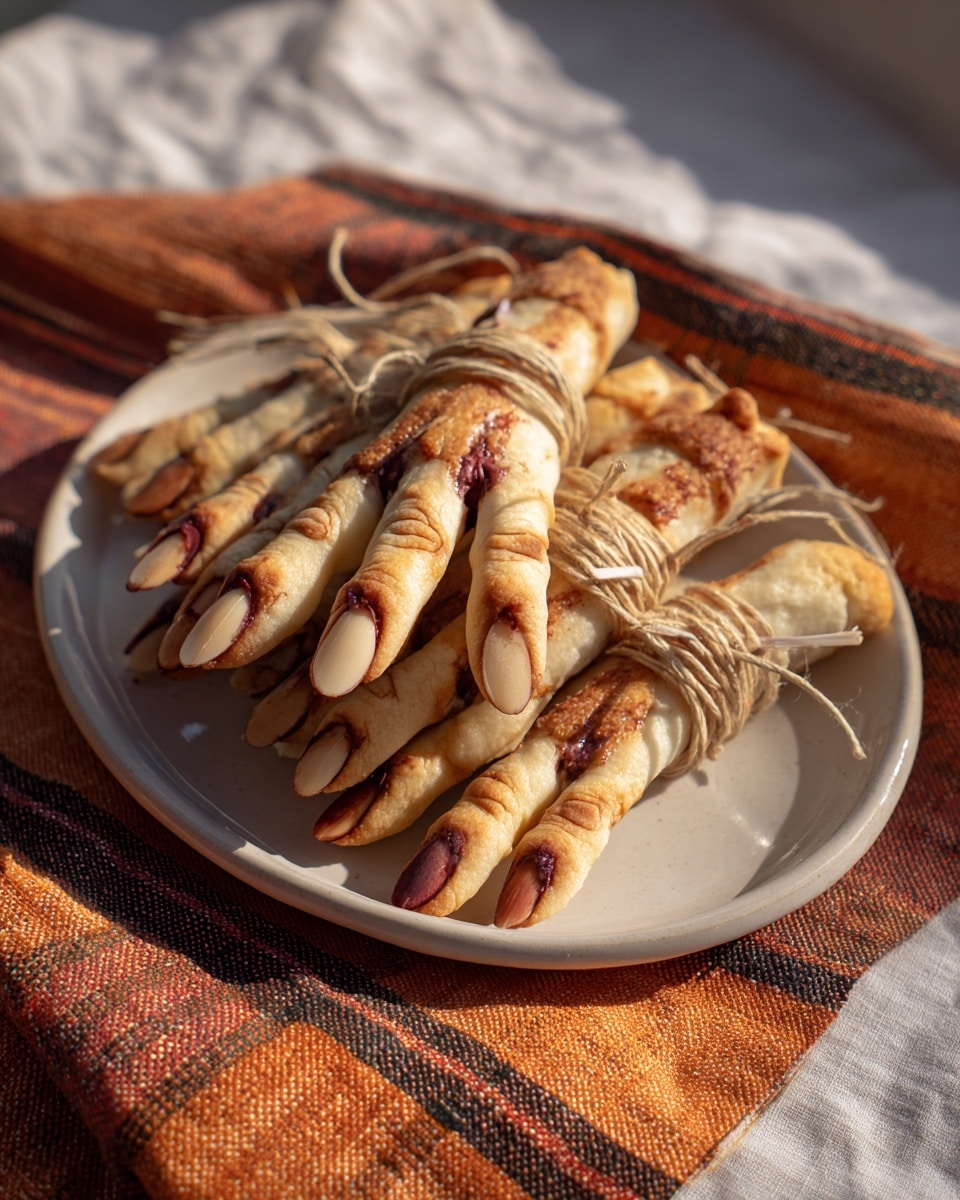
If you are craving a spooky treat that combines buttery goodness and a creepy visual twist, the Halloween Zombie Fingers Recipe is your perfect match. These delightfully eerie cookies are shaped like ghoulish fingers, complete with almond “nails” and a splash of blood-red jam to give them that spine-chilling effect. They’re fun and surprisingly simple to make, making them an irresistibly festive addition to your Halloween festivities that will have everyone reaching for more.

Ingredients You’ll Need
Getting the ingredients right is key to nailing the perfect texture and spooky appearance in this recipe. Each item contributes to the rich flavor, tender crumb, or eerie look, creating a spooky yet delicious result.
- 1 cup unsalted butter (softened): Ensures a rich, tender shortbread base with that melt-in-your-mouth quality.
- 1 cup powdered sugar: Adds sweetness and a delicate texture unlike granulated sugar.
- 1 large egg: Binds the dough and enriches the flavor for a perfect cookie structure.
- 1 teaspoon vanilla or almond extract: Gives warm, fragrant notes that complement the buttery dough beautifully.
- 2 ¾ cups all-purpose flour: The foundation of the dough providing structure and that classic cookie bite.
- ½ teaspoon baking powder: Lightens the dough slightly so the fingers aren’t too dense.
- ¼ teaspoon salt: Balances sweetness and enhances the overall flavor.
- ½ cup whole blanched almonds: Acts as creepy fingernails for the fingers, adding texture and an authentic touch.
- ¼ cup strawberry or raspberry jam (for “blood”): Adds a vivid, gory accent that brings the zombie fingers to life.
How to Make Halloween Zombie Fingers Recipe
Step 1: Prepare Your Oven and Mixing Bowls
Begin by preheating your oven to 350°F (177°C) and lining a baking sheet with parchment paper to prevent sticking. Having everything ready at this stage makes the process smooth and enjoyable.
Step 2: Cream Butter and Sugar
In a large bowl, cream together the softened butter and powdered sugar until the mixture becomes light and fluffy. This step is essential because it incorporates air, making the cookies tender yet firm enough to hold their finger shape.
Step 3: Add Egg and Flavor
Beat in the large egg and your choice of vanilla or almond extract. These add moisture and a burst of flavor that makes each bite delightful and aromatic.
Step 4: Combine Dry Ingredients
In a separate bowl, whisk together the all-purpose flour, baking powder, and salt. This ensures even distribution of the leavening agent and seasoning throughout the dough.
Step 5: Form the Dough
Gradually add the dry ingredients into the wet mixture, stirring until a soft dough forms. The dough should be pliable yet not too sticky for easy handling.
Step 6: Shape Your Zombie Fingers
Scoop out about one tablespoon of dough at a time and roll it into a thin finger shape, keeping in mind to make them slightly thinner than your desired final size since they puff up during baking. Press a whole blanched almond into one end to serve as the “fingernail.” Use a butter knife or toothpick to create small indentations along the finger for knuckle lines – these details elevate your cookies from cute to delightfully creepy.
Step 7: Bake and Add the Bloody Details
Place the shaped fingers on your prepared baking sheet and bake for 12 to 15 minutes, or until they turn lightly golden around the edges. Once out of the oven and cooled for a few minutes, carefully lift each almond nail and dab a small amount of strawberry or raspberry jam underneath to create a bloody nail effect. For extra gore, smear some jam at the base or around the knuckles. Let the cookies cool completely before serving to allow the jam to set.
How to Serve Halloween Zombie Fingers Recipe
Garnishes
To amp up the spooky factor, consider placing these zombie fingers on a platter dusted lightly with edible green or gray powder to mimic dust or decay. You can also add a few drops of extra jam around the plate to simulate a fresh “bloody crime scene.” Leafy herbs like rosemary can mimic “witch’s hair” around the edges, adding a creepy natural touch.
Side Dishes
These Halloween Zombie Fingers Recipe cookies pair wonderfully with classic fall treats such as a steaming cup of hot apple cider or a rich chocolate dip for dunking. For an extra chilling theme, serve alongside black licorice or gummy worms to keep your party table satisfyingly eerie and exciting.
Creative Ways to Present
Why not arrange your zombie fingers poking out of a “graveyard” made with crushed Oreos to mimic dirt? Using small decorative tombstones or placing the fingers in a mock “finger bowl” adds a playful and theatrical element your guests will love. Presentation really elevates this recipe from just a cookie into a Halloween masterpiece.
Make Ahead and Storage
Storing Leftovers
You can store leftover Halloween Zombie Fingers in an airtight container at room temperature for up to 5 days. Make sure to keep them in a single layer or separated with parchment paper to maintain their shape and avoid sticky jam smudges.
Freezing
If you want to prepare these spooky treats in advance, you can freeze the shaped but unbaked dough by placing the fingers on a baking sheet, freezing until solid, then transferring to a freezer-safe bag or container. When ready to bake, simply add a couple of extra minutes to the baking time. Baked cookies freeze well too; freeze cooled fingers in an airtight container and thaw at room temperature.
Reheating
To enjoy fresh-tasting cookies after refrigeration or freezing, warm them gently in a 300°F (150°C) oven for about 5 minutes. This helps revive the buttery softness without melting the juicy blood-red jam details.
FAQs
Can I use almond extract only, or should I mix with vanilla?
Almond extract works perfectly on its own and enhances the spooky feel with a nutty aroma. However, mixing it with vanilla can add warmth and complexity if you prefer a subtler flavor.
What type of jam is best for the “blood” effect?
Strawberry and raspberry jams are ideal because their bright red color looks realistic and their sweet-tart flavor complements the buttery cookies well. Avoid darker jams that might not create the same visual impact.
How do I keep the fingers from puffing too much during baking?
Rolling the dough slightly thinner and gently shaping each finger reduces puffing. Using baking powder sparingly also helps maintain the shape. Chilling the dough before shaping can firm it up for better control.
Can I make these cookies vegan?
To make a vegan version, substitute butter with a dairy-free alternative and use a flax egg or other egg replacer. Keep in mind the texture may vary slightly but they can still be deliciously spooky!
How do I make the dough colored green or gray?
Adding a few drops of green or gray gel food coloring to the dough before shaping will give your Halloween Zombie Fingers a more ghastly, undead appearance. Be sure to knead the color evenly for consistency.
Final Thoughts
Making the Halloween Zombie Fingers Recipe is as much fun as eating them, bringing everyone into the Halloween spirit with a little creative flair and a whole lot of flavor. Whether you’re hosting a party or just want to surprise your family with spooky delights, these creepy cookies will not disappoint. Go ahead, get your hands messy, and watch your guests’ faces light up as they nibble on this wonderfully eerie treat!
Print
Halloween Zombie Fingers Recipe
- Prep Time: 30 minutes
- Cook Time: 15 minutes
- Total Time: 45 minutes
- Yield: 24 cookies
- Category: Dessert
- Method: Baking
- Cuisine: American
- Diet: Vegetarian
Description
Halloween Zombie Fingers are spooky, fun-to-make treats shaped like creepy fingers with an almond “nail” and blood-red jam for a realistic, gory effect. Made from buttery shortbread dough and flavored with vanilla or almond, they’re the perfect eerie addition to any Halloween party table.
Ingredients
Cookie Dough
- 1 cup unsalted butter (softened)
- 1 cup powdered sugar
- 1 large egg
- 1 teaspoon vanilla or almond extract
- 2 ¾ cups all-purpose flour
- ½ teaspoon baking powder
- ¼ teaspoon salt
Decoration
- ½ cup whole blanched almonds
- ¼ cup strawberry or raspberry jam (for “blood”)
Instructions
- Preheat Oven and Prepare Baking Sheet: Preheat your oven to 350°F (177°C) and line a baking sheet with parchment paper to prevent sticking and ensure even baking.
- Cream Butter and Sugar: In a large bowl, beat together the softened unsalted butter and powdered sugar until the mixture is light and fluffy, creating a smooth base for the dough.
- Add Egg and Flavoring: Beat in the large egg and your choice of 1 teaspoon vanilla or almond extract until fully incorporated and the batter is uniform in color and texture.
- Combine Dry Ingredients: In a separate bowl, whisk together the all-purpose flour, baking powder, and salt to evenly distribute the leavening and seasoning.
- Form the Dough: Gradually add the dry ingredients into the wet mixture, mixing until a soft dough forms that holds together well but isn’t sticky.
- Shape Fingers: Scoop about 1 tablespoon of dough at a time and roll each into a thin finger shape, slightly thinner than the final desired size because they will puff up during baking.
- Add Almond Nails and Knuckles: Press a whole blanched almond at one end of each finger to mimic a fingernail. Using a butter knife or toothpick, create small indentations along the fingers to simulate knuckle lines for a creepy realistic detail.
- Bake: Place the shaped fingers onto the prepared baking sheet and bake for 12 to 15 minutes or until the edges are lightly golden, indicating they are done.
- Add Bloody Details: Once removed from the oven, allow cookies to cool for a few minutes. Carefully lift each almond and add a small dab of strawberry or raspberry jam underneath to create the effect of a bleeding nail. Optionally, spread some jam at the base or knuckle areas for extra gore.
- Cool and Serve: Let the cookies cool completely on a wire rack before serving or storing in an airtight container.
Notes
- For a more dramatic and eerie effect, tint the dough with green or gray gel food coloring before shaping to resemble decaying skin.
- Dough can be prepared ahead of time and chilled in the refrigerator to make shaping easier and to improve the finger definition.
- Store finished cookies in an airtight container at room temperature for up to 5 days to maintain freshness.


