Description
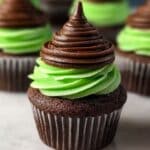
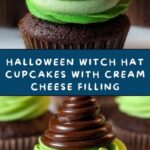
Celebrate Halloween with these fun and festive Halloween Witch Hat Cupcakes. Rich dark chocolate cupcakes filled with a creamy, colorful green-tinted cream cheese filling and topped with whimsical witch hat decorations made from chocolate sandwich cookies and chocolate kisses. Perfect for parties or spooky treats!
Ingredients
Cupcakes
- 1 (15.25 oz) box Dark Chocolate Cake Mix
- 3 Eggs (or follow package instructions)
- ½ cup Oil (or follow package instructions)
- 1 ¼ cups Water (or follow package instructions)
Cream Cheese Filling (Optional)
- 8 oz Cream Cheese (room temperature)
- ½ cup Sugar
- 1 Egg
- 1 tsp Vanilla Extract
- 34 drops Green Food Coloring
- 3 drops Yellow Food Coloring
- 2 drops Blue Food Coloring
Witch Hats & Frosting
- 24 Chocolate Sandwich Cookies (with green/mint filling or your choice)
- 24 Dark Chocolate Kisses Candy
- 1 (16 oz) tub Dark Chocolate Frosting
- 1 small Squeeze Tube of Green Frosting
Instructions
- Prepare the Cupcake Batter: Preheat your oven to 350°F (or follow the instructions on your cake mix box). Prepare the dark chocolate cake mix according to the package directions, combining eggs, oil, and water as suggested. Set the batter aside once mixed.
- Make the Cream Cheese Filling: In a mixing bowl, use a hand mixer to beat the room temperature cream cheese, sugar, egg, and vanilla extract until the mixture is smooth and creamy.
- Add Green Food Coloring: Incorporate the green, yellow, and blue food coloring drops into the cream cheese filling, blending thoroughly until the color is evenly distributed. Refrigerate the filling for 10-15 minutes to allow it to firm up.
- Assemble the Cupcakes: Line two 12-cup cupcake pans with black cupcake liners. Fill each liner about one-third full with the prepared cupcake batter.
- Add Cream Cheese Filling: Spoon a dollop of the green cream cheese filling into the center of each cupcake liner, then cover with more cake batter until the liners are about three-quarters full, sealing the filling inside.
- Bake the Cupcakes: Place the pans in the oven and bake for 13-16 minutes, or until a toothpick inserted into the cupcake (avoiding the filling) comes out clean.
- Cool the Cupcakes: Remove the cupcake pans from the oven and let them cool for 30 minutes in the pans. Then transfer the cupcakes to a wire rack to cool completely.
- Assemble the Witch Hats: While the cupcakes are cooling, attach a dark chocolate kiss candy to the center of each chocolate sandwich cookie using a small amount of dark chocolate frosting to act as glue.
- Add the Hat Bands: Use the green frosting to pipe a small band around the base of each chocolate kiss on the cookie, creating the witch hat look.
- Frost the Cupcakes: Once fully cooled, frost the tops of the cupcakes with the remaining dark chocolate frosting.
- Decorate with Witch Hats: Place a witch hat cookie on top of each frosted cupcake to complete each festive treat.
Notes
- You can omit the cream cheese filling if you prefer simpler cupcakes.
- Mixing the green food coloring yourself lets you customize the exact shade of green you want for the filling.
- Use black cupcake liners to enhance the spooky Halloween vibe.
- If you want a dairy-free option, substitute ingredients accordingly and check candy ingredients.
- Ensure cupcakes are fully cooled before frosting to prevent melting.
- Store cupcakes in an airtight container for up to 3 days for best freshness.

