
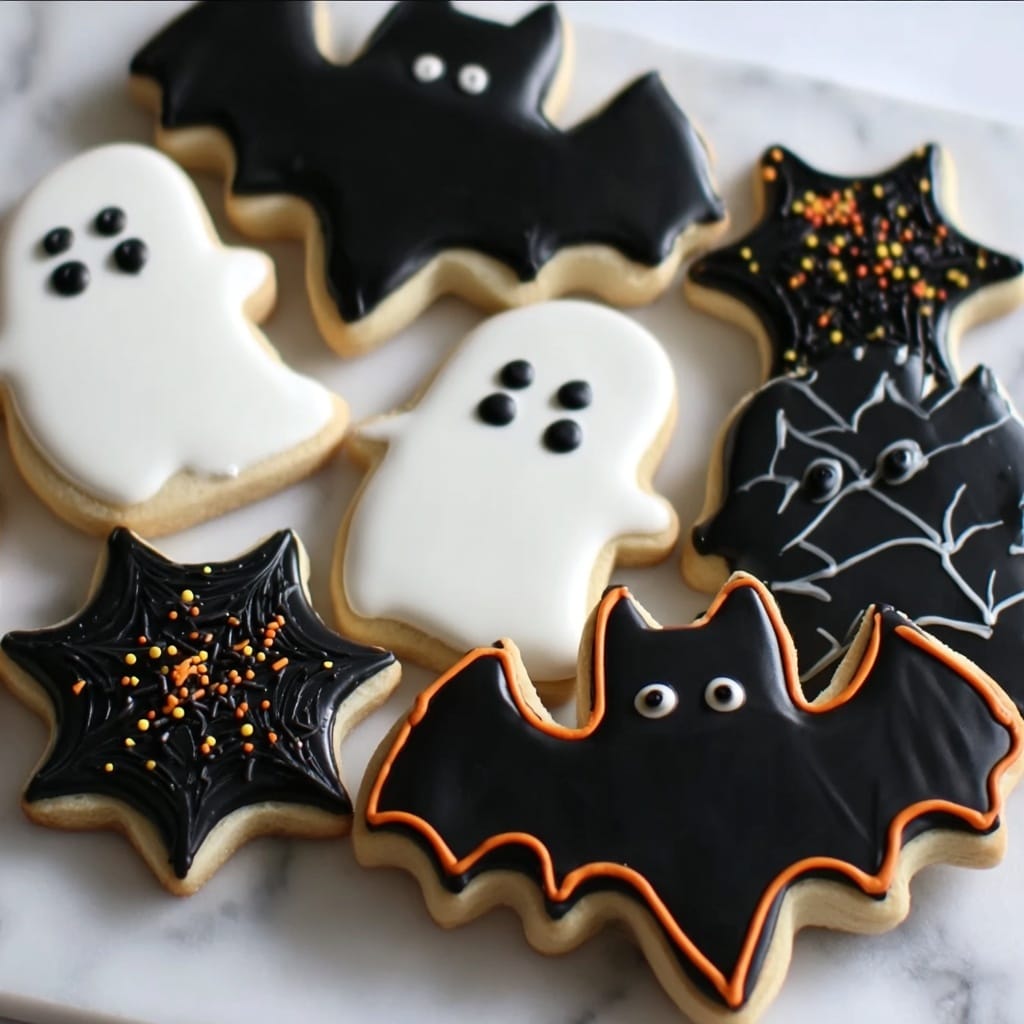
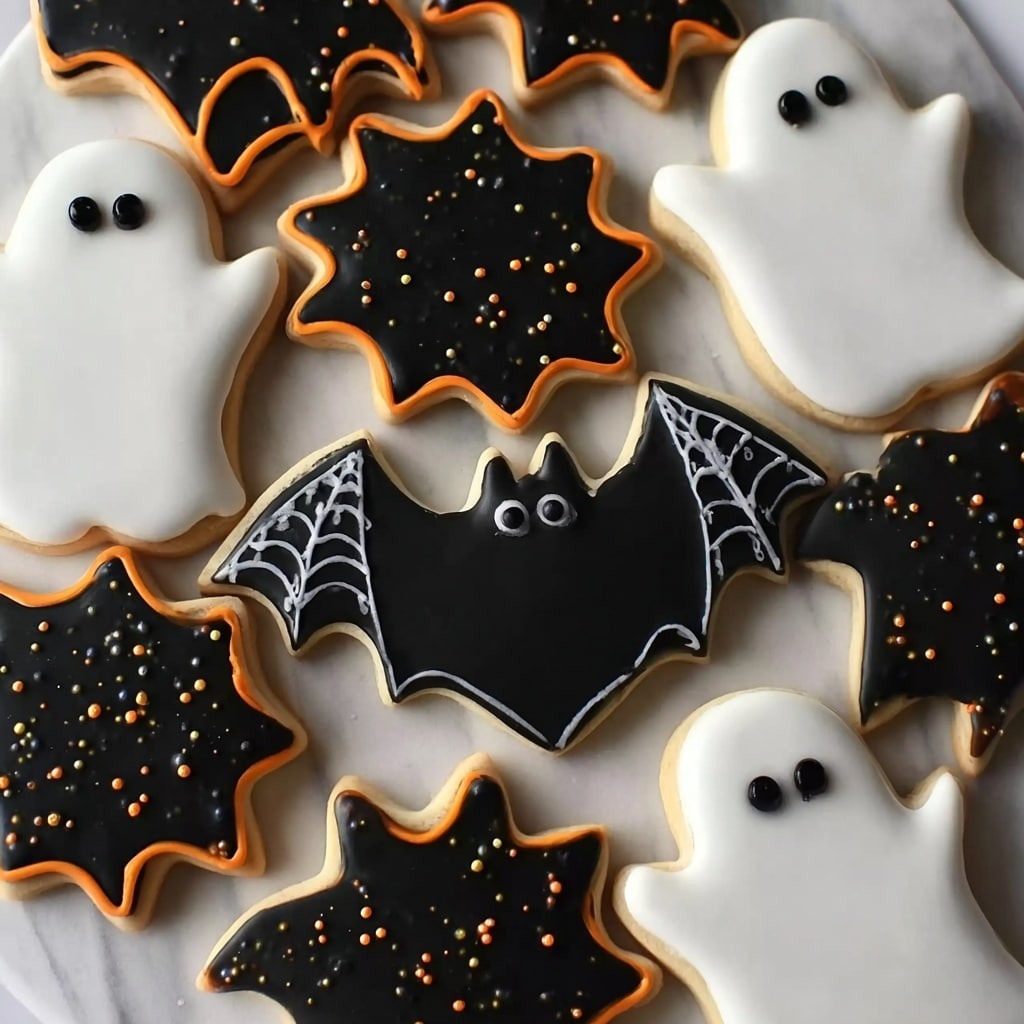
If you’re looking to dive into a festive baking project, this Halloween Royal Icing Cookies Recipe is an absolute must-try! These cookies capture the spooky spirit of the season with fun shapes and vibrant royal icing that’s perfect for decorating. The combination of buttery, tender cookies with smooth, colorful icing makes each bite a delight. Beyond just being tasty treats, these cookies are a fantastic way to get creative with Halloween-themed designs while enjoying a classic, crowd-pleasing flavor.

Ingredients You’ll Need
Every successful baking adventure starts with the right ingredients, and this Halloween Royal Icing Cookies Recipe calls for simple pantry staples that come together to create magic. Each ingredient plays a crucial role, whether it’s building the perfect cookie texture or creating that glossy, smooth icing that’s ideal for decorating.
- 1 cup (226 g) unsalted butter (chilled): Using chilled butter ensures flaky, tender cookies that hold their shape during baking.
- 1 cup (200 g) granulated sugar: Adds the perfect level of sweetness and helps with the cookie’s golden color.
- 1 whole egg + 1 egg yolk: Provides structure and moisture for soft, rich cookies.
- 2 tsp vanilla extract: Infuses a warm, comforting flavor base in the dough.
- 1 tsp salt: Balances sweetness and enhances all the other flavors in the cookies.
- 3 cups + 2 tbsp (375 g) all-purpose flour: The backbone of your cookies, creating that ideal chew and crispness.
- 4 egg whites: Base ingredient for royal icing to achieve that signature stiff peak texture.
- 2 lbs powdered sugar: Sweetener for the icing, enabling it to pipe smoothly and dry hard.
- 1 tsp vanilla extract (for icing): Adds delicate flavor to the royal icing, enhancing its sweetness.
- ½ tsp butter emulsion (or butter flavoring): Introduces a subtle buttery note to the icing without altering texture.
- ¼ tsp almond emulsion (or almond extract): Adds a hint of nutty depth to the royal icing’s flavor.
- Water (as needed): Adjusts icing consistency for perfect piping and flooding.
- Gel food coloring (orange and black): Essential for creating those iconic Halloween colors that make the cookies come alive.
- Halloween candy skulls (for coffin cookies): Fun, thematic embellishments that add a playful touch to your designs.
- Sprinkles (for cauldron cookies): Sparkly accents that bring texture and extra festive charm.
How to Make Halloween Royal Icing Cookies Recipe
Step 1: Prepare the Cookie Dough
Begin by mixing chilled unsalted butter with granulated sugar until the mixture is light and fluffy. Then add the whole egg, egg yolk, and vanilla extract for moistness and flavor. Incorporate salt and gradually mix in the all-purpose flour until the dough holds together without being sticky. Refrigerate the dough for at least 30 minutes—this step helps stiffen the dough for easier rolling and precise cutouts.
Step 2: Roll and Cut the Cookies
Once chilled, roll the dough out evenly on a lightly floured surface to your desired thickness, about 1/4 inch thick is perfect. Use Halloween-themed cookie cutters such as pumpkins, coffins, or cauldrons to cut out shapes. Place these cutouts onto a parchment-lined baking sheet, spaced slightly apart to avoid spreading, then pop them into the oven preheated to 350°F (175°C).
Step 3: Bake the Cookies
Bake the cookies for 10 to 12 minutes, until the edges just start to turn golden brown. It’s key to not overbake so the cookies stay tender and hold their shape perfectly. After baking, allow them to cool completely on a wire rack before moving on to the icing stage.
Step 4: Make the Royal Icing
While the cookies cool, whisk together the egg whites with powdered sugar until you achieve glossy stiff peaks. Stir in vanilla extract, butter emulsion, and almond emulsion for depth and richness. Divide the icing into separate bowls and add gel food coloring—orange and black—to create the classic Halloween colors you need for decorating.
Step 5: Decorate Your Cookies
Use piping bags fitted with fine tips to outline each cookie and then flood the center with more diluted icing for a smooth finish. While the icing is still wet, sprinkle Halloween candy skulls on coffin shapes and add sprinkles to cauldron cookies for extra spooky fun. Allow the icing to dry fully for several hours or overnight to ensure long-lasting decoration.
How to Serve Halloween Royal Icing Cookies Recipe
Garnishes
Adding additional garnishes like edible glitter or mini candy pieces can make your cookies feel even more festive and special. These little touches catch the light beautifully and make every bite feel like part of a Halloween celebration.
Side Dishes
Pair these Halloween Royal Icing Cookies Recipe treats with warm apple cider or a rich hot chocolate for a cozy fall gathering. These drinks complement the sweet, buttery flavors of the cookies and help set a fun, seasonal mood.
Creative Ways to Present
Arrange your cookies on tiered trays or Halloween-themed platters for an eye-catching display that’s perfect for parties or gift giving. Wrapping them individually in clear cellophane tied with orange and black ribbons also makes delightful spooky gifts for friends and family.
Make Ahead and Storage
Storing Leftovers
Store leftover Halloween Royal Icing Cookies in an airtight container at room temperature to keep them fresh and maintain icing crispness. They generally stay delicious for up to a week, making them a convenient treat to enjoy over time.
Freezing
You can freeze these cookies after they are completely decorated and dried. Place them in a single layer on a baking sheet, freeze until solid, then transfer to a freezer bag or container separated by parchment paper. They keep well for up to three months.
Reheating
It’s best to enjoy these cookies at room temperature. If they’ve been refrigerated or frozen, simply let them thaw out naturally—heating royal icing cookies can cause the icing to soften or melt, which might ruin that perfect finish.
FAQs
Can I make the dough ahead of time?
Absolutely! You can prepare the dough up to 2 days in advance and keep it refrigerated. Just be sure to wrap it tightly to prevent it from drying out or absorbing odors.
Is it safe to use raw egg whites in royal icing?
If you’re concerned about raw eggs, look for pasteurized egg whites or meringue powder alternatives that are safe and work just as well in royal icing recipes.
How do I fix royal icing that’s too runny?
Add more powdered sugar a little at a time to thicken the icing. If it’s too stiff, a few drops of water will loosen it to the right piping consistency.
Can I use other colors besides orange and black?
Definitely! Feel free to use any gel food coloring you love to customize your Halloween Royal Icing Cookies Recipe with purple, green, or even neon shades for a different twist.
What’s the best way to store decorated cookies?
Keep them in a single layer in an airtight container at room temperature, away from heat or moisture, to preserve both the cookie’s crunch and the smooth icing finish.
Final Thoughts
There’s something truly joyful about creating and sharing these Halloween Royal Icing Cookies Recipe masterpieces with friends and family. It’s more than just a recipe—it’s an experience filled with creativity, warmth, and holiday cheer. I hope you have a blast making them and that they become a lovely part of your Halloween traditions!
Print
Halloween Royal Icing Cookies Recipe
- Prep Time: 1 hour 30 minutes
- Cook Time: 12 minutes per batch
- Total Time: 1 hour 45 minutes
- Yield: 24-30 decorated cookies
- Category: Dessert
- Method: Baking
- Cuisine: American
- Diet: Vegetarian
Description
Celebrate Halloween with these festive Royal Icing Cookies featuring rich buttery sugar cookie bases decorated with smooth, vibrant royal icing. Perfect for spooky gatherings, these cookies offer delightful flavors with vanilla and almond emulsions, crowned with Halloween-themed candies and sprinkles for an extra eerie touch.
Ingredients
Cookie Dough
- 1 cup (226 g) unsalted butter (chilled)
- 1 cup (200 g) granulated sugar
- 1 whole egg
- 1 egg yolk
- 2 tsp vanilla extract
- 1 tsp salt
- 3 cups + 2 tbsp (375 g) all-purpose flour
Royal Icing
- 4 egg whites
- 2 lbs powdered sugar
- 1 tsp vanilla extract
- ½ tsp butter emulsion (or butter flavoring)
- ¼ tsp almond emulsion (or almond extract)
- Water (as needed)
- Gel food coloring (orange and black)
Decorations
- Halloween candy skulls (for coffin cookies)
- Sprinkles (for cauldron cookies)
Instructions
- Prepare the Cookie Dough: In a large mixing bowl, cream the chilled unsalted butter and granulated sugar together until light and fluffy. Add the whole egg, egg yolk, and 2 teaspoons of vanilla extract, mixing well until fully combined.
- Incorporate Dry Ingredients: Add 1 teaspoon of salt and gradually mix in the all-purpose flour by adding it in batches. Continue mixing until the dough comes together and is no longer sticky.
- Chill the Dough: Shape the dough into a flat disc, wrap in plastic wrap, and refrigerate for at least 1 hour to firm up for easier rolling and cutting.
- Preheat and Prepare for Baking: Preheat your oven to 350°F (175°C). Line baking sheets with parchment paper.
- Roll and Cut Cookies: Roll out the chilled dough on a lightly floured surface to about ¼ inch thick. Use Halloween-themed cookie cutters (e.g., coffins, cauldrons) to cut shapes and place them on the prepared baking sheets.
- Bake the Cookies: Bake in the preheated oven for 10-12 minutes or until the edges are lightly golden. Remove from oven and cool completely on wire racks before decorating.
- Make the Royal Icing: In a mixing bowl, beat 4 egg whites until frothy. Gradually add 2 lbs of powdered sugar, mixing on low speed until fully incorporated. Add 1 teaspoon vanilla extract, ½ teaspoon butter emulsion, and ¼ teaspoon almond emulsion. Adjust consistency with small amounts of water, beating until stiff peaks form.
- Color the Icing: Divide the royal icing into separate bowls. Tint portions with gel food coloring to achieve vibrant orange and black hues.
- Decorate the Cookies: Using piping bags fitted with fine tips, outline and flood the cookies with the colored royal icing. For coffin-shaped cookies, embellish with Halloween candy skulls before the icing sets. For cauldron-shaped cookies, sprinkle Halloween-themed sprinkles while the icing is wet.
- Dry the Icing: Allow the decorated cookies to dry completely at room temperature for several hours or overnight to set the royal icing fully.
Notes
- Chilling the dough is essential for easy handling and sharp cookie edges.
- Make sure to fully cool cookies before decorating to prevent icing from melting.
- Use paste or gel food coloring to avoid thinning the royal icing.
- Store decorated cookies in an airtight container for up to one week.
- Butter emulsion provides a richer flavor than butter flavoring but both work well.


