

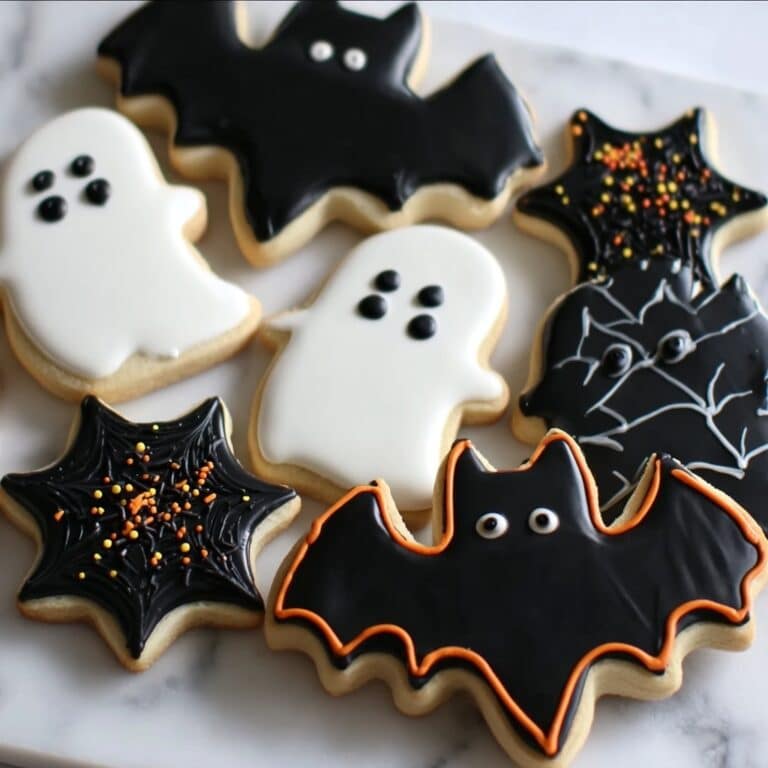
If you are looking for an enchanting treat that will mesmerize your guests this season, the Halloween Cauldron Cookie Creation Recipe is the perfect magical delight. These charming cookies blend the rich flavors of chocolate and candy corn with dazzling royal icing that transforms each bite into a bubbling, spooky cauldron of fun. Whether you are baking for a festive party or cozy family night, this recipe is a true crowd-pleaser that combines craft, flavor, and Halloween spirit in every crumb.

Ingredients You’ll Need
Getting ready to bake these captivating cookies is easier than you might think thanks to a straightforward list of ingredients, each chosen to build layers of flavor and texture that bring your Halloween Cauldron Cookie Creation Recipe to life. From buttery sweetness to that perfect pop of candy corn, every item plays a vital role in this delicious adventure.
- Unsalted butter, 1 cup, softened: Provides rich, creamy goodness and a tender crumb that melts in your mouth.
- Granulated sugar, 1 cup: Adds sweetness and helps achieve the perfect cookie crunch.
- Brown sugar, 1 cup, packed: Deepens the flavor with its molasses notes, giving the cookies a subtle chewiness.
- Large eggs, 2: Bind ingredients together and add moisture for a soft, cohesive dough.
- Vanilla extract, 2 teaspoons: Boosts flavor with warm, comforting aromas.
- All-purpose flour, 3 cups: The foundation for your cookies, providing structure and body.
- Baking soda, 1 teaspoon: Helps the cookies rise just right for a pleasant texture.
- Salt, 1/2 teaspoon: Balances sweetness and enhances all other flavors.
- Chocolate chips, 1 cup: Little pockets of rich chocolate that make every bite irresistible.
- Candy corn, 1 cup: Adds festive color and a classic Halloween sweetness.
- Powdered sugar, 4 cups, sifted: Essential for luscious, smooth royal icing.
- Meringue powder, 3 tablespoons: Creates that perfect stiff peak texture in icing for intricate designs.
- Clear vanilla extract, 1/2 teaspoon: Keeps your icing flavorful without coloring it.
- Warm water, 6-8 tablespoons: Adjusts icing consistency for piping and flooding.
- Gel food colorings (green, purple, black, white, orange optional): Bring your cauldron cookies to life with vivid hues.
- Edible glitter (optional): Adds a magical shimmer that looks like potion bubbles.
- Various Halloween sprinkles (optional): Extra touches of spooky fun and texture.
- Small candy eyes (optional): Perfect for those mischievous little finishing touches.
How to Make Halloween Cauldron Cookie Creation Recipe
Step 1: Prepare Cookie Dough
Start by whisking together your dry ingredients: flour, baking soda, and salt. In a separate bowl, cream the softened butter with both sugars until you reach a light, fluffy texture that promises a tender crumb. Next, incorporate eggs and vanilla, blending until smooth. Gradually add the dry mixture and finish by folding in the chocolate chips and candy corn, bringing bursts of sweetness and bite-sized texture. Chill the dough to make rolling and cutting a breeze.
Step 2: Bake Cookies
Preheat your oven to 375°F (190°C). Roll your dough out on a lightly floured surface to a quarter-inch thickness and cut out your cauldron shapes, or simply scoop for drop-style cookies. Place them on parchment-lined sheets and bake just until the edges begin to set—this keeps them tender inside. Allow your cookies to cool fully on racks, essential for the smooth royal icing that will follow.
Step 3: Prepare Royal Icing
For the signature look of your Halloween Cauldron Cookie Creation Recipe, royal icing is key. Sift powdered sugar and meringue powder for a silky base. Blend in clear vanilla and warm water until stiff peaks form and the icing shines like a polished gem. Adjust the consistency to create distinct outlines and flooded sections, and divide the icing into portions for your colorful palette—black, green, purple, white, with optional flashes of orange. Keep your iced masterpiece ingredients covered to prevent drying out.
Step 4: Decorate Cauldron Base
Begin decorating with a bold black outline around each cookie’s edge to carve out the cauldron shape. Allow this border to set into a stable frame before flooding inside the lines with black icing, carefully smoothing for a flawless, glassy finish. Patience is key here—let your base dry completely, either for several hours or overnight, to form the perfect canvas for your “potion” details.
Step 5: Add Bubbling Potion
Bring your cauldrons to life by piping an irregular, wavy green outline across the top edge of your black base for the bubbling potion’s lip. Once set, flood this area with your green icing, and before it dries, add colorful dots of purple, white, and black or dark green. Gently swirl these colors with a scribe tool to create a mesmerizing bubbling effect that looks like the witch’s brew is actively fizzing and alive. Allow this layer to dry completely for hours or overnight to maintain its magical charm.
Step 6: Add Final Spooky Touches
The finishing touches are where your cookies become enchanting showstoppers. Dust your bubbling potion with edible glitter for that glimmer of magical shimmer. Attach candy eyes or sprinkle on themed sprinkles and edible bones using tiny dots of royal icing to secure them. Give these final adornments at least an hour to dry fully, ensuring your creation remains intact as you share the spooky fun with your favorite goblins and ghouls.
How to Serve Halloween Cauldron Cookie Creation Recipe

Garnishes
Adding the right garnishes enhances the overall theme and taste of your Halloween Cauldron Cookie Creation Recipe. Consider pairing with a light dusting of edible glitter or small, candy eyes to emphasize the witchy vibes. Colorful sprinkles shaped like bats or pumpkins add playful texture and a vibrant finishing flourish.
Side Dishes
Pair these cookies with festive drinks like warm apple cider, a rich hot chocolate spiked with a hint of cinnamon, or even a glowing green punch to continue the bubbling cauldron theme. Fresh fruit skewers with orange and black fruit pieces can provide a refreshing contrast to the sweet richness of the cookies.
Creative Ways to Present
Presentation brings an extra layer of delight to your Halloween Cauldron Cookie Creation Recipe. Arrange cookies on a black platter sprinkled with faux spider webs or place them nestled in a cauldron-shaped bowl for a dramatic reveal. Wrapping each cookie in a clear bag tied with orange and black ribbons makes them perfect spooky party favors or thoughtful gifts.
Make Ahead and Storage
Storing Leftovers
Once decorated and completely dry, your cookies can be stored in an airtight container at room temperature for up to one week. Layer cookies with parchment paper to avoid sticking and keep those intricate royal icing details looking flawless.
Freezing
For longer storage, freeze your baked and decorated cookies in a single layer on a baking sheet before transferring them to an airtight container or freezer bag. This method prevents damage to your carefully crafted icing and keeps your cookies fresh for up to three months.
Reheating
Since these cookies are best enjoyed at room temperature, simply thaw frozen cookies overnight in their container at room temperature. Avoid microwaving as heat can soften the icing and affect texture, but allowing them to come to room temperature naturally keeps the cauldron magic intact.
FAQs
Can I use regular eggs instead of large eggs?
While large eggs are standard and provide the correct moisture content, you can use medium eggs but measure carefully to ensure the dough doesn’t become too wet or dry.
How do I get the royal icing to the right consistency for flooding and outlining?
Adjust your icing by adding small amounts of water to make it thinner for flooding, about the consistency of honey, and keep it thicker, like toothpaste, for outlining. Practice on parchment paper to perfect before decorating your cookies.
Can I substitute candy corn with other candy?
Sure! If candy corn isn’t your favorite, consider using small gummy candies or colorful chocolate pieces to maintain the colorful burst inside the cookies.
How long does it take for the icing to dry completely?
The black icing base and the bubbling potion layers require several hours to overnight to dry fully, ensuring a smooth, sturdy surface that won’t smudge during further decorating or handling.
Are these cookies suitable for children to help decorate?
Absolutely! The Halloween Cauldron Cookie Creation Recipe is a wonderful activity for kids, especially when it comes to adding icing colors and sprinkles, making it a fun and creative family project.
Final Thoughts
Now that you’ve unlocked all the secrets behind the Halloween Cauldron Cookie Creation Recipe, you’re ready to dazzle your loved ones with a treat that’s just as magical as it is delicious. Baking these cookies is more than a recipe; it’s an opportunity to stir up some fun, creativity, and seasonal spirit. So grab your mixing bowls and piping bags, gather your ingredients, and cast a sweet spell with every bite!
Print
Halloween Cauldron Cookie Creation Recipe
- Prep Time: 30 minutes (plus 1 hour chilling dough and icing preparation time)
- Cook Time: 8-10 minutes per batch
- Total Time: 15 hours (including chilling and multiple icing drying times overnight)
- Yield: 24 cookies
- Category: Baking
- Method: Baking
- Cuisine: American
- Diet: Vegetarian
Description
Create festive Halloween Cauldron Cookies featuring a rich, buttery cookie base studded with chocolate chips and candy corn, topped with vibrant, glossy royal icing decorations resembling bubbling potions. Perfect for holiday parties, these eye-catching treats combine classic flavors with creative spooky designs.
Ingredients
Cookie Dough
- 1 cup unsalted butter, softened
- 1 cup granulated sugar
- 1 cup brown sugar, packed
- 2 large eggs
- 2 teaspoons vanilla extract
- 3 cups all-purpose flour
- 1 teaspoon baking soda
- 1/2 teaspoon salt
- 1 cup chocolate chips
- 1 cup candy corn
Royal Icing
- 4 cups powdered sugar, sifted
- 3 tablespoons meringue powder
- 1/2 teaspoon clear vanilla extract
- 6–8 tablespoons warm water
- Green gel food coloring
- Purple gel food coloring
- Black gel food coloring
- White gel food coloring
- Orange gel food coloring (optional)
Decorations (Optional)
- Edible glitter
- Various Halloween sprinkles
- Small candy eyes
Instructions
- Prepare Cookie Dough: In a bowl, whisk together 3 cups all-purpose flour, 1 teaspoon baking soda, and 1/2 teaspoon salt. In a stand mixer, cream 1 cup softened unsalted butter with 1 cup granulated sugar and 1 cup packed brown sugar until light and fluffy. Beat in 2 large eggs and 2 teaspoons vanilla extract. Gradually add dry ingredients to wet, mixing until just combined. Fold in 1 cup chocolate chips and 1 cup candy corn. Cover and chill the dough for at least 1 hour to ensure easier handling and better texture.
- Bake Cookies: Preheat the oven to 375°F (190°C). On a lightly floured surface, roll the chilled dough to about 1/4 inch thickness. Cut dough into cauldron shapes using a cookie cutter or shape by hand, or scoop for drop cookies if preferred. Place cookies on parchment-lined baking sheets, spacing evenly. Bake for 8-10 minutes until cookie edges are lightly set but centers remain soft. Remove cookies and allow them to cool completely on a wire rack before decorating.
- Prepare Royal Icing: Sift 4 cups powdered sugar and 3 tablespoons meringue powder into a mixing bowl. Add 1/2 teaspoon clear vanilla extract and start with 6 tablespoons warm water. Beat the mixture with a mixer on medium-high speed for 5-7 minutes until thick, glossy, and forming stiff peaks. Adjust water quantity to reach the desired consistency: thicker (toothpaste-like) for outlining and thinner (honey-like) for flooding. Divide the icing into portions and color with green, purple, black, white, and optionally orange gel food coloring. Keep the icing covered when not in use to prevent drying out.
- Decorate Cauldron Base: With black outlining icing, carefully pipe a border around each cooled cookie forming the cauldron shape. Let outlines dry for 10-15 minutes to hold structure. Then flood the outlined interiors with the black flooding icing, spreading evenly and popping any air bubbles with a toothpick or scribe tool. Allow this base layer to dry completely, several hours or overnight, so it forms a smooth, firm surface for further decoration.
- Add Bubbling Potion: After the black base is fully dry, pipe an irregular, wavy outline with green outlining icing along the top edge of each cauldron to create the ‘potion lip’. Let this set for 10-15 minutes. Flood inside the green outline with green flooding icing. While still wet, immediately drop small dots of purple, white, and black/dark green icing onto the green flooding layer. Using a scribe tool, gently drag through the dots to produce a swirly, bubbling potion effect. Allow this decoration to dry completely for 6-12 hours or overnight for best results.
- Add Final Spooky Touches: When all layers have dried, gently brush edible green or iridescent glitter over the potion areas to add shimmer and magic. Attach any small candy eyes, Halloween sprinkles, or edible bones by placing tiny dots of royal icing as glue. Allow these final details to dry for at least one hour before serving or packaging to ensure they stay perfectly set.
Notes
- Chilling the cookie dough improves handling and ensures the cookies keep their shape while baking.
- Royal icing consistency control is crucial: thicker icing outlines shape, thinner icing floods surfaces.
- Use gel food coloring to avoid affecting the icing consistency.
- Allow ample drying time between layers for a clean, professional finish.
- Store decorated cookies in an airtight container at room temperature; avoid refrigeration to prevent icing moisture issues.


