

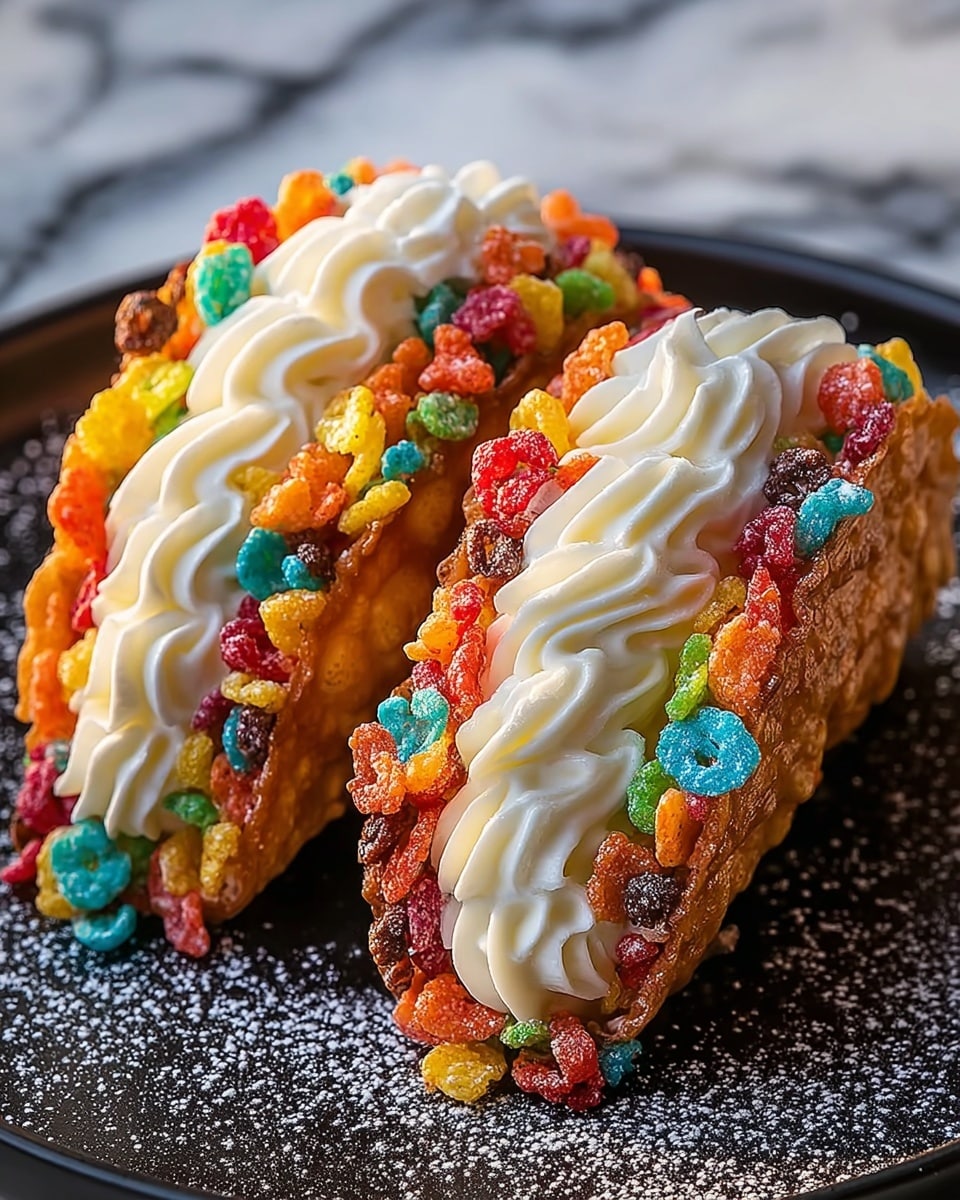
If you are looking for a dessert that is as playful as it is delicious, your search ends right here with Fruity Pebbles Cheesecake Tacos: A Deliciously Fun Dessert Recipe. These colorful, crispy taco shells made from Fruity Pebbles cereal hold a luxuriously creamy cheesecake filling that’s sweet, tangy, and utterly irresistible. This recipe combines nostalgia, texture, and flavor in a way that will make your taste buds dance and your guests ask for seconds. Whether you’re planning a fun family treat or a show-stopping dessert for friends, these cheesecake tacos bring joy and whimsy to every bite.

Ingredients You’ll Need
Getting your ingredients together for Fruity Pebbles Cheesecake Tacos: A Deliciously Fun Dessert Recipe is a breeze because each component plays a clear and delicious role—from the crunchy colorful shells to the silky cheesecake filling. These simple staples combine to create a party on your plate.
- Fruity Pebbles cereal (2 cups): The star ingredient for the colorful, crispy taco shells that add fun and crunch.
- Unsalted butter (2 tablespoons, melted): Helps bind the crushed cereal together for sturdy shells.
- Granulated sugar (1 tablespoon + 1/2 cup): Sweetens both the taco shells and the cheesecake filling perfectly.
- Cream cheese (8 ounces, softened): The rich and creamy foundation of the cheesecake filling.
- Sour cream (1/4 cup): Adds a tangy depth to the cheesecake for balance.
- Vanilla extract (1 teaspoon): Brings warm aromatic notes to the filling.
- Heavy cream (1/4 cup): Whipped into the filling for lightness and fluffiness.
- Additional Fruity Pebbles cereal (1 cup, finely crushed): Creates a colorful, crunchy coating for the taco edges.
- Whipped cream: For topping and extra creaminess.
- Fresh berries (strawberries, blueberries, raspberries): Adds freshness and vibrant color.
- Chocolate shavings: Optional garnish to elevate flavor and presentation.
- Extra Fruity Pebbles cereal: For garnish and added fun crunch.
How to Make Fruity Pebbles Cheesecake Tacos: A Deliciously Fun Dessert Recipe
Step 1: Prepare the Fruity Pebbles Taco Shells
Start by pulsing 2 cups of Fruity Pebbles cereal in a food processor until finely ground. If you don’t have a processor, no worries — place the cereal in a zip-top bag and crush it with a rolling pin until the texture resembles breadcrumbs. This finely ground cereal will become the base of your crunchy taco shells.
Step 2: Combine Ingredients for the Shells
In a medium bowl, mix the crushed Fruity Pebbles with melted unsalted butter and one tablespoon of granulated sugar. This mixture will hold the shells together and add just the right touch of sweetness to complement the filling.
Step 3: Shape and Bake the Taco Shells
Preheat your oven to 350°F (175°C). Line a baking sheet with parchment paper, then scoop about 2 tablespoons of the cereal mixture and press each into a 4-5 inch circle. Leave about one inch between each circle to prevent them from sticking. Bake for 8-10 minutes until the edges are lightly golden and the shells feel firm but still pliable.
Step 4: Form the Taco Shape
As soon as you remove the shells from the oven, let them cool just enough to handle—about 1-2 minutes. While still warm and flexible, gently drape each shell over the bar of an oven rack or the edge of a muffin tin to create the classic taco shell shape. Let them cool completely for 15-20 minutes so they harden perfectly without cracking.
Step 5: Make the Cheesecake Filling
Make sure your cream cheese is softened before starting to avoid lumps. Using an electric mixer, beat together the cream cheese and 1/2 cup of granulated sugar until smooth and creamy. Add sour cream and vanilla extract, then continue beating until everything is combined. Finally, gradually mix in the heavy cream, beating until the filling becomes light and fluffy. Chill for at least 30 minutes to help it set up nicely.
Step 6: Coat Taco Shell Edges with Crushed Fruity Pebbles
Crush one cup of Fruity Pebbles cereal finely using a rolling pin, then pour into a shallow dish. Dip the edges of each taco shell into the crushed cereal, pressing gently so the colorful bits stick and add an extra pop of texture and fun.
Step 7: Assemble Your Fruity Pebbles Cheesecake Tacos
Remove the cheesecake filling from the refrigerator and spoon or pipe it generously into each taco shell. This creamy filling is the perfect contrast to the crisp taco shell, creating a harmony of textures and flavors with every bite.
Step 8: Add Your Favorite Toppings
Top your cheesecake tacos with dollops of whipped cream, fresh berries for a burst of freshness, and chocolate shavings for an elegant touch. Sprinkle extra Fruity Pebbles on top to catch the eye and add even more cheerful crunch.
How to Serve Fruity Pebbles Cheesecake Tacos: A Deliciously Fun Dessert Recipe
Garnishes
Whipped cream, fresh, juicy berries, and a sprinkle of chocolate shavings not only enhance the flavors but also make each taco look almost too pretty to eat. The vivid colors of the Fruity Pebbles paired with natural fruits create an irresistible visual feast that invites you in.
Side Dishes
Keep it light and refreshing by pairing these tacos with a simple fruit salad or a chilled glass of sparkling lemonade. These sides highlight the playful nature of the dessert without overwhelming your palate.
Creative Ways to Present
For parties, present your Fruity Pebbles Cheesecake Tacos upright in a cupcake pan or arrange them on a colorful platter surrounded by fresh fruit. You can even serve them family-style with separate bowls of toppings so guests can customize their own. This interactive presentation adds to the fun and makes dessert time a memorable event.
Make Ahead and Storage
Storing Leftovers
If you have any leftover Fruity Pebbles Cheesecake Tacos, store them in an airtight container in the refrigerator. The shells will remain somewhat crispy if kept separate from the filling, but assembled tacos are best eaten within 2 days to enjoy optimal freshness and texture.
Freezing
Freezing assembled cheesecake tacos is not recommended because the shells will become soggy. However, you can freeze the cheesecake filling separately for up to one month. Thaw overnight in the refrigerator before using it fresh in a new batch of taco shells.
Reheating
These tacos are best served chilled or at room temperature. If you want to enjoy a warm shell, briefly warm the shell alone in the oven at a low temperature for a few minutes before filling it. Avoid reheating once filled, as that will affect the texture and flavor negatively.
FAQs
Can I use other cereals to make the taco shells?
Absolutely! While Fruity Pebbles offer vibrant color and unique flavor, cereals like Rice Krispies or Cocoa Pebbles can also work. Keep in mind the texture and sweetness will vary depending on the cereal you choose.
How do I make sure the taco shells don’t crack?
Timing is key. Take the shells out of the oven when they’re still slightly pliable, and shape them immediately over a rack or muffin tin. Letting them cool fully in the shape will help them harden without cracking.
Can I make the cheesecake filling dairy-free?
Yes! Use dairy-free cream cheese, sour cream alternatives like coconut-based sour cream, and plant-based whipped cream. The consistency might differ slightly, but the dessert will still be delicious.
What’s the best way to crush the Fruity Pebbles cereal?
A food processor works best for evenly finely crushed cereal, but a zip-top bag and rolling pin or meat mallet can also do the trick if you press gently to avoid pulverizing them into powder.
Can I prepare this dessert ahead for a party?
You can prepare the taco shells and cheesecake filling separately the day before. Assemble just before serving for the best texture and freshness, and add garnishes last minute for maximum visual appeal.
Final Thoughts
There is something truly special about Fruity Pebbles Cheesecake Tacos: A Deliciously Fun Dessert Recipe that combines childhood nostalgia with elegant flavors in one delightful bite. Every element from the crispy, colorful shell to the fluffy, creamy cheesecake filling is crafted to bring smiles and sweet moments to your table. I can’t wait for you to try this recipe and see how it lights up your dessert experience with fun and flavor all at once!
Print
Fruity Pebbles Cheesecake Tacos: A Deliciously Fun Dessert Recipe
- Prep Time: 30 minutes
- Cook Time: 10 minutes
- Total Time: 40 minutes
- Yield: 6-8 tacos
- Category: Dessert
- Method: Baking
- Cuisine: American
- Diet: Vegetarian
Description
Fruity Pebbles Cheesecake Tacos are a playful and colorful dessert that combines crispy, fruity cereal taco shells with a creamy cheesecake filling. These easy-to-make tacos are topped with whipped cream, fresh berries, and chocolate shavings for a fun treat perfect for parties or a delightful dessert.
Ingredients
Taco Shells
- 2 cups Fruity Pebbles cereal
- 2 tablespoons unsalted butter, melted
- 1 tablespoon granulated sugar
Cheesecake Filling
- 8 ounces cream cheese, softened
- 1/2 cup granulated sugar
- 1/4 cup sour cream
- 1 teaspoon vanilla extract
- 1/4 cup heavy cream
Coating & Toppings
- 1 cup Fruity Pebbles cereal, finely crushed
- Whipped cream
- Fresh berries (strawberries, blueberries, raspberries)
- Chocolate shavings
- Extra Fruity Pebbles cereal
Instructions
- Prepare the Cereal Crumble: In a food processor, pulse 2 cups of Fruity Pebbles cereal until finely ground, or place the cereal in a zip-top bag and crush with a rolling pin.
- Make the Taco Shell Mixture: In a medium bowl, combine the crushed Fruity Pebbles, melted butter, and granulated sugar; mix thoroughly to combine.
- Form the Taco Shells: Preheat your oven to 350°F (175°C) and line a baking sheet with parchment paper. Press about 2 tablespoons of the mixture into 4-5 inch circles on the baking sheet, spacing them about 1 inch apart.
- Bake the Shells: Bake the circles for 8-10 minutes until the edges are lightly golden and the shells set.
- Shape the Shells: Remove the baking sheet and let the circles cool 1-2 minutes. While still pliable, drape each circle over an oven rack bar or muffin tin edge to shape them into taco shells.
- Cool and Harden: Allow the taco shells to cool completely and harden for about 15-20 minutes before removing from the shaping tool.
- Soften the Cream Cheese: Ensure the cream cheese is fully softened for a smooth filling.
- Mix Cream Cheese and Sugar: Using an electric mixer, beat the cream cheese and 1/2 cup granulated sugar together until smooth and creamy.
- Add Sour Cream and Vanilla: Beat in sour cream and vanilla extract until well incorporated.
- Incorporate Heavy Cream: Gradually add heavy cream, beating until the filling is light and fluffy.
- Chill the Filling: Cover the bowl with plastic wrap and refrigerate the filling for at least 30 minutes to firm up.
- Crush Additional Fruity Pebbles: Place 1 cup of Fruity Pebbles in a bag and crush finely with a rolling pin or meat mallet. Pour into a shallow dish.
- Coat Taco Shell Edges: Dip edges of each taco shell into crushed Fruity Pebbles, pressing gently to adhere the cereal.
- Fill the Tacos: Remove the filling from the fridge and spoon or pipe it into each taco shell.
- Decorate the Tacos: Top with whipped cream, fresh berries, chocolate shavings, and extra Fruity Pebbles cereal as desired.
- Serve Immediately: For the best flavor and texture, serve the Fruity Pebbles Cheesecake Tacos right away.
Notes
- Make sure cream cheese is softened to avoid lumps in the filling.
- Shape the taco shells while warm to prevent cracking.
- Feel free to customize toppings with nuts, sprinkles, or other favorite candies.
- Store leftover cheesecake filling in the refrigerator for up to 2 days.
- These tacos are best enjoyed fresh to maintain crispness of the shells.


