

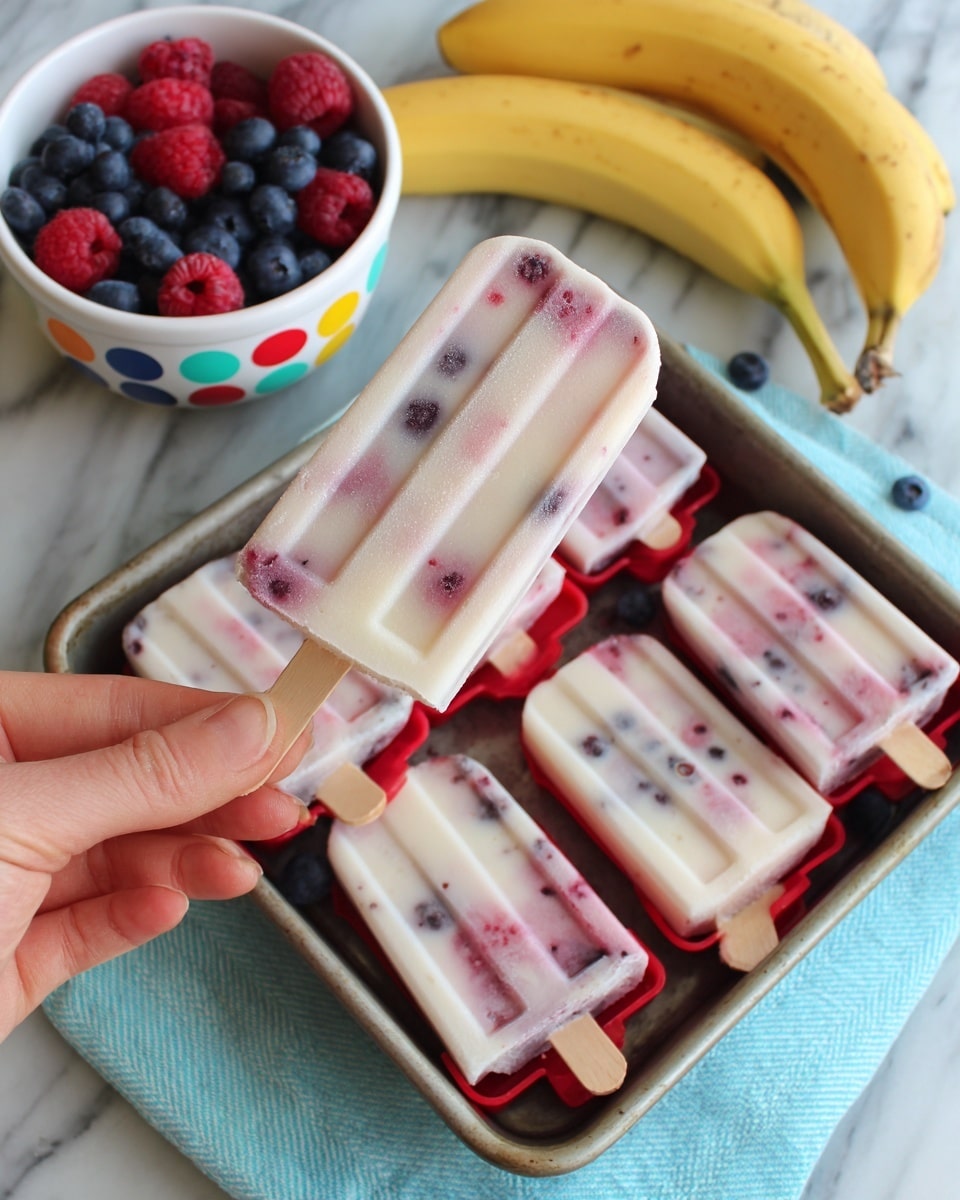
If you’ve been searching for a deliciously refreshing snack that feels like summer in every bite, let me introduce you to Frozen Yogurt Pops: The Ultimate Homemade Treat Recipe. These pops combine creamy Greek yogurt with the natural sweetness and vibrant colors of fresh fruit, creating frozen delights that are not only incredibly tasty but also surprisingly simple to make. They’re perfect for cooling down on a warm day, sneaking in a healthy snack for the kids, or delighting yourself with a guilt-free indulgence that feels like a party in your mouth.

Ingredients You’ll Need
Getting started with Frozen Yogurt Pops: The Ultimate Homemade Treat Recipe is a breeze because it relies on simple, wholesome ingredients. Each component has a special role, whether it’s building creamy texture, adding natural sweetness, or providing bright, fruity bursts of flavor.
- 4 cups plain Greek yogurt: The creamy base that makes these pops rich and protein-packed.
- 1 cup fresh or frozen fruit: For that juicy sweetness and beautiful colors—berries, mango, or peaches work wonderfully.
- ½ cup honey or maple syrup: Natural sweetness that balances the tang of the yogurt perfectly.
- 1 teaspoon vanilla extract (optional): A little flavor magic that takes the taste up a notch.
- ¼ cup milk or yogurt: Used to thin the mixture if it’s too thick, ensuring easy pouring into molds.
- Pinch of salt: Enhances the flavors and helps balance the sweetness.
- Optional toppings: Granola, chocolate chips, shredded coconut, or chopped nuts add crunch and extra fun textures.
How to Make Frozen Yogurt Pops: The Ultimate Homemade Treat Recipe
Step 1: Prepare the Fruit
Start by washing your fresh fruit and chopping it into small, bite-sized pieces. If you’re using frozen fruit, no need to thaw—just use it straight from the freezer. For a smoother pop texture, puree about half of the fruit, then combine it back with the whole pieces. This way, you get vibrant color and enjoyable fruity chunks in every bite.
Step 2: Make the Yogurt Mixture
In a large mixing bowl, combine the Greek yogurt, honey or maple syrup, and vanilla extract if you’re using it. Stir it vigorously until you get a nice, smooth mixture that’s slightly sweetened but still nicely tangy. This creamy blend is the heart of your pops.
Step 3: Adjust Sweetness
Give your mixture a quick taste test and decide if you want it sweeter. Add a little more honey or maple syrup if needed. This step lets you tailor the pops to your exact desired sweetness, making them perfect for any palate.
Step 4: Thin the Mixture
If the yogurt mix seems a bit thick for pouring, no worries. Add the milk or a bit of extra yogurt one tablespoon at a time until it’s easily pourable. You want a consistency that flows smoothly into your popsicle molds without being too runny.
Step 5: Add Salt
A pinch of salt might seem unusual in a sweet treat, but trust me, it brightens all the flavors beautifully. Stir it into your yogurt mixture for that extra flavor boost that makes these pops impossible to stop eating.
Step 6: Combine Fruit and Yogurt
Gently fold the prepared fruit into your yogurt mixture, taking care not to smash all those lovely chunks. You want the fruit pieces evenly distributed so every bite has a delightful burst of fruitiness.
Step 7: Fill Popsicle Molds
Carefully pour the yogurt and fruit mixture into your popsicle molds. Don’t fill them right to the top—leave a bit of space so the mixture can expand as it freezes without overflowing.
Step 8: Add Toppings
If you’re feeling creative, sprinkle toppings like granola, chocolate chips, shredded coconut, or chopped nuts on top of each filled mold. They add a wonderful crunch and make your frozen treats look extra special.
Step 9: Insert Popsicle Sticks
Pop your sticks right into the center of each mold so you have a handy handle once the pops are fully frozen.
Step 10: Freeze
Place your filled molds into the freezer and leave them there for at least 4 to 6 hours. For the best texture and convenience, freezing overnight works like a charm.
Step 11: Remove from Molds
When you’re ready to enjoy, run the molds briefly under warm water to loosen the pops. Then gently pull on the sticks and watch your creamy, fruity Frozen Yogurt Pops: The Ultimate Homemade Treat Recipe slide right out with ease.
Step 12: Enjoy
Serve immediately for the freshest bite or store the pops back in the freezer wrapped up so you can enjoy them later.
How to Serve Frozen Yogurt Pops: The Ultimate Homemade Treat Recipe
Garnishes
Adding garnishes not only makes Frozen Yogurt Pops look like a treat but also boosts textures and flavors. Fresh mint leaves, a little drizzle of honey, or a sprinkle of cinnamon can elevate each pop into an experience worth savoring.
Side Dishes
Pair these pops with light, fresh summer salads or simple nut clusters for a balanced snack that satisfies your sweet tooth without feeling heavy. They also make a fun after-school treat alongside a small handful of mixed nuts or fruit salad.
Creative Ways to Present
Try serving your Frozen Yogurt Pops in a chilled glass with a little extra granola at the bottom, or cut the pops into bite-sized pieces and serve them as bite snacks on a platter for parties. Using colorful popsicle molds or wrapping each pop in parchment paper can turn everyday pops into festive delights that are perfect for sharing.
Make Ahead and Storage
Storing Leftovers
If you happen to have leftovers—though that’s rare—store your frozen yogurt pops in an airtight container or zip-top freezer bags to prevent freezer burn. Keep them flat in the freezer so they freeze evenly and stay fresh for up to a month.
Freezing
Always freeze your pops in well-sealed molds or containers to avoid absorbing any unwanted freezer odors. Remember, patience is key—the longer they freeze, the better the consistency. At least 4 hours is needed, but overnight is best.
Reheating
Frozen yogurt pops are best enjoyed straight from the freezer, so reheating isn’t really necessary or recommended. If they get too hard, let them sit at room temperature for a couple of minutes to soften before eating.
FAQs
Can I use any type of yogurt for this recipe?
While Greek yogurt is recommended for its thick creaminess and protein content, you can substitute with regular plain yogurt or even flavored yogurt if you prefer a sweeter base. Just keep in mind that thinner yogurts might need less milk.
What fruits work best in Frozen Yogurt Pops?
Almost any fruit you love! Berries like strawberries and blueberries are classic, but tropical options like mango and peaches bring a juicy sweetness. Mixing frozen and fresh fruit lets you get the best texture and flavor balance.
Are these Frozen Yogurt Pops healthy?
Absolutely! Made with natural ingredients, minimal sweeteners, and packed with protein and vitamins from fruit and yogurt, these pops make a nutritious snack or dessert option.
Can I make these pops dairy-free?
Yes! Use plant-based yogurts like coconut or almond milk yogurt and swap honey for maple syrup to keep the recipe vegan and dairy-free, while still enjoying that creamy frozen yumminess.
How long do Frozen Yogurt Pops last in the freezer?
If stored well in an airtight container, they’ll remain delicious for up to one month. After that, they might start to lose their texture and flavor quality.
Final Thoughts
Fresh, fun, and endlessly customizable, Frozen Yogurt Pops: The Ultimate Homemade Treat Recipe is a must-try for anyone who loves a simple yet delightful snack that cools you down and lifts your spirits. Grab your ingredients, gather your favorite fruits, and dive into making your own perfect pops at home—you won’t regret it!
Print
Frozen Yogurt Pops: The Ultimate Homemade Treat Recipe
- Prep Time: 15 minutes
- Cook Time: 0 minutes
- Total Time: 4 hours 15 minutes
- Yield: 8 servings
- Category: Dessert
- Method: No-Cook
- Cuisine: American
- Diet: Vegetarian
Description
Homemade Frozen Yogurt Pops are a simple, delicious, and healthy treat perfect for hot days. Made with Greek yogurt, fresh or frozen fruit, and natural sweeteners like honey or maple syrup, these popsicles offer a creamy texture and customizable flavors. With optional toppings such as granola or chocolate chips, they are a fun snack for both kids and adults. This easy no-bake recipe requires minimal preparation and a few hours in the freezer to create refreshing frozen desserts.
Ingredients
Yogurt Mixture
- 4 cups plain Greek yogurt (full-fat or non-fat)
- ½ cup honey or maple syrup (adjust to taste)
- 1 teaspoon vanilla extract (optional)
- ¼ cup milk or yogurt (if needed, to thin the mixture)
- Pinch of salt
Fruit
- 1 cup fresh or frozen fruit (berries, mango, peaches, etc.)
Optional Toppings
- Granola
- Chocolate chips
- Shredded coconut
- Chopped nuts
Instructions
- Prepare the Fruit: Wash and chop fresh fruit into small pieces. If using frozen fruit, use them directly from frozen. Puree half of the fruit for a smoother texture if desired, then combine all prepared fruit in a bowl.
- Make the Yogurt Mixture: In a large bowl, combine Greek yogurt, honey or maple syrup, and vanilla extract if using. Mix thoroughly until the mixture is smooth and creamy.
- Adjust Sweetness: Taste the mixture and add more honey or maple syrup as needed to reach your preferred level of sweetness.
- Thin the Mixture (if needed): If the yogurt mixture is too thick to pour, add milk or additional yogurt one tablespoon at a time until it becomes pourable.
- Add Salt: Stir in a pinch of salt to enhance the overall sweetness and flavor of the mixture.
- Combine Fruit and Yogurt: Gently fold the prepared fruit into the yogurt mixture, ensuring that the fruit is evenly distributed without crushing it.
- Fill Popsicle Molds: Carefully pour the yogurt and fruit mixture into popsicle molds, leaving a little space at the top to allow for expansion when freezing.
- Add Toppings (optional): Sprinkle your choice of optional toppings such as granola, chocolate chips, shredded coconut, or chopped nuts over the filled molds for extra texture and flavor.
- Insert Popsicle Sticks: Place popsicle sticks in the center of each mold, making sure they are secure and upright.
- Freeze: Place the molds in the freezer and freeze for at least 4 to 6 hours, or preferably overnight, until the pops are completely frozen solid.
- Remove from Molds: To remove the popsicles, run the molds under warm water for a few seconds to loosen them. Gently pull on the sticks to release the pops.
- Enjoy: Serve immediately or store the frozen yogurt pops in the freezer until ready to enjoy.
Notes
- You can customize the fruit based on seasonality and preference—berries, mango, peaches, or even kiwi work well.
- For a smoother texture, puree half the fruit before mixing; for chunkier pops, use the fruit chopped.
- Use full-fat Greek yogurt for creamier popsicles or non-fat for a lighter version.
- If you want to avoid dairy, consider using coconut or almond milk yogurt alternatives and adjust the consistency accordingly.
- Adding a pinch of salt enhances the natural sweetness, balancing the flavors perfectly.
- Optional toppings add texture but can be omitted for a simpler treat.
- Ensure molds are properly sealed and sticks are secure to avoid melting or breaking during freezing.


