
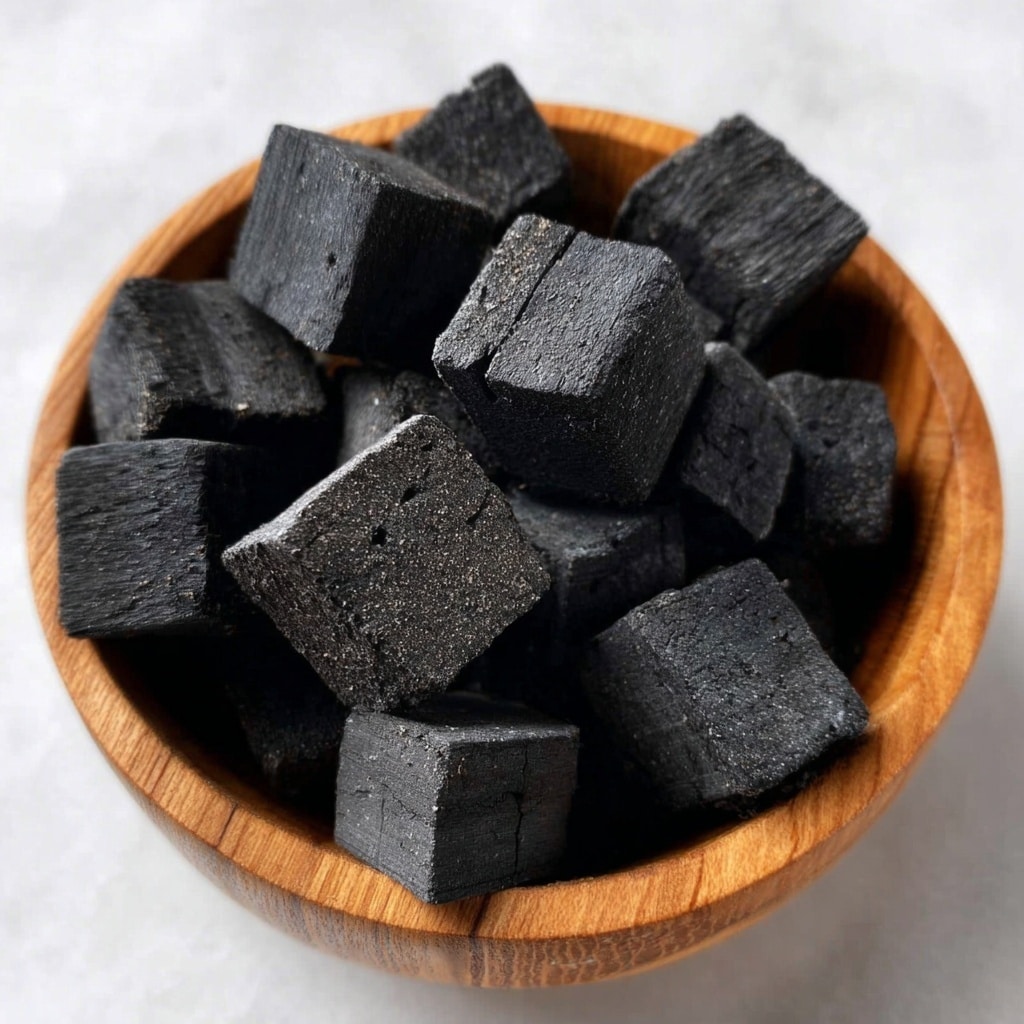
If you’re ready to discover a truly magical treat that’s as fun to make as it is to eat, then you are in for a real delight with the Edible Coal Candy: Honeycomb Chocolate Coated Honeycomb Bits Recipe. This recipe transforms humble ingredients into a striking, crunchy delight that looks like chunks of coal but tastes like sweet, airy honeycomb wrapped in smooth dark chocolate. Perfect for sharing at parties or gifting during holidays, these chocolate-coated honeycomb bits have a satisfying crunch and an irresistible combination of textures and flavors. I promise, once you try this, it’ll become a festive staple in your kitchen!

Ingredients You’ll Need
Every ingredient in this recipe plays a crucial role, whether it’s providing the perfect honeycomb crunch, that enticing sweetness, or the deep, luscious chocolate coating. Simple but essential, these components come together to create a candy that’s as visually stunning as it is delicious.
- 1 1/2 cups granulated sugar: The base sweetness that caramelizes beautifully for that crunchy honeycomb texture.
- 1/4 cup light corn syrup (or golden syrup): Adds moisture and prevents sugar crystallization for a smooth candy.
- 3/4 cup water: Helps dissolve the sugar evenly and controls consistency.
- 1 tablespoon baking soda: The secret agent that creates the airy, bubbly honeycomb structure.
- 8 oz dark or semisweet chocolate, melted: A rich coating that adds sophistication and balances sweetness.
- 1 cup caster sugar: For a fine-textured sugar base to be dyed black and add sparkle on the outside.
- Black food coloring: Gives the caster sugar a dramatic coal-like appearance.
How to Make Edible Coal Candy: Honeycomb Chocolate Coated Honeycomb Bits Recipe
Step 1: Prepare Your Pan
Start by lining an 8×10 or 9×9-inch heat-safe container with parchment paper. This will be your candy mold, so having it prepared early means the hot, bubbling honeycomb mixture can be poured in without delay. The parchment makes removing your candy a breeze once it’s set.
Step 2: Make the Sugar Mixture
In a large pot over medium-low heat, combine the granulated sugar, corn syrup, and water. Stir constantly until the sugar dissolves fully; this is important to prevent a gritty texture later on. Once dissolved, stop stirring and let the mixture gently come to a boil.
Step 3: Heat to Hard Crack Stage
Attach a candy thermometer to the pot. Let the mixture cook undisturbed until it reaches the hard crack stage—between 300 and 310°F, ideally around 305°F. This precise temperature ensures the candy will have the perfect snap, not too soft or overly brittle.
Step 4: Add Baking Soda
Remove the pot from the heat and immediately whisk in the baking soda for no more than ten seconds. This reaction creates a wonderful bubbling foam that forms the light, airy honeycomb texture we all adore. Don’t wait too long to move to the next step, or you’ll lose that magical frothiness.
Step 5: Pour and Cool
Carefully pour your foaming mixture into the prepared parchment-lined pan. Let it cool completely for 1 to 2 hours until it hardens fully. This is where patience pays off since rushing can crack your candy unevenly.
Step 6: Break Into Pieces
Once hardened, use a knife to break the honeycomb into chunk-sized bits that resemble pieces of coal. Don’t throw away the smaller shards! They make fantastic toppings for ice cream or baked goods later on.
Step 7: Color the Sugar
Place caster sugar in a sealable plastic bag and add several drops of black food coloring. Seal and rub the sugar thoroughly until it is uniformly black. Adjust the coloring to your liking before transferring it into a bowl for coating your candy.
Step 8: Melt the Chocolate
Gently melt the dark or semisweet chocolate in 30-second bursts in the microwave, stirring very well in between. Aim for a smooth, glossy finish with no lumps, which will create a stunning shell around your honeycomb bits.
Step 9: Dip the Honeycomb
Dip each chunk of honeycomb candy into the melted chocolate, allowing excess chocolate to drip off before placing them on a parchment-lined baking sheet. This step is so satisfying—you’re finally crafting those edible coal chunks!
Step 10: Coat with Black Sugar
Before the chocolate sets completely, carefully roll or sprinkle each coated piece with the black sugar for a sparkly, textured finish. If the chocolate hardens too quickly, simply warm it gently with food-safe gloves to help the sugar stick perfectly.
Step 11: Set and Store
Let your edible coal candy cool at room temperature until the chocolate fully hardens. Once set, store your delicious creations in an airtight container at room temp to maintain freshness for up to a month. This gives you plenty of time to enjoy or gift your sweet coal!
How to Serve Edible Coal Candy: Honeycomb Chocolate Coated Honeycomb Bits Recipe

Garnishes
These coal-looking bites are already pretty show-stopping but pairing them with a sprinkle of edible glitter or a dusting of cocoa powder can make them sparkle even more. They also look marvelous when served atop whipped cream desserts or festive holiday plates.
Side Dishes
Edible coal candy pairs beautifully with a hot cup of coffee or rich hot chocolate. The bitterness of the chocolate and coffee complements the sweet, crunchy honeycomb perfectly. Alternatively, serve alongside a cheese board to add a playful and unexpected sweet element.
Creative Ways to Present
Package your edible coal candy in small burlap sacks tied with rustic twine for an old-fashioned coal look that’s fantastic for holiday gifting. You can also layer chunks in clear glass jars with fairy lights for a whimsical party display. Seeing guests’ delight as they discover these coal pieces is simply priceless.
Make Ahead and Storage
Storing Leftovers
Keep your leftover edible coal candy in an airtight container at room temperature. Avoid humid or warm areas to prevent the candy from becoming sticky or the chocolate from melting prematurely. Stored well, your candy will stay crisp and delicious for about a month.
Freezing
Freezing is not ideal for this candy because honeycomb tends to absorb moisture and lose its signature crunch when frozen and thawed. It’s best enjoyed fresh or stored at room temperature as described.
Reheating
Since this candy is meant to be crunchy and coated in chocolate, reheating is unnecessary. Attempting to warm it may cause melting and sticky textures, so just enjoy straight from storage!
FAQs
Can I use milk chocolate instead of dark chocolate for this Edible Coal Candy: Honeycomb Chocolate Coated Honeycomb Bits Recipe?
Absolutely! Milk chocolate will create a sweeter, creamier coating that some find irresistible. Just be mindful that milk chocolate melts at a slightly lower temperature, so work quickly when dipping.
What if I don’t have black food coloring?
You can still make the honeycomb and coat it in chocolate without the black sugar finish—it will look more like classic honeycomb candy. Alternatively, use activated charcoal powder for coloring, but ensure it’s food grade and safe for consumption.
How do I make sure my honeycomb doesn’t turn out chewy?
Cooking the sugar mixture to the hard crack stage (300-310°F) is key. Use a candy thermometer to monitor temperature carefully and don’t rush the cooling process. Proper baking soda whisking also guarantees the right airy texture.
Is the baking soda added to the sugar mixture safe to eat?
Yes! The small amount of baking soda reacts during cooking to create bubbles and lightness but does not leave a noticeable taste and is perfectly safe in candy recipes like this.
Can I make these coal candy pieces smaller or bigger?
Definitely! You can break or cut your honeycomb into chunks of any size to suit your needs, whether for bite-sized treats or larger centerpiece pieces. Just remember smaller bits may melt or get sticky faster when coated.
Final Thoughts
I hope you’ve enjoyed learning how to make the enchanting Edible Coal Candy: Honeycomb Chocolate Coated Honeycomb Bits Recipe. It’s one of those recipes that bring a bit of magic to your kitchen and your taste buds with every bite. Don’t hesitate to give it a try—whether for a festive gift or a unique treat, it’s a crowd-pleaser that’s guaranteed to impress and delight!
Print
Edible Coal Candy: Honeycomb Chocolate Coated Honeycomb Bits Recipe
- Prep Time: 15 minutes
- Cook Time: 20 minutes
- Total Time: 1 hour 45 minutes
- Yield: 50 pieces
- Category: Candy
- Method: Stovetop
- Cuisine: American
Description
This delightful Edible Coal Candy recipe creates a fun and festive treat perfect for holiday gifting or themed parties. Combining a crunchy honeycomb candy base with a smooth dark chocolate coating, and finished with a dusting of black-colored sugar, these coal-shaped candies are as visually striking as they are delicious. The recipe uses simple pantry ingredients and straightforward stovetop candy-making techniques to achieve a satisfying hard crack texture. With a preparation and cooling time of just under two hours, yielding about 50 bite-sized pieces, this recipe is both accessible and impressive.
Ingredients
Honeycomb Candy
- 1 1/2 cups granulated sugar
- 1/4 cup light corn syrup (or golden syrup)
- 3/4 cup water
- 1 tablespoon baking soda
Chocolate Coating
- 8 oz dark or semisweet chocolate, melted
Decorative Sugar
- 1 cup caster sugar
- Black food coloring (for coloring the caster sugar)
Instructions
- Prepare Pan: Line a heat-safe approximately 8×10 or 9×9-inch container with parchment paper. This pan will be used to cool and set the honeycomb candy once cooked.
- Make Sugar Mixture: In a large pot over medium-low heat, combine granulated sugar, corn syrup, and water. Stir or whisk until the sugar is fully dissolved to prevent graininess in the candy.
- Heat to Hard Crack Stage: Increase the heat to medium and fix a candy thermometer to the pot. Stop stirring once the sugar has dissolved completely. Allow the mixture to cook undisturbed until it reaches 300-310°F (hard crack stage), aiming for about 305°F for the ideal texture.
- Add Baking Soda: Remove the pot from heat and immediately whisk in the baking soda for approximately 10 seconds. The mixture will vigorously bubble and foam, forming the characteristic honeycomb texture.
- Pour and Cool: Carefully and quickly pour the foaming mixture into the prepared pan. Let it cool completely, which usually takes 1 to 2 hours, until the honeycomb hardens.
- Break into Pieces: Once cooled, use a knife to break the honeycomb slab into coal-sized chunks. Smaller shards can be saved for other uses such as toppings or decorations.
- Color Sugar: Place the caster sugar and a few drops of black food coloring into a plastic bag. Seal the bag and rub it until the sugar is evenly colored black. Add more food coloring if needed, then transfer the colored sugar into a bowl.
- Melt Chocolate: Melt the dark or semisweet chocolate in the microwave by heating in 30-second intervals, stirring well between each session until smooth and glossy.
- Dip Honeycomb: Dip each honeycomb piece into the melted chocolate, allowing any excess chocolate to drip off. Arrange the coated pieces on a parchment-lined baking sheet for setting.
- Coat with Black Sugar: Before the chocolate sets completely, toss each piece into the black colored sugar to give it a textured finish. If the chocolate hardens too quickly, gently warm it using food-safe gloves to allow the sugar to stick better.
- Set and Store: Allow the chocolate to fully set at room temperature. Store the coal candy in an airtight container at room temperature for up to one month, preserving its crunch and flavor.
- Optional Packaging: For festive presentation, package the coal candy in small burlap bags adorned with decorative labels or hand-drawn markers, making wonderful gifts.
Notes
- Ensure the sugar mixture reaches the hard crack stage (300-310°F) precisely for the proper honeycomb texture. Using a candy thermometer is essential.
- Work quickly when pouring the foaming mixture, as it sets rapidly.
- Be cautious when whisking in baking soda, as the bubbling can be vigorous and hot.
- Use gloves or warm hands gently when re-warming hardened chocolate for coating sugar to ensure proper adhesion.
- Store in an airtight container away from humidity to maintain crispness.
- Small shards of honeycomb can be utilized as crunchy toppings for desserts or ice cream.


