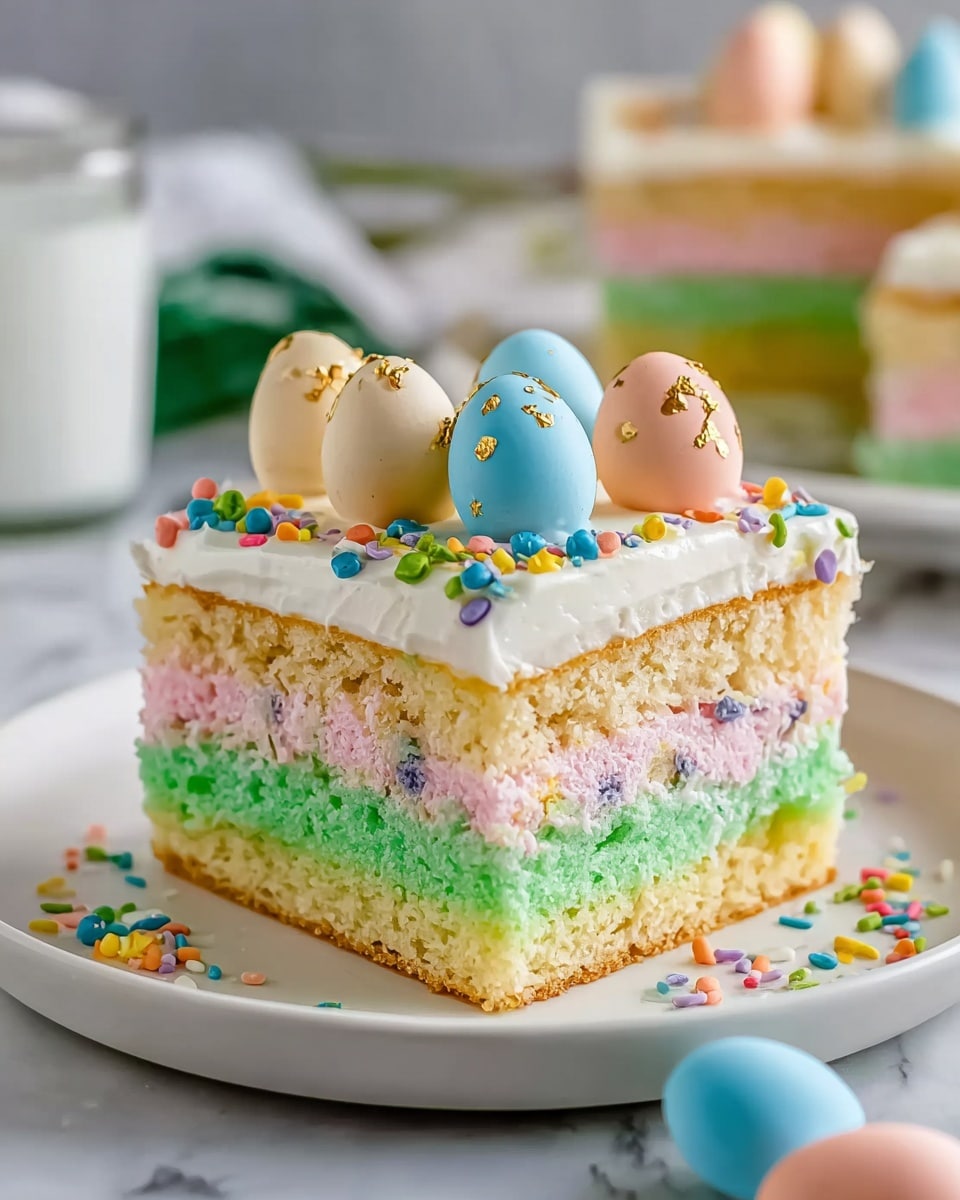
If you are looking for a vibrant, moist, and delightfully fun dessert to celebrate springtime or any festive occasion, this Easter Poke Cake Recipe is a total showstopper. Imagine a soft vanilla cake bursting with colorful gelatin that seeps into every bite, topped with light whipped cream and bright sprinkles that make it look as joyful as it tastes. This cake is not only a feast for your eyes but also a comforting, creamy treat that brings smiles all around the table. Whether it’s an Easter celebration or just because you want a cheerful dessert, this Easter Poke Cake Recipe will quickly become a beloved tradition.
Ingredients You’ll Need
Keeping this recipe simple lets each ingredient shine while making the process stress-free. These essential ingredients combine to deliver a moist texture, vibrant color, and that perfect balance of sweetness and creaminess.
- Vanilla cake mix: The foundation of the cake, providing a classic, fluffy base that’s easy to work with and loved by all.
- Large eggs: Help bind the batter and enrich the cake’s flavor and texture.
- Vegetable oil: Adds moisture to keep the cake soft and tender.
- Water (or milk): Milk adds richness, but water works perfectly for the batter’s consistency.
- Gelatin powder: This is the magic that creates colorful pockets of flavor soaked into the cake, making every slice uniquely delicious.
- Whipped topping: A light and fluffy finish that balances the cake’s sweetness and adds a creamy texture.
- Sprinkles: Brighten up the cake visually, adding a festive touch that kids and adults both adore.
How to Make Easter Poke Cake Recipe
Step 1: Prepare Your Baking Dish
Start by preheating your oven to 350°F (175°C) and greasing a 9×13 inch baking dish. This ensures your cake doesn’t stick when it comes out, making it easy to serve those beautiful slices later on.
Step 2: Mix the Batter
In a large bowl, combine the vanilla cake mix with water, eggs, and vegetable oil. Whisk everything until the batter turns smooth and has no lumps. This step is all about getting that perfect base that will bake into a light, airy cake.
Step 3: Bake Your Cake
Pour the batter into the prepared dish and place it in the oven. Bake for 30-35 minutes or until a toothpick inserted in the center comes out clean. The aroma of vanilla baking is always a lovely preview to the treat ahead!
Step 4: Poke the Cake
Once the cake has cooled slightly but is still warm, take a fork and poke holes evenly all over the surface. These holes are essential for soaking in the jelly-like gelatin, infusing each bite with juicy bursts of flavor.
Step 5: Add the Gelatin
Dissolve the gelatin powder in boiling water as instructed on the package. Then, carefully pour it evenly over the cake, letting it seep deep into the holes. This colorful, jiggly step is a signature of the Easter Poke Cake Recipe, making it truly unforgettable.
Step 6: Chill and Top with Whipped Cream
Place the cake in the fridge and let it chill completely. Once set, spread the whipped topping all over the cake, creating a soft, cloud-like layer that keeps the cake moist and luscious.
Step 7: Add Finishing Touches
Sprinkle the top with colorful sprinkles to give your cake that festive Easter flair. Now it’s ready to serve and impress everyone!
How to Serve Easter Poke Cake Recipe

Garnishes
Adding a few extra colorful sprinkles or even edible glitter on top instantly elevates the fun vibe of this cake. Fresh fruit like strawberries or blueberries can also be placed around the edges for a fresh contrast to the creamy layers.
Side Dishes
This cake pairs beautifully with light sides such as a simple fruit salad or a dollop of vanilla ice cream. The fresh fruit balances the richness while adding an extra pop of natural sweetness.
Creative Ways to Present
For a playful twist, serve the Easter Poke Cake Recipe in individual clear cups or mini trifle dishes, showcasing the colorful gelatin pockets. You can also cut the cake into festive shapes with cookie cutters for an adorable holiday touch.
Make Ahead and Storage
Storing Leftovers
Leftover Easter Poke Cake stays fresh when covered tightly and refrigerated. The whipped topping and gelatin layers hold up well for up to 3 days, perfect for enjoying extended celebrations.
Freezing
This cake doesn’t freeze well due to the gelatin and whipped topping’s delicate texture, so it’s best enjoyed fresh within a few days of making. For best results, avoid freezing to maintain that classic poke cake texture.
Reheating
Since this cake is best served chilled, reheating is not recommended. Serve straight from the fridge to enjoy the full contrast of creamy topping and gelatin flavors bursting in every bite.
FAQs
Can I use flavored gelatin instead of plain?
Absolutely! Using flavored gelatin adds an extra dimension to your Easter Poke Cake Recipe and lets you customize colors and flavors to match your preference or party theme.
Can I make the cake from scratch instead of using a mix?
Yes, you can bake a homemade vanilla cake if you prefer. Just ensure it’s sturdy enough to hold the gelatin without falling apart when poked.
Is it possible to use fresh fruit juice instead of water for the gelatin?
Using fresh juice can add delicious flavor but may affect gelatin setting. For best results, follow gelatin package instructions and consider mixing juice with water.
Can I swap whipped topping for homemade whipped cream?
Definitely! Homemade whipped cream offers a fresh, rich texture and pairs beautifully with this cake, making the dessert feel extra special.
How far in advance can I make this cake?
You can prepare the cake a day ahead. Just make sure it chills long enough for the gelatin to set fully, and add the whipped topping and sprinkles right before serving for the freshest look.
Final Thoughts
This Easter Poke Cake Recipe is one of those magical desserts that brings vibrant color, incredible flavor, and joyful memories all at once. It’s perfect to share with family and friends, especially when you want to brighten up the table with something a little different but oh so delicious. Give it a try — I promise it will become one of your favorite festive treats to make and enjoy year after year.
Print
Easter Poke Cake Recipe
- Prep Time: 15 minutes
- Cook Time: 35 minutes
- Total Time: 2 hours 50 minutes
- Yield: 12 servings
- Category: Dessert
- Method: Baking
- Cuisine: American
Description
This vibrant Easter Poke Cake is a delicious and festive dessert perfect for spring celebrations. A moist vanilla cake is baked, then poked with holes and filled with colorful gelatin, creating a fun and flavorful surprise in every bite. Topped with creamy whipped topping and festive sprinkles, this cake is sure to delight both kids and adults alike.
Ingredients
Cake
- 1 box vanilla cake mix
- 3 large eggs (room temperature)
- 1/2 cup vegetable oil
- 1 cup water (or milk for richness)
Gelatin Filling
- 1 package (3 oz) gelatin powder (any color)
Topping
- 1 tub (8 oz) whipped topping
- 1/4 cup sprinkles
Instructions
- Preheat and prepare pan: Preheat your oven to 350°F (175°C) and grease a 9×13 inch baking dish thoroughly to prevent sticking.
- Mix batter: In a large bowl, combine the vanilla cake mix, water (or milk), eggs, and vegetable oil. Stir until the batter is smooth and well integrated.
- Bake the cake: Pour the batter evenly into the prepared baking dish. Bake in the preheated oven for 30-35 minutes, or until a toothpick inserted into the center comes out clean.
- Poke holes: Allow the cake to cool slightly until warm but not hot. Using a fork, poke holes evenly all over the surface of the cake to allow the gelatin to seep in.
- Prepare and pour gelatin: Dissolve the gelatin powder in boiling water according to the package instructions. Pour the dissolved gelatin evenly over the cake so it fills the holes you made.
- Chill and set: Refrigerate the cake completely, allowing the gelatin to firm up, at least two hours, ensuring the flavors meld beautifully.
- Add topping and decorate: Spread the whipped topping evenly over the chilled cake. Finish by sprinkling the top with colorful sprinkles to enhance the festive look before serving.
Notes
- Use milk instead of water for a richer cake texture.
- Choose gelatin colors that complement your Easter theme for a festive display.
- Make sure the cake is only slightly warm before poking the holes to avoid tearing.
- Chilling time can be extended overnight for best flavor infusion.
- This cake is best served cold for the refreshing gelatin effect.


