

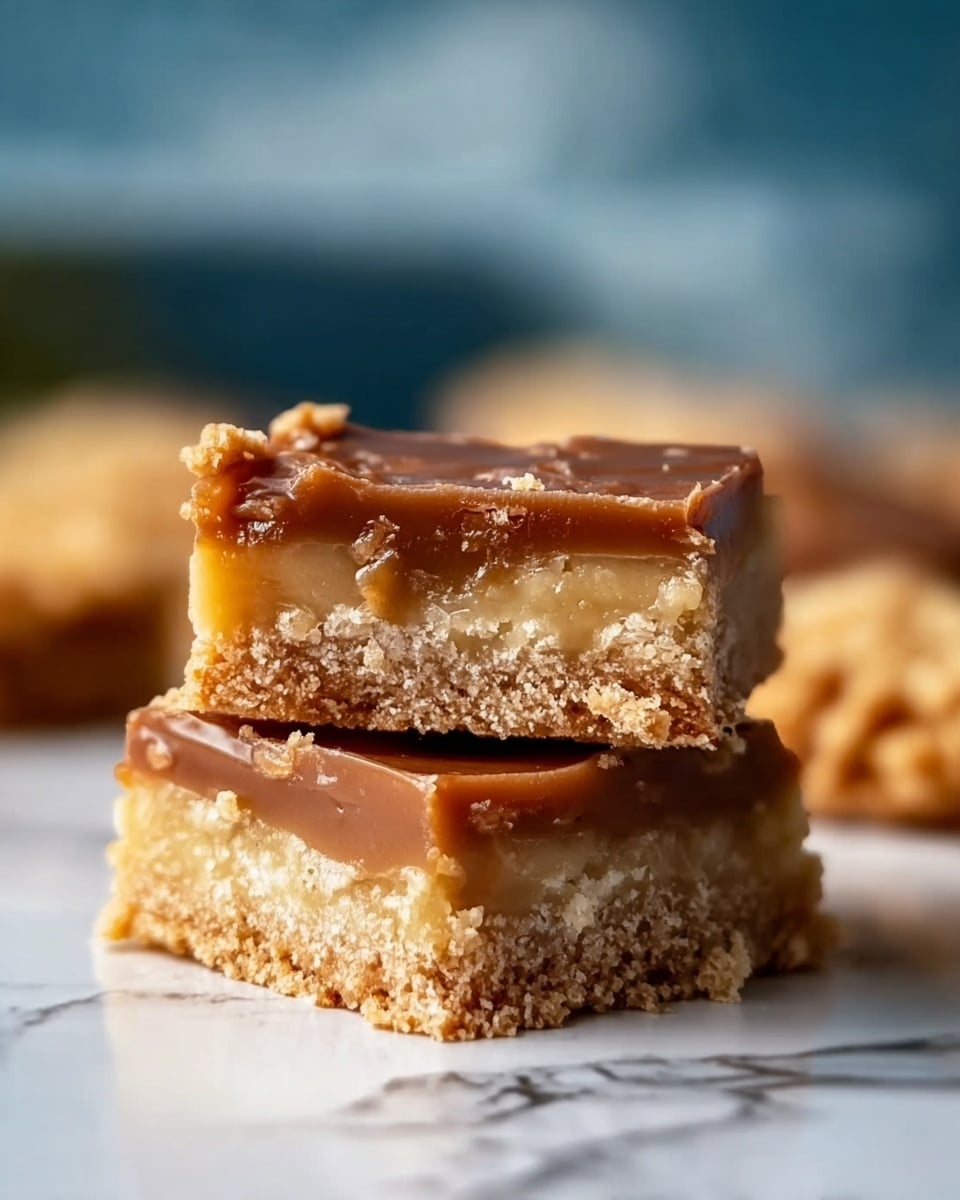
If you have a sweet tooth that craves rich, creamy, and nostalgic flavors all at once, let me introduce you to Disneyland’s Irresistible Peanut Butter Sandwich Bars Recipe. These bars combine the comforting crunch of graham crackers with the luscious smoothness of a peanut butter filling, topped off with a glossy layer of chocolate that sets perfectly every time. It’s like a magical taste of Disneyland right in your kitchen, guaranteed to bring smiles and a little sprinkle of joy to any occasion. Trust me, once you try this recipe, it will quickly become a favorite treat you can’t stop making.

Ingredients You’ll Need
Don’t be fooled by how few ingredients this recipe calls for—each one is essential for creating that perfect balance of flavor and texture. The harmony of crunchy graham crackers, creamy peanut butter, and silky chocolate chips is what makes these bars truly irresistible.
- Graham Crackers: A full sleeve of approximately 9 whole crackers forms the crunchy base and top layers, providing that classic sandwich bar structure.
- Creamy Peanut Butter: One cup makes the star filling, bringing that rich, smooth, and nutty flavor that peanut butter lovers adore.
- Unsalted Butter, Melted: Half a cup adds moisture and richness, ensuring the filling stays soft yet holds together nicely.
- Powdered Sugar: One and a half cups sweeten the peanut butter mixture just right, creating a velvety texture without grittiness.
- Vanilla Extract: A teaspoon enhances all the flavors, adding a subtle warmth and depth.
- Salt: Just a quarter teaspoon to balance sweetness and intensify the chocolate-peanut butter combo.
- Semi-sweet Chocolate Chips: One and a half cups melt into a glossy, decadent topping that perfectly complements the peanut butter layer.
- Additional Peanut Butter: Two tablespoons stirred into the chocolate keep the topping soft and easy to slice.
How to Make Disneyland’s Irresistible Peanut Butter Sandwich Bars Recipe
Step 1: Prep Your Pan
Start by lining an 8×8 or 9×9-inch baking pan with parchment paper. The overhang is your best friend here because it makes lifting the entire batch out of the pan a breeze once everything has set.
Step 2: Build the First Graham Base
Arrange your whole graham crackers in a single layer, covering the entire bottom of the pan. Don’t stress if you need to break a cracker or two to fill the gaps—that’s perfectly fine and won’t affect your final bars.
Step 3: Mix the Peanut Butter Filling
In a medium bowl, combine the melted butter, creamy peanut butter, powdered sugar, vanilla extract, and salt. Mix thoroughly until your mixture is smooth, thick, and utterly creamy. This layer is what makes these bars incredibly luscious.
Step 4: Spread the Filling
Pour the peanut butter mixture over your graham cracker base and spread it evenly using a spatula. Make sure every corner gets coated because every bite deserves that perfect peanut buttery hug.
Step 5: Add the Top Graham Layer
Carefully place another layer of whole graham crackers right on top of the peanut butter filling. Gently press them down so everything feels snug but try not to push too hard—you want the layers to stay distinct yet connected.
Step 6: Prepare the Chocolate Topping
Using a microwave-safe bowl, melt your semi-sweet chocolate chips together with the extra two tablespoons of peanut butter. Heat them in 30-second bursts, stirring well between each, until smooth and velvety.
Step 7: Finish with Chocolate
Pour the melted chocolate over the top layer of graham crackers. Use a spatula to spread it into an even, glossy layer, giving these bars that irresistible chocolate finish.
Step 8: Chill and Slice
Refrigerate the bars for at least 1 to 2 hours, or until the chocolate firms up and the bars are fully set. When ready, use the parchment paper to lift them from the pan, then cut into squares or rectangles with a sharp knife. You can enjoy these chilled or let them come to room temperature for a melt-in-your-mouth experience.
How to Serve Disneyland’s Irresistible Peanut Butter Sandwich Bars Recipe
Garnishes
While these bars are stunning on their own, sprinkling a few crushed peanuts or a light dusting of powdered sugar on top can add a lovely touch and some extra texture. If you’re feeling adventurous, a drizzle of caramel or a pinch of flaky sea salt elevates the flavor profile beautifully.
Side Dishes
Serve these bars alongside a cold glass of milk or a steaming cup of coffee to balance their sweetness. They also pair well with fresh fruit, such as sliced bananas or berries, which add a refreshing contrast to the rich peanut butter and chocolate.
Creative Ways to Present
Try layering these bars in a clear trifle dish for a visually stunning dessert or cut them into bite-sized squares and arrange them on a decorative platter for parties. Wrapping individual bars in parchment paper tied with a ribbon makes an adorable gift or party favor.
Make Ahead and Storage
Storing Leftovers
Keep your leftover bars stored in an airtight container in the refrigerator for up to one week. This helps maintain their texture and prevents the chocolate from melting or becoming too soft.
Freezing
You can freeze these bars wrapped tightly in plastic wrap and then placed in a freezer-safe bag. They will keep well for up to two months. Just thaw them in the refrigerator overnight before serving, so they retain their creamy, delectable consistency.
Reheating
These bars are best enjoyed chilled or at room temperature, so reheating is not necessary. If you prefer a softer texture, simply let them sit out for 10 to 15 minutes before eating. Avoid microwaving as the chocolate layer may lose its shine and become melty.
FAQs
Can I use crunchy peanut butter instead of creamy?
You can! Using crunchy peanut butter will add extra texture to the filling, giving your bars a bit of a nutty bite. It’s a tasty variation, but creamy keeps it smooth and classic.
Is it necessary to use parchment paper?
Parchment paper makes removing the bars from the pan much easier and keeps them intact when cutting. If you don’t have it, lightly grease your pan well, but lifting and slicing may be trickier.
Can I substitute the semi-sweet chocolate chips with another type of chocolate?
Definitely. Milk chocolate or bittersweet chocolate both work well. Just keep in mind that milk chocolate will be sweeter, while bittersweet offers more of a rich, intense flavor.
What’s the best way to cut the bars cleanly?
Use a sharp knife warmed under hot water, then dried before slicing. This prevents the chocolate from cracking and helps create smooth edges.
Are these bars gluten-free?
Not as written, since graham crackers typically contain wheat. However, you could use gluten-free graham crackers or a gluten-free wafer substitute to make these bars safe for a gluten-free diet.
Final Thoughts
If you’re searching for a delicious, no-fuss treat that captures the magic of Disneyland right at home, the Disneyland’s Irresistible Peanut Butter Sandwich Bars Recipe is your golden ticket. Simple ingredients come together to create a bound-to-please dessert full of nostalgia, texture, and flavor. I can’t wait for you to try it and see just how irresistible these bars really are—they’re guaranteed to become a beloved staple in your recipe collection.
Print
Disneyland’s Irresistible Peanut Butter Sandwich Bars Recipe
- Prep Time: 15 minutes
- Cook Time: 0 minutes
- Total Time: 1 hour 15 minutes (including chilling time)
- Yield: Approximately 16 bars
- Category: Dessert
- Method: No-Cook
- Cuisine: American
Description
These irresistibly delicious Disneyland-style Peanut Butter Sandwich Bars feature layers of crunchy graham crackers, creamy peanut butter filling, and a smooth, chocolatey topping. Perfectly balanced in sweetness and texture, they make a delightful no-bake treat that’s easy to prepare and sure to please peanut butter lovers of all ages.
Ingredients
Base Layer
- 1 sleeve graham crackers (approx. 9 whole crackers), plus extra for layering
Peanut Butter Filling
- 1 cup creamy peanut butter
- ½ cup unsalted butter, melted
- 1½ cups powdered sugar
- 1 teaspoon vanilla extract
- ¼ teaspoon salt
Chocolate Topping
- 1½ cups semi-sweet chocolate chips
- 2 tablespoons peanut butter (to help the chocolate set soft)
Instructions
- Prepare the Pan: Line an 8×8 or 9×9-inch baking pan with parchment paper, leaving some overhang for easy lifting of the bars later.
- Layer the Base Crackers: Lay whole graham crackers in a single layer across the bottom of the pan. Break crackers as necessary to cover the entire base evenly.
- Make the Peanut Butter Filling: In a medium mixing bowl, combine melted unsalted butter, creamy peanut butter, powdered sugar, vanilla extract, and salt. Mix thoroughly until the mixture becomes thick and smooth.
- Add Peanut Butter Layer: Pour the prepared peanut butter mixture over the graham cracker base and spread it out evenly using a spatula for a consistent layer.
- Top with More Crackers: Place another full layer of whole graham crackers on top of the peanut butter filling. Press gently to secure the layer without breaking the crackers.
- Melt Chocolate Topping: In a microwave-safe bowl, melt the semi-sweet chocolate chips with 2 tablespoons of peanut butter in 30-second bursts, stirring after each interval until completely smooth.
- Finish with Chocolate Layer: Pour the melted chocolate mixture evenly over the top graham cracker layer and spread gently with a spatula.
- Chill and Set: Refrigerate the pan for at least 1 to 2 hours, or until the chocolate topping firms up and the bars are fully set.
- Slice and Serve: Use the parchment paper overhang to lift the set bars out of the pan. Cut into squares or rectangles with a sharp knife. Serve chilled or at room temperature for best taste and texture.
Notes
- For easier removal, use parchment paper with edges hanging over the pan.
- Adjust the sweetness by using less powdered sugar if desired.
- Store leftover bars in an airtight container in the refrigerator for up to one week.
- These bars are a no-bake dessert, perfect for quick preparation without an oven.
- Peanut butter can be substituted with almond butter for a different flavor twist, but the texture will change slightly.


