

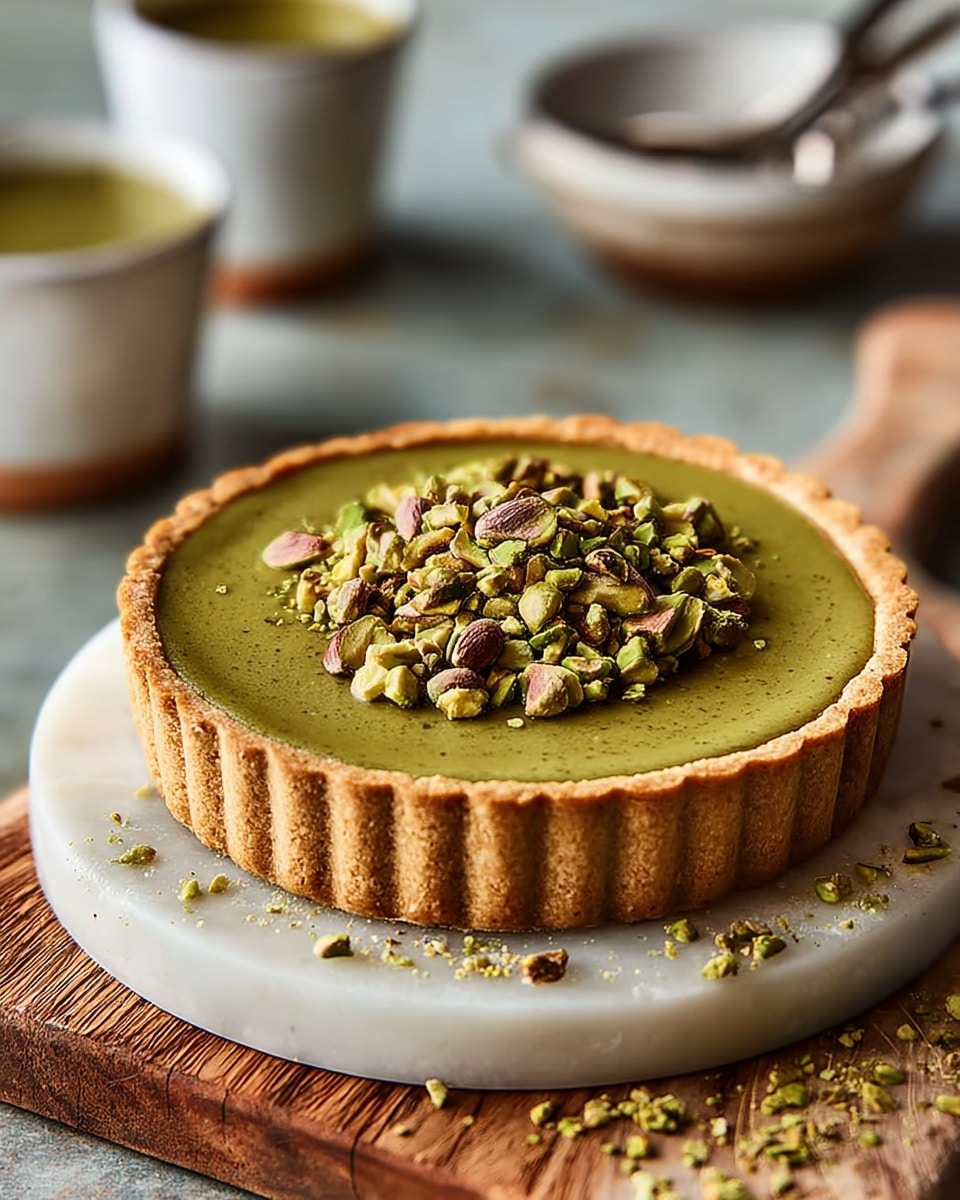
If you’re searching for a dessert that feels both indulgent and elegant, this Creamy Pistachio Tart with Rich Pistachio Filling Recipe is going to steal your heart (and your taste buds). Imagine a delicate, buttery crust embracing a luxuriously smooth and nutty pistachio filling that’s just bursting with flavor. This tart is a celebration of pistachios in every spoonful, perfect for any occasion when you want to impress or simply treat yourself. It’s an irresistible French-inspired delight combining creamy textures and vibrant pistachio hues that light up the plate and your senses.

Ingredients You’ll Need
To create this dreamy Creamy Pistachio Tart with Rich Pistachio Filling Recipe, you’ll keep things simple but powerful. Each ingredient plays a vital role in achieving the perfect balance of texture, flavor, and that gorgeous pistachio color we all adore.
- All-purpose flour: Forms the sturdy, flaky base that cradles the luscious filling beautifully.
- Powdered sugar: Adds delicate sweetness to the crust without any graininess.
- Salt: Enhances flavors and balances the natural sweetness and creaminess.
- Cold unsalted butter: The secret to a tender, melt-in-your-mouth crust.
- Cold water: Helps bring the dough together without warming the butter.
- Shelled unsalted pistachios: The heart of the filling, providing that unmistakable nutty richness.
- Granulated sugar: Sweetens the filling and helps blend textures smoothly.
- Heavy cream: Gives the tart its indulgently creamy mouthfeel.
- Whole milk: Lightens the filling slightly while keeping it rich and smooth.
- Egg yolks: Create a thick, custard-like consistency that holds the tart together.
- Unsalted butter: Adds silkiness and depth to the pistachio filling.
- Vanilla extract: Offers a subtle warmth that enhances nutty flavors.
- Pinch of salt: Balances sweetness and heightens the pistachio’s natural depth.
- Optional toppings: Chopped pistachios, whipped cream, or white chocolate shavings to spoil yourself even more.
How to Make Creamy Pistachio Tart with Rich Pistachio Filling Recipe
Step 1: Prepare the Crust
Start off by preheating your oven to 350°F (175°C) so it’s ready when your tart shell is shaped. In a food processor, blend together the flour, powdered sugar, and salt. Toss in your cold, cubed butter and pulse until the mixture looks like coarse crumbs. This texture ensures the crust will be flaky and tender. Slowly add cold water one tablespoon at a time, pulsing just until the dough comes together—don’t overwork it! Press the dough evenly into a 9-inch tart pan with a removable bottom, then prick the base with a fork to prevent bubbles while baking. Chill it in the fridge for 15 minutes to firm up before baking. Bake for 18 to 20 minutes until lightly golden, then set aside to cool thoroughly before filling.
Step 2: Blend the Pistachios and Sugar
While the crust chills, finely grind your shelled pistachios with granulated sugar in a food processor. This step is key for a smooth pistachio texture that will meld perfectly with the creamy custard. The finer the grind, the silkier your filling will be!
Step 3: Heat the Cream and Milk
In a saucepan over medium heat, gently warm the heavy cream and whole milk until it’s just steaming—you don’t want it to boil. This warm milk mixture will temper the egg yolks and ensure a silky filling without cooking the eggs too quickly.
Step 4: Temper the Egg Yolks
Whisk your egg yolks in a bowl, then slowly add the warm cream and milk mixture a little at a time, whisking constantly. This gentle mix prevents lumps and cooks the yolks evenly. Once combined, return the mixture to the saucepan for the next step.
Step 5: Cook the Pistachio Filling
Add the finely ground pistachio and sugar blend, unsalted butter, vanilla extract, and a pinch of salt to the saucepan. Cook over medium-low heat, stirring constantly, until the filling thickens enough to coat the back of a spoon—about 5 to 7 minutes. Keep an eye on it and never let it boil. The rich aroma and smooth texture at this stage are absolutely mouthwatering!
Step 6: Chill and Assemble
Remove the filling from heat and let it cool slightly before pouring it into your fully cooled crust. Use a spatula to smooth the top evenly. Refrigerate the tart for at least 4 hours or until the filling is completely set and beautifully firm.
How to Serve Creamy Pistachio Tart with Rich Pistachio Filling Recipe
Garnishes
Nothing completes this tart like a few thoughtful garnishes. Sprinkle chopped pistachios on top for an extra crunch and vibrant green pop. Add a dollop of freshly whipped cream for that light, airy contrast. White chocolate shavings also make a stunning and subtly sweet decoration that complements the nutty flavor perfectly.
Side Dishes
This tart shines on its own but also pairs wonderfully with a few light sides. Fresh berries or a berry coulis can add a tangy brightness that cuts through the richness. A scoop of vanilla or pistachio ice cream alongside makes for an ultra indulgent dessert experience.
Creative Ways to Present
For special occasions, serve slices on elegant plates with a drizzle of honey or a dusting of powdered sugar. You can turn this tart into individual mini servings using tartlet pans, perfect for parties or afternoon teas. Another idea is layering thin slices of fresh fruit on top for a colorful twist that showcases your creativity.
Make Ahead and Storage
Storing Leftovers
Once chilled, your Creamy Pistachio Tart with Rich Pistachio Filling Recipe will keep beautifully in the refrigerator for up to 3 days. Make sure to cover it tightly with plastic wrap or store in an airtight container to preserve freshness and prevent absorbing any fridge odors.
Freezing
If you want to enjoy this tart later, freezing is possible but with a slight change in texture. Wrap the tart snugly in plastic wrap and then foil, placing it in the freezer for up to one month. Thaw the tart overnight in the refrigerator before serving, though fresh is always best for the creamiest texture.
Reheating
This tart is best enjoyed chilled, so reheating isn’t generally recommended. However, if you prefer it slightly warmer, let it sit at room temperature for 20 to 30 minutes before slicing and serving to soften the filling gently without melting it completely.
FAQs
Can I use pistachio paste instead of whole pistachios?
Absolutely! Pistachio paste can enhance the color and make the filling even smoother, but using whole pistachios gives a lovely texture and a more robust nutty flavor. You could combine both for an extra rich filling.
Is this recipe gluten-free?
The crust in this Creamy Pistachio Tart with Rich Pistachio Filling Recipe uses all-purpose flour, which contains gluten. To make it gluten-free, you can experiment with almond flour or a gluten-free flour blend, but the texture will be different.
Can I substitute heavy cream with a lighter option?
While heavy cream supplies the richness that makes this tart special, you can use half-and-half or full-fat coconut milk as alternatives, but the filling may be less creamy and slightly less stable when chilled.
How do I know when the filling is cooked enough?
The filling is ready when it thickens and coats the back of a spoon. If you run your finger across the back of the spoon and the filling stays separated, it’s perfectly cooked. Avoid boiling, or the custard may curdle.
Can I make this tart a day ahead of serving?
Yes! In fact, making it a day in advance helps the flavors meld and ensures the filling sets perfectly. Just keep it chilled and covered until you’re ready to serve.
Final Thoughts
There’s something truly magical about the Creamy Pistachio Tart with Rich Pistachio Filling Recipe—it’s a standout dessert that feels luxurious yet approachable. Once you make it, you’ll understand why it becomes a fast favorite to share with friends or savor during special moments. I hope you give it a try and let it brighten up your dessert table with those gorgeous pistachio flavors and creamy textures everyone will adore.
Print
Creamy Pistachio Tart with Rich Pistachio Filling Recipe
- Prep Time: 30 minutes
- Cook Time: 30 minutes
- Total Time: 5 hours
- Yield: 8 servings
- Category: Dessert
- Method: Baking
- Cuisine: French-Inspired
- Diet: Vegetarian
Description
This Creamy Pistachio Tart features a rich and luscious pistachio filling nestled in a buttery, crisp tart crust. Perfectly balanced with sweetness and a velvety texture, this French-inspired dessert is topped with optional chopped pistachios, whipped cream, or white chocolate shavings for an elegant finish. Ideal for special occasions or indulgent treats, it offers a vibrant natural green color and intense nutty flavor.
Ingredients
For the crust:
- 1 1/4 cups all-purpose flour
- 1/4 cup powdered sugar
- 1/4 teaspoon salt
- 1/2 cup cold unsalted butter, cubed
- 1–2 tablespoons cold water
For the filling:
- 1 cup shelled unsalted pistachios
- 3/4 cup granulated sugar
- 1/2 cup heavy cream
- 1/4 cup whole milk
- 2 large egg yolks
- 2 tablespoons unsalted butter
- 1 teaspoon vanilla extract
- pinch of salt
Optional toppings:
- chopped pistachios
- whipped cream
- white chocolate shavings
Instructions
- Prepare the crust: Preheat your oven to 350°F (175°C). In a food processor, combine the all-purpose flour, powdered sugar, and salt. Add the cold cubed unsalted butter and pulse until the mixture resembles coarse crumbs. Gradually add 1 to 2 tablespoons of cold water, pulsing just until the dough comes together. Press the dough evenly into a 9-inch tart pan with a removable bottom. Prick the base all over with a fork to prevent bubbling, then chill the crust in the refrigerator for 15 minutes.
- Bake the crust: Place the chilled crust in the preheated oven and bake for 18 to 20 minutes, or until the crust turns lightly golden on top. Remove from the oven and allow it to cool completely before adding the filling.
- Make the filling: In a food processor, blend the shelled unsalted pistachios with the granulated sugar until finely ground. In a medium saucepan, gently heat the heavy cream and whole milk over medium heat until just steaming, but not boiling. In a separate bowl, whisk the egg yolks thoroughly. Slowly pour the warm cream mixture into the egg yolks while whisking constantly to temper the eggs. Return this mixture to the saucepan. Add the ground pistachio-sugar mixture, unsalted butter, vanilla extract, and a pinch of salt.
- Cook the filling: Over medium-low heat, cook the filling mixture while stirring constantly to prevent curdling. Continue until the mixture thickens sufficiently to coat the back of a spoon, approximately 5 to 7 minutes. Do not allow the mixture to boil. Remove from heat and let it cool slightly.
- Assemble the tart: Pour the warm pistachio filling into the cooled tart shell, smoothing the surface with a spatula. Transfer the tart to the refrigerator and chill for at least 4 hours, or until the filling is completely set.
- Serve: Before serving, optionally garnish the tart with chopped pistachios, whipped cream, or white chocolate shavings to enhance texture and presentation. Slice and enjoy your creamy pistachio tart!
Notes
- Use high-quality shelled pistachios for the best flavor and a naturally vibrant green color.
- For an even greener filling, incorporate a small amount of pistachio paste or a few drops of natural green food coloring.
- This tart can be prepared a day in advance and stored covered in the refrigerator, allowing flavors to mature and making serving easier.
- Be careful not to overcook the filling to avoid curdling the eggs; constant stirring and medium-low heat are key.
- Ensure the crust is fully cooled before adding the filling to prevent sogginess.


