

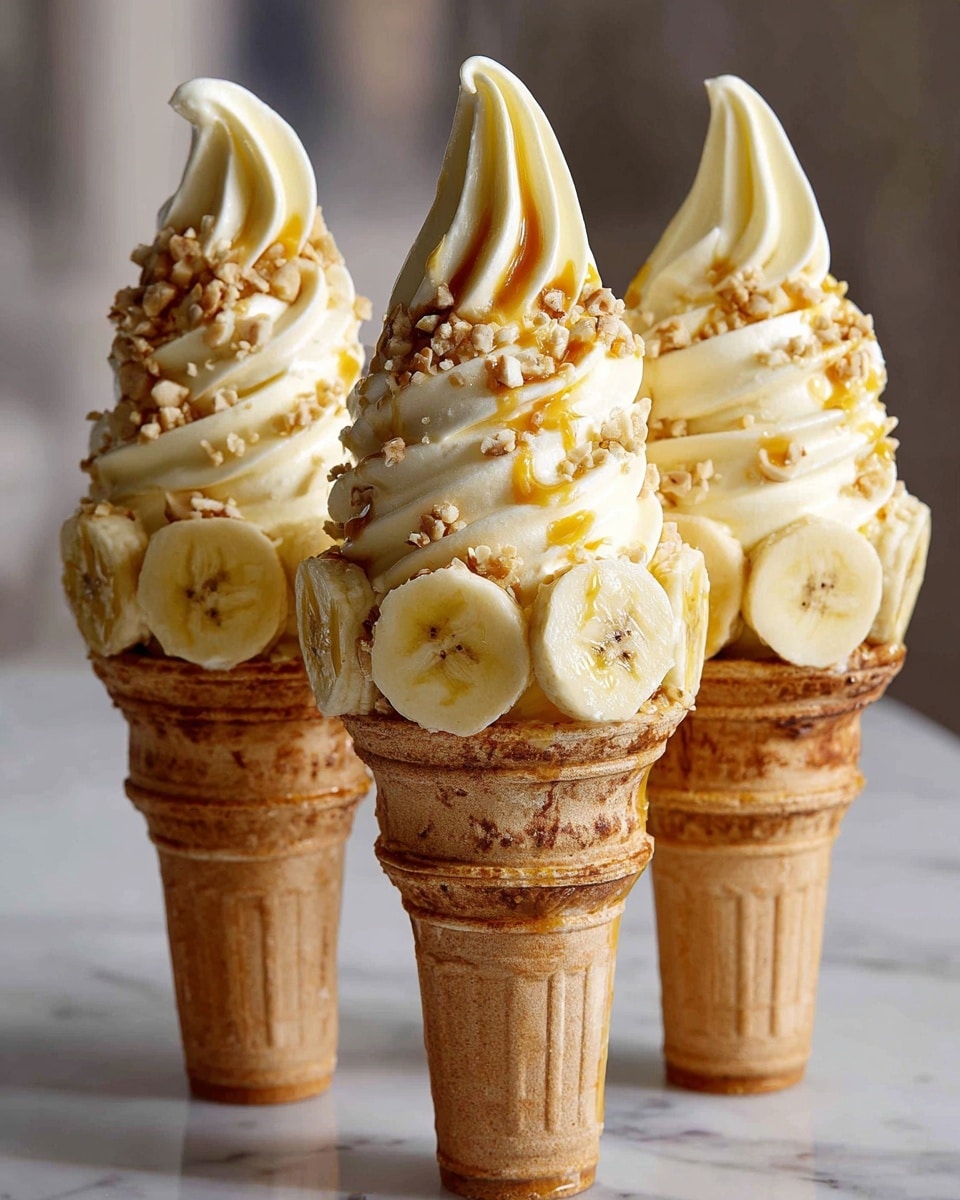
If you have a soft spot for Southern desserts that offer a delightful blend of creamy, crunchy, and fruity flavors, then you are going to adore the Classic Banana Pudding Cheesecake Cones Recipe. This no-bake treat wraps the beloved flavors of banana pudding and cheesecake into a fun handheld cone, perfectly marrying sweet banana slices, fluffy cheesecake mousse, and the satisfying snap of vanilla waffle cones. It’s the kind of recipe that instantly brightens any gathering with its charming presentation and irresistible taste.

Ingredients You’ll Need
Getting these ingredients together is simple, and each one plays a starring role in creating the perfect balance of textures and flavors in your Classic Banana Pudding Cheesecake Cones Recipe. From creamy dairy to naturally sweet bananas, the components come together effortlessly to make magic happen.
- 8 waffle cones: These serve as the crisp, tasty vessel that holds all the luscious filling.
- 1 (3.4 oz) package instant banana pudding mix: Adds that iconic banana flavor and creamy texture to the dessert.
- 1 ½ cups cold milk: Used to whisk the pudding mix silky-smooth and perfectly thickened.
- 8 ounces cream cheese (softened): Creates the rich, velvety cheesecake base essential for that luscious mouthfeel.
- 1 cup heavy cream: Whipped into soft peaks, it lightens the filling into a dreamy mousse.
- ½ cup powdered sugar: Sweetens the cream cheese mixture subtly without overpowering the banana notes.
- 1 teaspoon vanilla extract: Enhances the flavors with a warm, fragrant touch.
- 1 cup crushed vanilla wafers: Adds a delightful crunch and classic southern cookie flavor.
- 2 ripe bananas (sliced): Fresh slices introduce natural sweetness and a fresh texture contrast.
- Whipped cream for topping: The perfect light topping to finish off each cone with a cloud-like flourish.
- Extra crushed wafers and banana slices for garnish: Adds irresistible visual appeal and texture contrast to the final presentation.
How to Make Classic Banana Pudding Cheesecake Cones Recipe
Step 1: Prepare the Banana Pudding Base
Start by whisking the instant banana pudding mix with cold milk until it thickens to a smooth, silky consistency. This step is key because it’s the foundation of that mouthwatering banana flavor. Setting this aside lets it firm up just enough to blend seamlessly with the cheesecake layers later.
Step 2: Soften the Cream Cheese
In a separate bowl, beat your softened cream cheese until perfectly smooth and creamy with no lumps. This ensures your cheesecake filling will be luxuriously rich and velvety without any graininess.
Step 3: Whip the Heavy Cream
Next, whip the heavy cream together with powdered sugar and vanilla extract until stiff peaks form. This fluffy whipped cream transforms your filling into a light, mousse-like texture, making every bite feel airy and indulgent.
Step 4: Combine for Cheesecake Mousse
Gently fold the whipped cream into the cream cheese base, taking care to preserve the airiness. Then, carefully fold in the thickened banana pudding, resulting in a luscious cheesecake mousse that captures the essence of classic banana pudding in every spoonful.
Step 5: Assemble the Cones
Begin by spooning a layer of crushed vanilla wafers into the bottom of each waffle cone for a delightful crunch. Then pipe or spoon in the banana cheesecake mixture, tucking a few banana slices in the middle for freshness. If your cones are generous in size, feel free to repeat these layers. Finally, top with whipped cream, a sprinkle of crushed wafers, and a few banana slices to complete the irresistible treat.
How to Serve Classic Banana Pudding Cheesecake Cones Recipe
Garnishes
Presentation is everything when serving this dessert. A dollop of homemade or store-bought whipped cream crowned with extra crushed vanilla wafers and fresh banana slices lends both visual appeal and an inviting texture contrast. For an extra special touch, you can also drizzle a little caramel sauce or sprinkle a light dusting of cinnamon.
Side Dishes
These cheesecake cones are rich and satisfying on their own, but pairing them with fresh berries or a crisp fruit salad can add a refreshing counterbalance. A tall glass of iced tea or lemonade complements the Southern-inspired flavors perfectly, turning any occasion into a laid-back celebration.
Creative Ways to Present
For a festive spin on the Classic Banana Pudding Cheesecake Cones Recipe, try dipping the cone edges in melted white chocolate and rolling them in crushed wafers before filling. Alternatively, serve cones upright in a decorative stand or mason jar lined with a colorful napkin. You could even create smaller, mini versions for a charming bite-sized dessert buffet at your next party.
Make Ahead and Storage
Storing Leftovers
If you happen to have any leftovers, store them in an airtight container in the refrigerator for up to two days. Because the cones can soften over time, consider storing the filling separately and assembling the cones fresh before serving to keep that delightful crisp crunch.
Freezing
Freezing is not recommended for the cones themselves, as the waffle texture will be compromised. However, you can freeze the cheesecake mousse in a separate container. When ready to enjoy, thaw it overnight in the refrigerator and spoon fresh portions into cones for serving.
Reheating
This dessert is best served chilled, so reheating is generally unnecessary. If you prefer, gently bring the mousse to room temperature for 10-15 minutes before assembling with cones to enhance the creamy texture.
FAQs
Can I make this dessert vegan or dairy-free?
Absolutely! Substitute the cream cheese with a vegan cream cheese alternative and use coconut milk-based pudding mix along with a plant-based whipping cream to create a delicious dairy-free version.
Can I use fresh banana pudding instead of instant mix?
Fresh banana pudding can be used, but the instant mix helps maintain the mousse’s structure and light texture. If using fresh pudding, make sure it’s thick enough so the cones don’t become soggy.
How long can I prepare these cones in advance?
For the best cone crispness, assemble these within 2 hours before serving. The filling can be prepared a day ahead and refrigerated to save time on the day you plan to serve them.
What can I substitute for vanilla wafers?
If you can’t find vanilla wafers, shortbread cookies or graham crackers crushed to similar sizes work beautifully and offer a nice textural element to the cones.
Is it okay to use overripe bananas?
Overripe bananas are actually excellent for this recipe as they are sweeter and more flavorful. Just slice them fresh when assembling to avoid browning.
Final Thoughts
This Classic Banana Pudding Cheesecake Cones Recipe is a delightful way to enjoy a Southern favorite with a fun twist. It’s straightforward to make yet feels special enough for any celebration or casual treat. Gather your ingredients, dive into the steps, and prepare to delight yourself and your loved ones with every bite of this creamy, crunchy, and utterly charming dessert.
Print
Classic Banana Pudding Cheesecake Cones Recipe
- Prep Time: 20 minutes
- Cook Time: 0 minutes
- Total Time: 20 minutes
- Yield: 8 cones
- Category: Dessert
- Method: No-Cook
- Cuisine: American
- Diet: Vegetarian
Description
Classic Banana Pudding Cheesecake Cones are a delightful no-bake dessert that merges creamy banana pudding, rich cheesecake mousse, and crunchy vanilla wafers within a crisp waffle cone. This handheld treat offers Southern-inspired flavors perfect for parties, picnics, or any occasion that calls for an easy, indulgent dessert.
Ingredients
Banana Pudding Mixture
- 1 (3.4 oz) package instant banana pudding mix
- 1 ½ cups cold milk
Cheesecake Mousse Filling
- 8 ounces cream cheese, softened
- 1 cup heavy cream
- ½ cup powdered sugar
- 1 teaspoon vanilla extract
Assembly
- 8 waffle cones
- 1 cup crushed vanilla wafers
- 2 ripe bananas, sliced
- Whipped cream for topping
- Extra crushed vanilla wafers and banana slices for garnish
Instructions
- Prepare Banana Pudding: In a bowl, whisk the instant banana pudding mix with cold milk until smooth and thickened. Set aside to allow it to fully set.
- Beat Cream Cheese: In a separate bowl, beat the softened cream cheese until smooth and creamy, ensuring no lumps remain.
- Whip Heavy Cream: In another large bowl, whip the heavy cream with powdered sugar and vanilla extract until stiff peaks form, creating a light whipped cream base.
- Combine Mixtures: Gently fold the whipped cream into the cream cheese to create a fluffy mixture. Then fold in the prepared banana pudding, blending everything into a light, airy cheesecake mousse.
- Layer Waffle Cones: Spoon a layer of crushed vanilla wafers into the bottom of each waffle cone to add crunch and structure.
- Fill with Cheesecake Mixture: Pipe or spoon the banana cheesecake mousse into each cone, adding a few banana slices in the middle layers for added flavor and texture if desired. For larger cones, repeat layering to fill completely.
- Garnish and Serve: Top each cone with whipped cream, extra crushed vanilla wafers, and banana slices for presentation. Serve immediately or chill for up to 2 hours before serving to keep cones crisp.
Notes
- For added crunch and a decorative touch, dip the tops of the waffle cones in melted white chocolate and roll in crushed vanilla wafers before filling.
- The cones are best enjoyed fresh to maintain their crispness; storing them too long can result in sogginess.


