

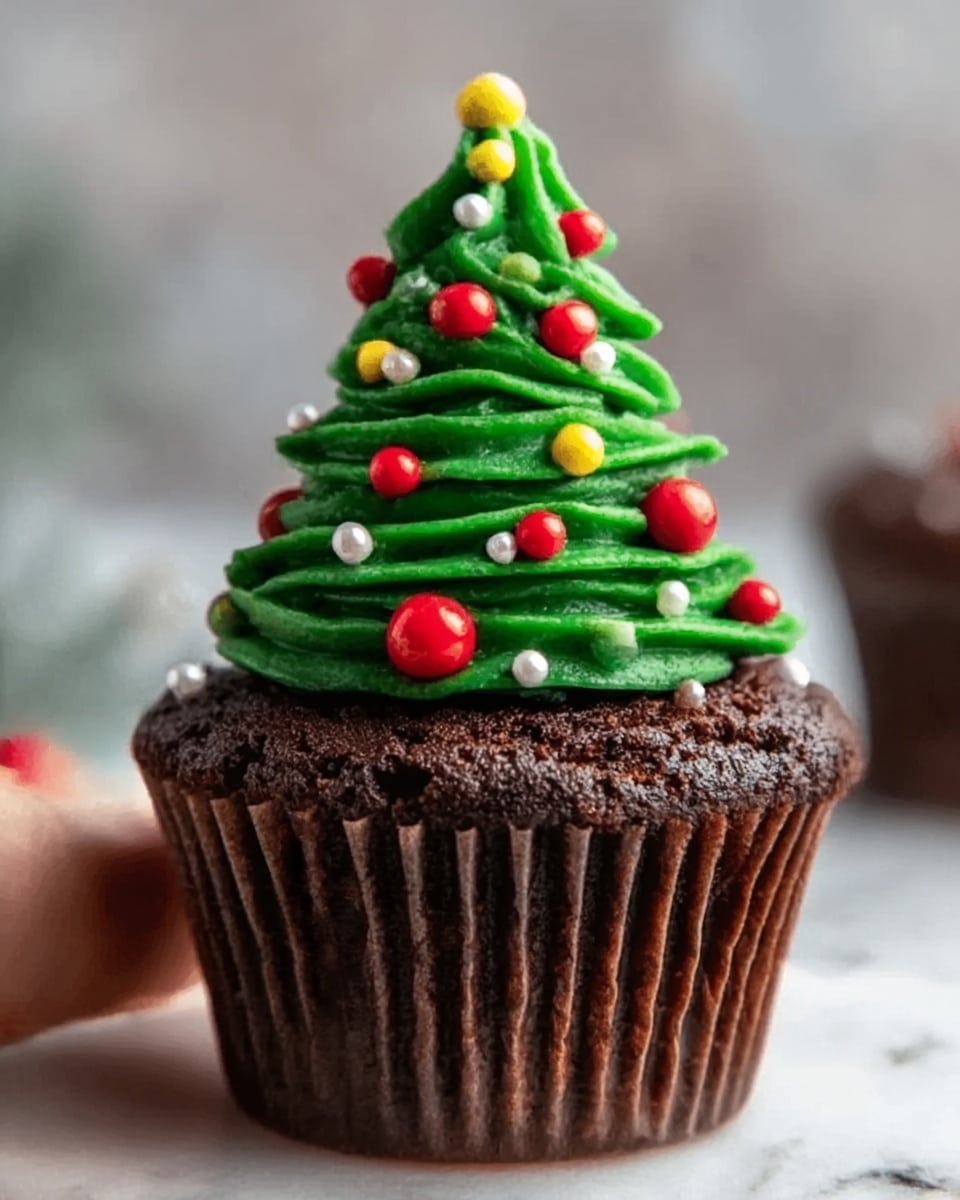
If you are looking to wow your friends and family with a festive treat that’s as delightful to look at as it is to eat, this Christmas Tree Brownie Cups Recipe is your go-to dessert. These bite-sized brownie cups are rich and fudgy, topped with luscious green whipped topping shaped like Christmas trees, and decorated with colorful sprinkles and mini M&Ms that sparkle like ornaments on a holiday tree. It’s a perfect combination of chocolatey goodness and cheerful holiday spirit that’s sure to become a cherished tradition in your celebrations.

Ingredients You’ll Need
The magic of this Christmas Tree Brownie Cups Recipe lies in its simplicity and the perfect harmony of ingredients. Each component plays a vital role: the brownie base provides a chewy, chocolate foundation, the white chocolate adds a creamy, sweet touch, the green-tinted whipped topping forms our festive tree, and the vibrant sprinkles bring the whole design to life.
- Brownie mix (1 box, 18.3 oz): Your base ingredient, keep it simple but high quality for rich chocolate flavor.
- White chocolate chips (1 cup): Melts smoothly to create the decorative rims on the brownie cups.
- Whipped topping (16 oz container): Light and fluffy to pipe the Christmas tree shapes.
- Green food coloring: Transforms the whipped topping into vibrant festive trees.
- Sprinkles (red and green nonpareils, sanding sugar, etc.): Adds sparkle and texture reminiscent of holiday tree ornaments.
- Mini M&Ms (1 cup): Perfect edible decorations that mimic bright Christmas baubles.
How to Make Christmas Tree Brownie Cups Recipe
Step 1: Prepare the Brownie Batter
Start off by preparing your brownie mix according to the package instructions. This batter forms the rich, chocolatey foundation of your Christmas Tree Brownie Cups Recipe, so take care to mix it until smooth and ready to pour.
Step 2: Preheat and Grease
Preheat your oven following the brownie mix box recommendations. While it’s heating up, grease two mini muffin tins well with cooking spray to ensure those adorable little cups come out perfectly without sticking.
Step 3: Fill the Muffin Tins
Fill each mini muffin well about two-thirds full with the prepared brownie batter. This gives enough room for the brownie to rise and still leave space for the frosting tree later on.
Step 4: Bake the Brownies
Bake the brownie cups for 12 to 15 minutes until the edges are firm and the tops develop that signature crinkly texture. Don’t forget to check doneness by inserting a toothpick into the center — it should come out with a few moist crumbs but not wet batter.
Step 5: Create Indentation in Each Cup
Once baked, use a teaspoon to gently press into the center of each warm brownie to create a small indentation. This is where your frosting “tree” will nestle perfectly. Allow the brownies to cool fully before removing them from the muffin tin to keep their shape intact.
Step 6: Melt the White Chocolate
While brownies cool, melt your white chocolate chips in a microwave-safe bowl. Heat them in 40-second bursts, stirring well each time, then follow up with 10-second increments until smooth and fully melted — this is key for a glossy finish on the rims.
Step 7: Decorate the Brownie Cup Rims
Dip the tops of the cooled brownie cups into the melted white chocolate, then immediately into sprinkles. This step adds a festive rim that looks like sparkling snow edging your charming chocolate cups.
Step 8: Color and Prepare the Frosting
Add a few drops of green food coloring to your whipped topping container and fold gently until you achieve the perfect shade of Christmas green. This frosting will be your “pine needles” for the tree shapes.
Step 9: Pipe the Christmas Trees
Using a piping bag with a large star tip (like a Wilton 1M), create tall, swirling peaks of green whipped topping on each brownie where you made the indentation. Build the frosting upward in concentric circles to mimic a lush, frosted pine tree.
Step 10: Add Decorations to Your Trees
Finish by placing mini M&Ms and additional sprinkles onto the green frosting to resemble ornaments and twinkling lights. This final touch brings the Christmas Tree Brownie Cups Recipe to life with color and festive cheer.
How to Serve Christmas Tree Brownie Cups Recipe
Garnishes
For an extra holiday flourish, consider dusting powdered sugar over the brownie cups to mimic fresh snow, or add a small fondant star atop each frosting tree. These simple garnishes elevate the presentation and delight your guests visually before they even take a bite.
Side Dishes
Pair your Christmas Tree Brownie Cups with a glass of cold milk, a cup of spiced hot cocoa, or even a tangy cranberry sauce to balance the sweetness. These companions complement the dessert beautifully and round out a festive spread.
Creative Ways to Present
Display your brownie cups on a festive platters arranged like a winter forest, or place them inside mini cupcake liners with holiday prints. You can even stack them in a pyramid shape on a tiered stand to create a charming Christmas tree centerpiece your guests will admire.
Make Ahead and Storage
Storing Leftovers
Place leftover Christmas Tree Brownie Cups in an airtight container in the refrigerator to keep the whipped topping fresh and maintain the chocolate’s fudgy texture. They will stay delicious for up to 3 days.
Freezing
While you can freeze the brownies before frosting, freezing assembled cups is not recommended as the whipped topping can separate and lose its texture. If you freeze plain baked brownie cups, thaw them completely and refresh the frosting before serving.
Reheating
Since these treats are best enjoyed cold or at room temperature, avoid reheating the decorated brownie cups. If needed, warm just the plain brownie cups briefly before frosting them.
FAQs
Can I use homemade brownie batter instead of a box mix?
Absolutely! Homemade brownie batter will work wonderfully and allow you to control the flavor and texture exactly how you like, making your Christmas Tree Brownie Cups Recipe even more special.
What’s the best type of whipped topping for piping the trees?
Use a stable whipped topping or stabilized whipped cream to ensure the trees hold their shape well and don’t melt quickly, especially if serving at room temperature or warm gatherings.
Can I use food coloring gel instead of liquid?
Yes, food coloring gel actually gives a more intense color without thinning the whipped topping, which is great for vibrant green frosting on your Christmas trees.
Are there alternatives to mini M&Ms for decorating?
You can definitely get creative! Small candies, chopped nuts, colored sugar pearls, or edible glitter all make fantastic decorating options to mimic Christmas ornaments.
How far in advance can I prepare these brownie cups?
Make the brownie cups and decorate them with melted white chocolate rims a day ahead, then prepare and pipe the frosting on the day you plan to serve for maximum freshness and visual appeal.
Final Thoughts
This Christmas Tree Brownie Cups Recipe is an irresistible treat that brings joy and festive charm right to your dessert table. It’s fun to make, beautiful to behold, and delicious to devour. Don’t hesitate to try this recipe and share the holiday magic with your loved ones—you’ll be creating sweet memories one festive bite at a time.
Print
Christmas Tree Brownie Cups Recipe
- Prep Time: 10 minutes
- Cook Time: 15 minutes
- Total Time: 30 minutes
- Yield: 24 servings
- Category: Dessert
- Method: Baking
- Cuisine: American
- Diet: Vegetarian
Description
Festive Christmas Tree Brownie Cups that combine rich, fudgy brownie bases with a creamy, green-tinted whipped topping piped into charming Christmas tree shapes, adorned with colorful sprinkles and mini M&Ms for a delightful holiday treat.
Ingredients
Brownie Base
- 1 (18.3 oz) box brownie mix, prepared according to the package instructions
Decoration
- 1 cup white chocolate chips
- 16 oz container whipped topping
- Green food coloring
- Sprinkles (red and green nonpareils, sanding sugar, etc.)
- 1 cup mini M&Ms
Instructions
- Prepare the Brownie Batter: Follow the instructions on your brownie mix box to prepare the batter until smooth and well combined.
- Preheat and Grease: Preheat your oven according to the brownie mix directions. Grease two mini muffin tins thoroughly with cooking spray to prevent sticking.
- Fill and Bake: Pour the brownie batter into the mini muffin tins, filling each about two-thirds full. Bake for 12-15 minutes or until the edges are firm and the top surface is crinkly. Use a toothpick inserted in the center to check doneness; it should come out with a few moist crumbs.
- Create an Indentation: Immediately after baking, press a teaspoon gently into the center of each brownie to form an indentation. Let the brownies cool completely in the pan before removing to keep their shape intact.
- Melt the White Chocolate: Place the white chocolate chips in a microwave-safe bowl. Heat for 40 seconds, then stir. Continue heating in 10-second bursts, stirring each time, until smooth and fully melted.
- Decorate the Rims: Dip the top rim of each cooled brownie into the melted white chocolate, then immediately into a shallow bowl of sprinkles to create a festive decorative edge.
- Prepare the Frosting: Add several drops of green food coloring to the whipped topping and fold gently until you achieve the desired green shade.
- Pipe the Trees: Fit a piping bag with a large star tip, such as a Wilton 1M. Pipe the green whipped topping onto each brownie in a swirling motion to resemble a Christmas tree shape.
- Add Decorations: Finish by decorating the whipped topping trees with mini M&M candies as ornaments and sprinkle additional sprinkles for a colorful, festive look.
Notes
- Ensure brownies are completely cool before decorating to prevent the whipped topping from melting.
- You can substitute whipped topping with stabilized whipped cream if preferred.
- For a gluten-free option, use a gluten-free brownie mix.
- Store brownie cups in the refrigerator to keep the whipped topping fresh.
- These brownie cups are perfect for holiday parties and can be made a day in advance.


