
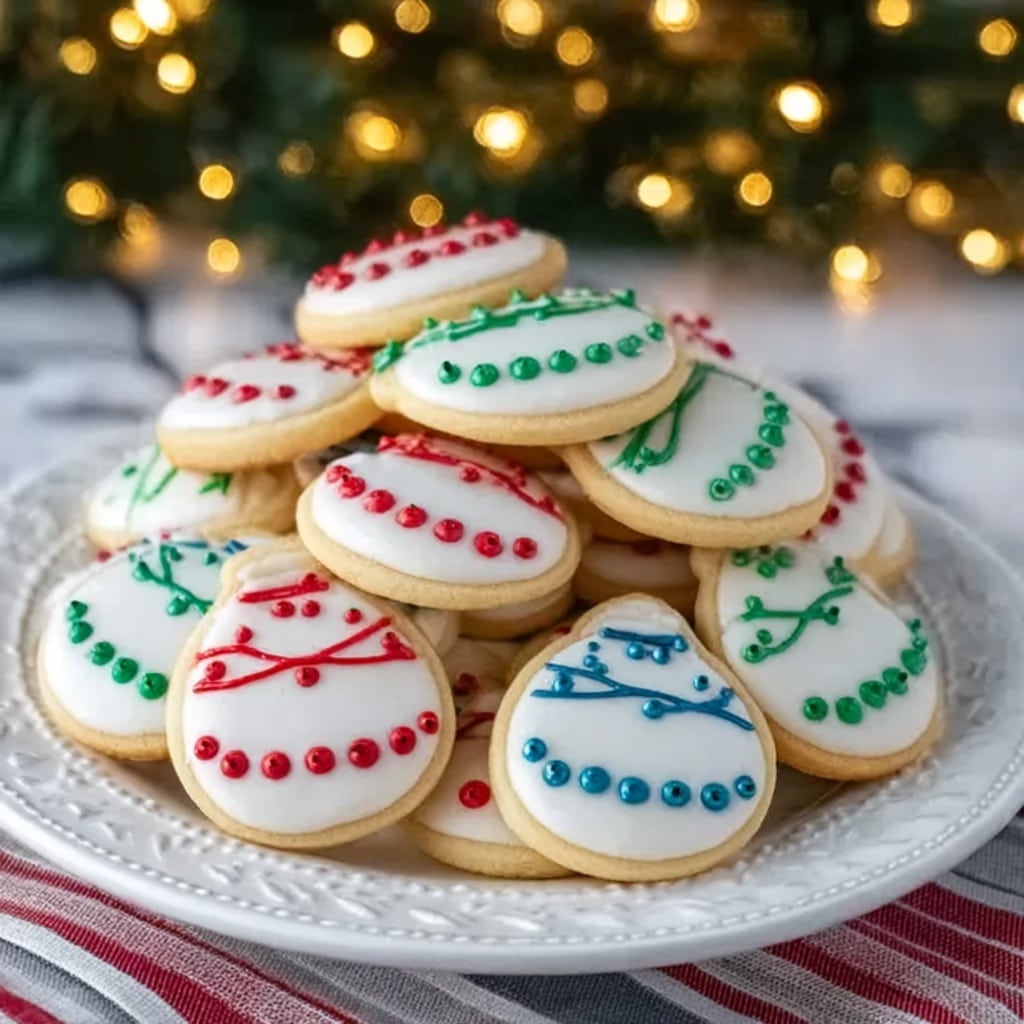
If you’re looking to brighten up your holiday baking, this Christmas Light Cookies Recipe is the perfect way to add a pop of festive fun to your cookie platter. These delightful treats combine a tender, buttery base with vibrant, colorful icing that mimics glowing holiday lights. The playful design and sweet taste make these cookies a beloved favorite for both kids and adults, creating joy with every bite and sparkle with every color.

Ingredients You’ll Need
This Christmas Light Cookies Recipe relies on simple, pantry-friendly ingredients that come together beautifully to create a soft, flavorful cookie and eye-catching decoration. Each ingredient plays a special role—from the richness of butter to the subtle vanilla aroma and the bright colors that bring these cookies to life.
- All-purpose flour (2 ¾ cups): Provides the perfect structure for soft, tender cookies that hold their shape well.
- Granulated sugar (1 cup): Sweetens the dough while helping to create a light, fluffy texture.
- Unsalted butter, softened (1 cup): Adds richness and moistness, making every bite melt in your mouth.
- Large eggs, room temperature (2): Bind the dough together and contribute to a tender crumb.
- Baking powder (1 tsp): Gives a slight lift without making the cookies cakey, keeping them just right.
- Vanilla extract (1 tsp): Offers a warm, aromatic depth that enhances the overall flavor.
- Food coloring (various colors): Turns plain icing into festive hues that resemble Christmas lights, adding visual cheer.
- Powdered sugar (2 cups, for icing): Creates a smooth, sweet icing perfect for decorating each cookie with precise, colorful details.
How to Make Christmas Light Cookies Recipe
Step 1: Prepare Your Oven and Baking Sheets
Start by preheating your oven to 350°F (175°C). While it warms, line two baking sheets with parchment paper. This step ensures your cookies bake evenly and slide off effortlessly later, keeping their charming shapes intact.
Step 2: Cream Butter and Sugar
In a large bowl, cream together the softened butter and granulated sugar until the mixture turns light and fluffy. This process introduces air into the dough, giving your cookies that tender, melt-in-your-mouth texture we all love.
Step 3: Incorporate Eggs and Vanilla
Add the eggs one at a time, beating well after each addition. Then mix in the vanilla extract. This not only helps bind the ingredients but also infuses the dough with warmth and complexity.
Step 4: Combine Dry Ingredients and Mix
In a separate bowl, whisk the all-purpose flour with baking powder. Gradually add this dry mix to your wet ingredients, stirring gently until the dough is smooth and cohesive. Avoid overmixing to keep the cookies tender rather than tough.
Step 5: Chill the Dough
Wrap or cover your dough and chill it in the refrigerator for about an hour. This crucial step makes the dough firm enough to handle and helps the cookies maintain their shape during baking—especially important for those adorable light bulb shapes.
Step 6: Roll and Cut the Dough
Lightly flour your work surface and roll out the chilled dough to about ¼ inch thickness. Use light bulb-shaped cookie cutters to cut out the cookies. Don’t worry if you don’t have the exact shape; any festive or bulb-like cutter will do just fine.
Step 7: Bake and Cool
Arrange the cutouts on your prepared baking sheets, spacing them apart. Bake the cookies for 8 to 10 minutes or until the edges are just starting to turn golden. Remove from the oven and allow them to cool completely on a wire rack before decorating.
Step 8: Decorate Your Christmas Light Cookies Recipe
Mix powdered sugar with a splash of water or milk until smooth to create icing. Divide and tint with your chosen food colors. Use piping bags or simple plastic bags with a corner snipped to add colorful squiggles, dots, and lines that look like glowing bulbs. Let the icing set before serving or storing.
How to Serve Christmas Light Cookies Recipe

Garnishes
Sprinkles, edible glitter, or tiny sugar pearls can add an extra sparkle to your decorated cookies, mimicking the twinkle of real holiday lights. Adding these will delight guests and make your cookies truly shine on any festive tray.
Side Dishes
Serve your Christmas Light Cookies with a warm cup of spiced hot cocoa, chai tea, or creamy eggnog for a complete holiday experience. The cozy beverages complement the sweet, buttery cookies perfectly and elevate your festive gathering.
Creative Ways to Present
Arrange your cookies in a shallow basket lined with colorful tissue paper or place them on a mirrored platter to reflect their vibrant hues. You could also string a delicate ribbon around each to mimic a string of lights, turning your cookies into edible decor!
Make Ahead and Storage
Storing Leftovers
Keep your Christmas Light Cookies in an airtight container at room temperature for up to a week. This will preserve their softness while keeping the icing decorations intact and fresh.
Freezing
If you want to prepare these festive treats in advance, freeze fully cooled cookies in a single layer on a baking sheet. Once solid, transfer them to a sealed freezer bag. Frozen cookies can last for up to three months, perfect for early holiday prep.
Reheating
These cookies are delightful as is, but if you want to warm them up, pop them in a low oven (about 300°F) for 3-5 minutes to refresh their softness. Avoid microwaving—icing can melt and lose its charm with too much heat.
FAQs
Can I use a different flour instead of all-purpose flour?
All-purpose flour works best for achieving the right balance of softness and structure. Using whole wheat or gluten-free flour will change the texture and may require recipe adjustments to maintain cookie quality.
How do I prevent the cookies from spreading too much during baking?
Chilling the dough before baking is key. It firms up the butter, helping the cookies hold their shape. Also, avoid pressing them down before baking so they bake thick and perfectly formed.
Can I make the icing ahead of time?
Absolutely! You can prepare the icing a day ahead and store it in airtight containers. Just give it a good stir before decorating, and if it thickens too much, add a drop of water to get the perfect consistency.
Are these cookies suitable for kids to decorate?
Yes! Decorating these Christmas Light Cookies is a great activity for kids. Just make sure to supervise when using piping bags or small decorating tools. It’s a fun way for little ones to get creative and involved.
What if I don’t have light bulb cookie cutters?
No worries! You can use any small, rounded cookie cutters or even freehand shapes with a knife. The key is to keep the shapes fun and festive—your gift of homemade cookies will shine no matter their shape.
Final Thoughts
This Christmas Light Cookies Recipe is more than just a dessert; it’s a cherished holiday tradition waiting to happen in your kitchen. The combination of buttery goodness and colorful, glowing icing makes every batch an irresistible joy. I can’t wait for you to try making these festive treats and share them with your loved ones—each cookie is sure to bring a smile and a sprinkle of holiday magic!
Print
Christmas Light Cookies Recipe
- Prep Time: 20 minutes
- Cook Time: 10 minutes
- Total Time: 1 hour 30 minutes
- Yield: 24 servings
- Category: Dessert
- Method: Baking
- Cuisine: American
Description
Celebrate the holiday season with these festive Christmas Light Cookies. Soft, buttery sugar cookies shaped like light bulbs and decorated with colorful icing bring a cheerful touch to any holiday gathering. Perfect for baking with family or gifting to friends, these cookies combine classic flavors with playful presentation.
Ingredients
Cookie Dough
- 2 ¾ cups all-purpose flour
- 1 cup granulated sugar
- 1 cup unsalted butter (softened)
- 2 large eggs (room temperature)
- 1 tsp baking powder
- 1 tsp vanilla extract
Icing
- 2 cups powdered sugar
- Food coloring (various colors)
Instructions
- Preheat and Prepare Baking Sheets: Preheat your oven to 350°F (175°C) and line two baking sheets with parchment paper to prevent sticking and ensure even baking.
- Cream Butter and Sugar: In a large bowl, cream together the softened butter and granulated sugar until the mixture becomes light and fluffy, creating a smooth base for the cookies. Add eggs one at a time, mixing well after each addition, then stir in the vanilla extract for flavor.
- Combine Dry Ingredients: In a separate bowl, whisk together the all-purpose flour and baking powder to evenly distribute the leavening agent, which helps the cookies rise during baking.
- Mix Dry and Wet Ingredients: Gradually add the dry ingredient mixture to the wet ingredients, stirring until the dough comes together into a smooth, cohesive mass.
- Chill the Dough: Wrap the dough in plastic wrap or place it in a covered container and chill in the refrigerator for about one hour. This step firms up the dough, making it easier to roll out and helping the cookies maintain their shape while baking.
- Roll Out Dough and Cut Shapes: Lightly flour a clean surface and roll out the chilled dough to approximately ¼ inch thickness. Use light bulb cookie cutters to cut out festive shapes, gathering and rerolling scraps as needed.
- Bake the Cookies: Place the shaped dough pieces on the prepared baking sheets and bake in the preheated oven for 8-10 minutes or until the edges are lightly golden, indicating they are perfectly baked.
- Cool and Decorate: Allow the cookies to cool completely on a wire rack before decorating. Prepare the icing by mixing powdered sugar with a small amount of water or milk until smooth and tint with food coloring as desired. Use the colorful icing to decorate each cookie to resemble bright Christmas light bulbs.
Notes
- Ensure butter is softened, not melted, to achieve the right dough texture.
- Chilling the dough is important for clean cookie shapes and preventing spreading.
- You can substitute powdered sugar icing with royal icing for a firmer finish.
- Store decorated cookies in an airtight container to maintain freshness.
- These cookies freeze well both before and after baking.


