

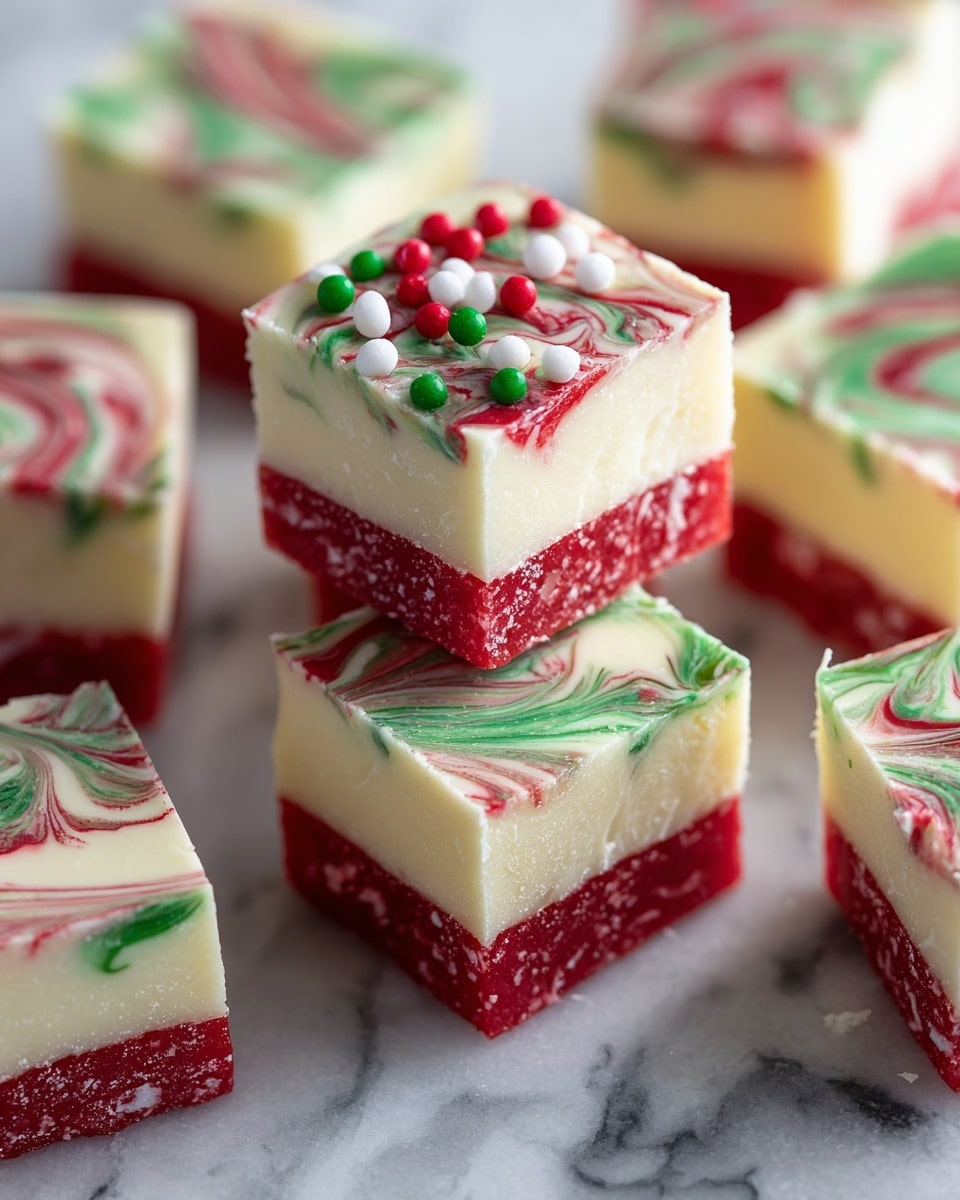
If you want to delight your friends and family with a festive treat that’s both rich and visually stunning, this Christmas Fudge Recipe is an absolute must-try. Creamy white chocolate, swirls of vibrant holiday colors, and a sprinkle of festive cheer come together in each bite, making this fudge a showstopper for any holiday gathering. Whether you’re a seasoned sweet-maker or just looking for the perfect seasonal indulgence, this recipe offers a simple yet irresistibly delightful way to add a personal touch to your Christmas celebrations.

Ingredients You’ll Need
Each ingredient in this Christmas Fudge Recipe is straightforward yet crucial for achieving that classic creamy texture and festive look. These essentials combine to give you a smooth, luscious fudge that’s easy to make and hard to resist.
- 3 cups white chocolate chips: The creamy base providing sweetness and that melt-in-your-mouth texture.
- 1 (14-ounce) can sweetened condensed milk: Adds richness and helps blend the fudge to the perfect consistency.
- 1/2 teaspoon vanilla extract: Enhances the flavors with a warm, inviting aroma.
- Red and green food coloring: Brings festive holiday colors to life for a cheerful appearance.
- 1/4 cup holiday sprinkles (optional): Adds a playful crunch and colorful decoration on top.
How to Make Christmas Fudge Recipe
Step 1: Prepare the Pan
Begin by lining an 8×8-inch baking dish with parchment paper, making sure to leave some overhang on the sides. This little tip makes it so much easier to lift your fudge out once it’s set, preventing any sticky mishaps.
Step 2: Melt the Chocolate
In a medium saucepan set to low heat, combine your white chocolate chips with the sweetened condensed milk. Stir steadily until the mixture is completely smooth and creamy, ensuring the chocolate doesn’t scorch. Once melted, remove from heat and stir in the vanilla extract for depth and warmth.
Step 3: Color the Fudge
Divide your luscious white chocolate mixture evenly into three bowls. Add red food coloring to one bowl, green to another, and leave the third bowl as it is to maintain the classic white. This step transforms your fudge into a festive canvas for those beautiful holiday swirls.
Step 4: Layer the Fudge
Carefully pour the red fudge into the prepared pan first, followed by the plain white fudge, and finally the green layer on top. To create a whimsical marbled effect, gently run a knife through the layers, swirling them just enough to blend the edges without mixing the colors completely.
Step 5: Add Sprinkles and Chill
While the fudge is still warm, sprinkle the holiday sprinkles on top, giving it an extra touch of festive sparkle and texture. Then, place the pan in the refrigerator and chill for at least 2 hours until the fudge firms up nicely. Once set, use the parchment paper to lift the fudge from the pan and cut it into perfect squares.
How to Serve Christmas Fudge Recipe
Garnishes
Adding a few extra touches can elevate your Christmas Fudge Recipe even more when serving. Fresh mint leaves or tiny edible gold stars make stunning garnishes that bring an elegant holiday feel to each plate. If you want to amp up the sweetness, a light dusting of powdered sugar over the top is also delightful.
Side Dishes
This fudge pairs beautifully with warm beverages such as hot cocoa, mulled wine, or a spiced holiday coffee. The rich creaminess balances perfectly with the cozy, fragrant drinks that warm everyone up during chilly holiday evenings.
Creative Ways to Present
Presentation can be half the joy with this Christmas Fudge Recipe. Try arranging the fudge squares in a festive tin lined with wax paper or layering them in a clear jar with red and green ribbons for a gorgeous edible gift. You could also place individual pieces on decorative holiday-themed plates or serve them alongside other Christmas treats like peppermint bark and gingerbread cookies for an irresistible dessert spread.
Make Ahead and Storage
Storing Leftovers
Because fudge is best enjoyed fresh but also quite forgiving, store any leftovers in an airtight container at room temperature for up to a week. Keeping it sealed helps preserve the creamy texture and prevents it from absorbing any other fridge odors.
Freezing
If you want to keep your Christmas Fudge Recipe fresh for longer, it freezes beautifully. Wrap individual squares tightly in plastic wrap and place them in a freezer-safe bag or container. When stored this way, the fudge can last up to three months without losing its delectable flavor or texture.
Reheating
Fudge is not typically reheated in the traditional sense, but if it becomes too firm, letting it sit at room temperature for about 15 minutes before serving will soften it gently. Avoid microwaving as it may cause the fudge to become oily or grainy.
FAQs
Can I use dark or milk chocolate instead of white chocolate chips?
While white chocolate chips create the perfect creamy base for this Christmas Fudge Recipe, swapping in dark or milk chocolate is possible but will significantly change the flavor and color. If you do, consider adjusting the coloring steps accordingly to match the holiday theme.
What is the best way to get smooth, creamy fudge?
Low and slow heat is key when melting your chocolate and sweetened condensed milk together. Stir gently and constantly to prevent burning. Also, be sure not to over-cook or over-stir once the vanilla is added to maintain that silky texture.
Can I make this fudge vegan or dairy-free?
This classic Christmas Fudge Recipe relies on dairy-rich ingredients, but you can try substituting with vegan white chocolate chips and a coconut milk-based condensed milk alternative. Keep in mind that the texture and flavor may vary slightly.
How do I achieve the marbled effect without the colors mixing too much?
Pour the colored fudge layers one at a time and avoid stirring too vigorously. Using a sharp knife, create gentle swirls just along the surface instead of mixing deeply to maintain those beautiful distinct colors.
Are the holiday sprinkles necessary?
Sprinkles add a festive pop of color and a bit of crunch but are completely optional. If you want to keep things elegant or allergen-friendly, the fudge tastes fantastic without them, too.
Final Thoughts
Making this Christmas Fudge Recipe is like wrapping a little holiday magic into every bite. It’s simple enough for any home cook yet impressive enough to wow guests and loved ones. So go ahead, bring out the colors, swirl in some joy, and enjoy this delicious tradition that’s sure to become a treasured favorite for many Christmases to come.
Print
Christmas Fudge Recipe
- Prep Time: 15 minutes
- Cook Time: 10 minutes
- Total Time: 2 hours 25 minutes
- Yield: 24 servings
- Category: Dessert
- Method: Stovetop
- Cuisine: American
- Diet: Vegetarian
Description
This festive Christmas Fudge recipe features creamy white chocolate combined with sweetened condensed milk, layered with vibrant red and green colors for a delightful holiday treat. With a marbled effect and optional holiday sprinkles on top, it’s perfect for gifting or enjoying during the season.
Ingredients
Main Ingredients
- 3 cups white chocolate chips
- 1 (14-ounce) can sweetened condensed milk
- 1/2 teaspoon vanilla extract
Coloring and Decoration
- Red food coloring
- Green food coloring
- 1/4 cup holiday sprinkles (optional, for decoration)
Instructions
- Prepare the Pan: Line an 8×8-inch baking dish with parchment paper, leaving an overhang on the sides for easy removal of the fudge.
- Melt the Chocolate: In a medium saucepan over low heat, combine the white chocolate chips and sweetened condensed milk. Stir constantly until the mixture is smooth and fully melted. Remove the pan from heat and stir in the vanilla extract for flavor.
- Color the Fudge: Divide the melted chocolate mixture evenly into three separate bowls. Tint one bowl with red food coloring, another with green food coloring, and leave the third bowl plain for the white layer.
- Layer the Fudge: Pour the red fudge layer into the prepared pan first, followed by the plain white fudge layer, and lastly the green fudge layer. Use a knife or skewer to gently swirl the layers together, creating a beautiful marbled effect.
- Add Sprinkles: While the fudge mixture is still warm, sprinkle the holiday sprinkles evenly on top to add festive decoration.
- Chill: Refrigerate the fudge for at least 2 hours or until fully firm. Once set, lift the fudge out of the pan using the parchment paper overhang and cut into squares for serving.
Notes
- Use parchment paper to make removing the fudge from the pan easier.
- Stir continuously while melting to avoid burning the chocolate.
- You can customize the colors and sprinkles according to your holiday theme.
- Store fudge in an airtight container in the refrigerator to keep it fresh.


