

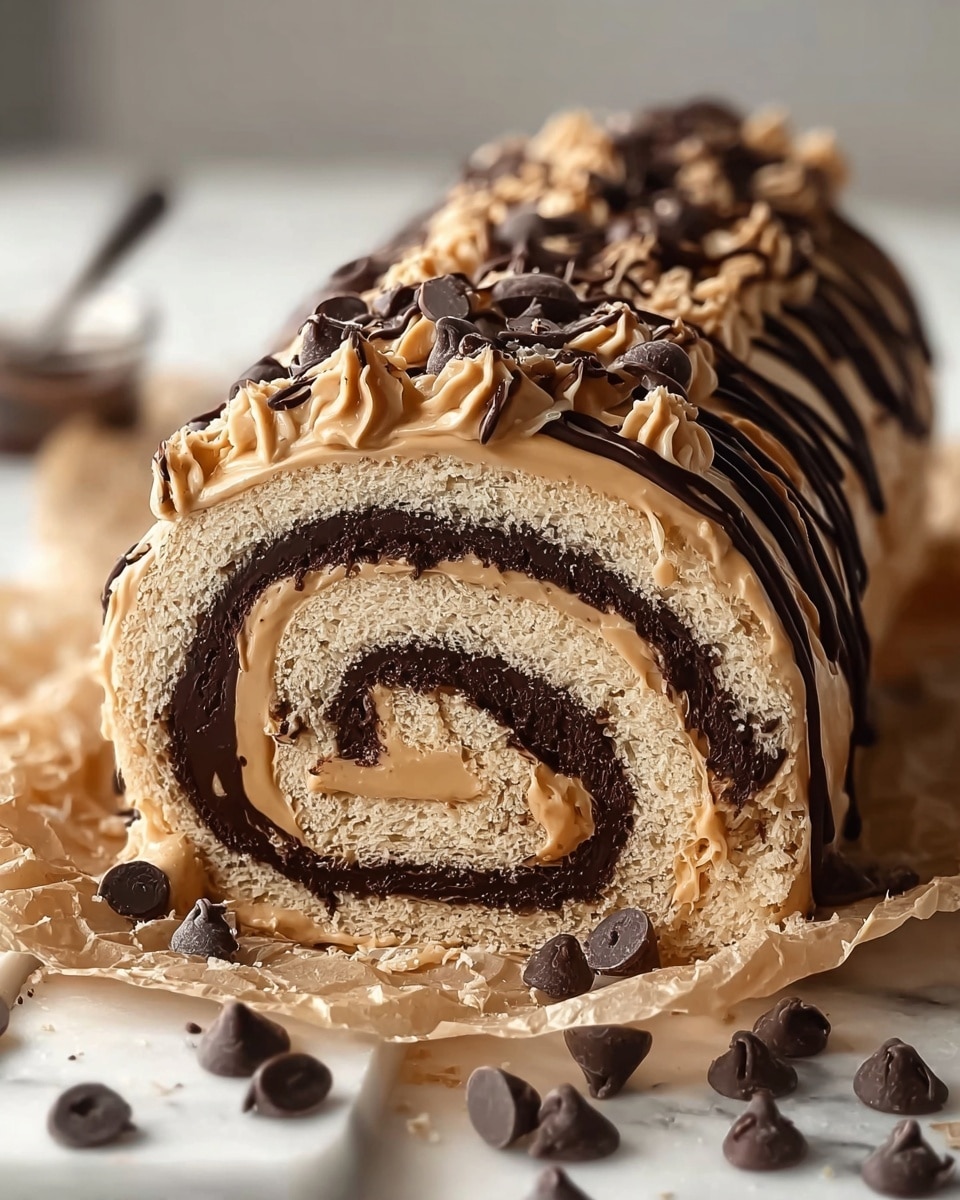
If you have a soft spot for the divine combination of chocolate and peanut butter, then you will absolutely adore the Chocolate Peanut Butter Dream Roll Recipe. This luscious dessert wraps a tender, chocolatey sponge cake around a creamy peanut butter filling studded with crunchy Reese’s peanut butter cups. It’s like a rich, fluffy hug for your taste buds that’s surprisingly simple to make but incredibly impressive. Whether for a special occasion or a sweet treat to brighten any day, this roll will quickly become a favorite in your dessert rotation.

Ingredients You’ll Need
This recipe relies on a handful of pantry staples that work together perfectly to create a delicious balance of flavors, textures, and colors. Each ingredient plays a key role, whether it’s building the cake’s soft structure or adding bursts of peanut buttery goodness.
- Chocolate cake mix: The base of your roll, providing a moist and tender chocolate sponge with minimal effort.
- Eggs, water, and oil: Usually included on the cake mix box, these bring the batter together and ensure a perfect bake.
- Creamy peanut butter: Adds a luscious, nutty richness that makes the filling wonderfully smooth.
- Whipped topping: Lightens the peanut butter with fluffy creaminess, perfect for a dreamy filling texture.
- Chopped Reese’s peanut butter cups: These add delightful chocolate-peanut crunch throughout the roll, making every bite exciting.
- Extra whipped topping (for garnish): To give your finished roll a pretty, inviting finish.
- Extra chopped Reese’s peanut butter cups (for garnish): Sprinkle on top for a fun, festive touch and texture.
How to Make Chocolate Peanut Butter Dream Roll Recipe
Step 1: Prepare Your Pan and Oven
Start by preheating your oven to the temperature suggested on your cake mix box, usually 350°F (175°C). Line a 10×15-inch jelly roll pan with parchment paper and lightly grease it to ensure your cake releases easily after baking. This prep really is key to rolling the cake smoothly later on.
Step 2: Mix and Pour the Cake Batter
Follow the instructions on your chocolate cake mix box, combining the ingredients listed there—typically eggs, water, and oil. Pour this luscious chocolate batter into your prepared pan, spreading it evenly so that the cake bakes uniformly. This creates the perfect thin layer that’s flexible enough for rolling.
Step 3: Bake to Perfection
Bake your cake for 12 to 15 minutes until it’s set but still soft and springy to the touch. Timing is crucial here; you don’t want to overbake because a dry cake will crack when rolled. Trust your senses: the cake should bounce back gently when pressed.
Step 4: Roll While Warm
The secret to a perfect roll is to gently lift the cake using the parchment paper and roll it up from the short edge while it’s still warm. This softens the sponge and helps it take shape without cracking. Let it cool completely while rolled to maintain this beautiful form.
Step 5: Whip Up the Filling
In a mixing bowl, stir together the creamy peanut butter and whipped topping until smooth and fluffy. This light filling contrasts beautifully with the rich cake, making every slice melt-in-your-mouth delicious.
Step 6: Assemble Your Dream Roll
Carefully unroll the cooled cake and spread your peanut butter filling evenly over the surface. Then, sprinkle generously with chopped Reese’s peanut butter cups, which add a sweet and crunchy surprise in every bite.
Step 7: Roll It Up Tight
Gently roll the cake back up, this time without the parchment paper. Keep it snug but be mindful not to crack the cake. Once rolled, place the cake seam-side down on your serving plate for a flawless presentation.
Step 8: Chill and Garnish
Pop your roll in the refrigerator for at least an hour to let it set up nicely. Before serving, add a final flourish of extra whipped topping and a sprinkle of chopped Reese’s peanut butter cups to make it truly irresistible.
How to Serve Chocolate Peanut Butter Dream Roll Recipe
Garnishes
Extra whipped topping and more chopped peanut butter cups add that gorgeous finishing touch, making your Chocolate Peanut Butter Dream Roll Recipe as pretty as it is tasty. You could also dust it lightly with cocoa powder or drizzle some melted chocolate for an elegant flair.
Side Dishes
This roll pairs beautifully with a scoop of vanilla ice cream or a simple cup of coffee. Fresh berries or sliced bananas on the side bring a refreshing contrast to the richness, balancing the dessert experience perfectly.
Creative Ways to Present
For parties or gatherings, slice the roll into neat pinwheels and arrange them on a platter with some extra peanut butter cups sprinkled around. This makes sharing so much easier and turns your dessert into a captivating centerpiece that everyone will admire.
Make Ahead and Storage
Storing Leftovers
Store any leftover Chocolate Peanut Butter Dream Roll Recipe in an airtight container in the refrigerator. It keeps beautifully for up to 3 days while retaining its moistness and fresh flavors.
Freezing
If you want to save some for later, wrap the roll tightly in plastic wrap and aluminum foil, then freeze for up to 2 months. Thaw overnight in the fridge to enjoy its fresh-baked taste like magic.
Reheating
Because this is a cream-filled roll, reheating isn’t recommended. Instead, enjoy slices straight from the fridge or allow them to sit at room temperature for 10 to 15 minutes before serving to soften slightly.
FAQs
Can I use homemade chocolate cake instead of box mix?
Absolutely! A homemade chocolate sponge cake will work wonderfully in the Chocolate Peanut Butter Dream Roll Recipe. Just be sure it’s thin and flexible enough to roll without cracking.
What if I’m allergic to peanuts?
You can substitute the peanut butter with almond or cashew butter and swap Reese’s cups for allergy-friendly chocolate candies. This way, you still get a nutty, chocolatey dream roll without the peanut risk.
Can I make this dessert vegan?
With a few tweaks like using a vegan chocolate cake mix, non-dairy whipped topping, and plant-based peanut butter cups, you can absolutely turn this into a vegan-friendly delight.
Why does the cake roll need to be warm?
Rolling the cake while it’s warm makes the sponge pliable and prevents cracks. As it cools rolled, it holds the shape perfectly for filling and final assembly.
How do I avoid cracks when rolling the cake?
Don’t overbake, and roll the cake gently using parchment paper while warm. If cracks do appear, cover them with whipped topping or peanut butter filling for a seamless look.
Final Thoughts
The Chocolate Peanut Butter Dream Roll Recipe is a delightful, fun, and impressively easy dessert that brings together two of the most beloved flavors in a show-stopping way. I can’t wait for you to try it and see just how perfectly simple ingredients can transform into a dreamy treat that everyone will ask for again and again. Happy baking and even happier indulging!
Print
Chocolate Peanut Butter Dream Roll Recipe
- Prep Time: 20 minutes
- Cook Time: 15 minutes
- Total Time: 1 hour 35 minutes
- Yield: 10 servings
- Category: Dessert
- Method: Baking
- Cuisine: American
Description
This Chocolate Peanut Butter Dream Roll is a decadent and fluffy jelly roll cake featuring a moist chocolate base layered with a creamy peanut butter and whipped topping filling. Chopped Reese’s peanut butter cups add delightful texture and rich flavor, making it a perfect treat for peanut butter and chocolate lovers. Easy to prepare with a boxed cake mix, this dessert is rolled to create an impressive yet simple presentation perfect for gatherings and celebrations.
Ingredients
Cake
- 1 box chocolate cake mix
- Ingredients listed on the cake mix box (usually eggs, water, and oil)
Filling
- 1 cup creamy peanut butter
- 2 cups whipped topping (such as whipped cream or whipped non-dairy topping)
- 1 cup chopped Reese’s peanut butter cups
Garnish
- Extra whipped topping (for garnish)
- Extra chopped Reese’s peanut butter cups (for garnish)
Instructions
- Preheat and prepare pan: Preheat the oven to 350°F (175°C) or the temperature directed on the cake mix box. Line a 10×15-inch jelly roll pan with parchment paper and lightly grease it to prevent sticking.
- Prepare cake batter: Prepare the chocolate cake mix according to the package instructions, mixing the required eggs, water, and oil. Pour the batter into the prepared pan and spread it evenly for uniform baking.
- Bake the cake: Bake the cake for 12–15 minutes until it is set but still soft to the touch. Be careful not to overbake to avoid cracking during rolling.
- Roll the warm cake: While the cake is still warm, use the parchment paper to gently roll the cake from the short end into a log shape. Allow it to cool completely while rolled to maintain its shape.
- Make the filling: In a bowl, combine the creamy peanut butter and whipped topping. Mix until smooth and fluffy to create a light, creamy filling.
- Unroll and fill the cake: Carefully unroll the cooled cake. Spread the peanut butter filling evenly over the entire surface, then sprinkle the chopped Reese’s peanut butter cups evenly over the filling.
- Re-roll the cake: Gently re-roll the cake without the parchment paper, keeping it tight but being careful not to crack the cake. Place the roll seam-side down on a serving plate.
- Chill and garnish: Refrigerate the roll for at least 1 hour to allow it to set firmly. Before serving, top with extra whipped topping and sprinkle more chopped Reese’s peanut butter cups if desired for extra decoration and flavor.
Notes
- Be careful not to overbake the cake to prevent cracking when rolling.
- Allow the rolled cake to cool completely before unrolling for filling to reduce breakage.
- Use parchment paper for easy rolling and removal of the cake.
- Chilling the roll helps the filling set and makes slicing easier.
- For a dairy-free version, use whipped non-dairy topping and ensure the cake mix is dairy-free.


