
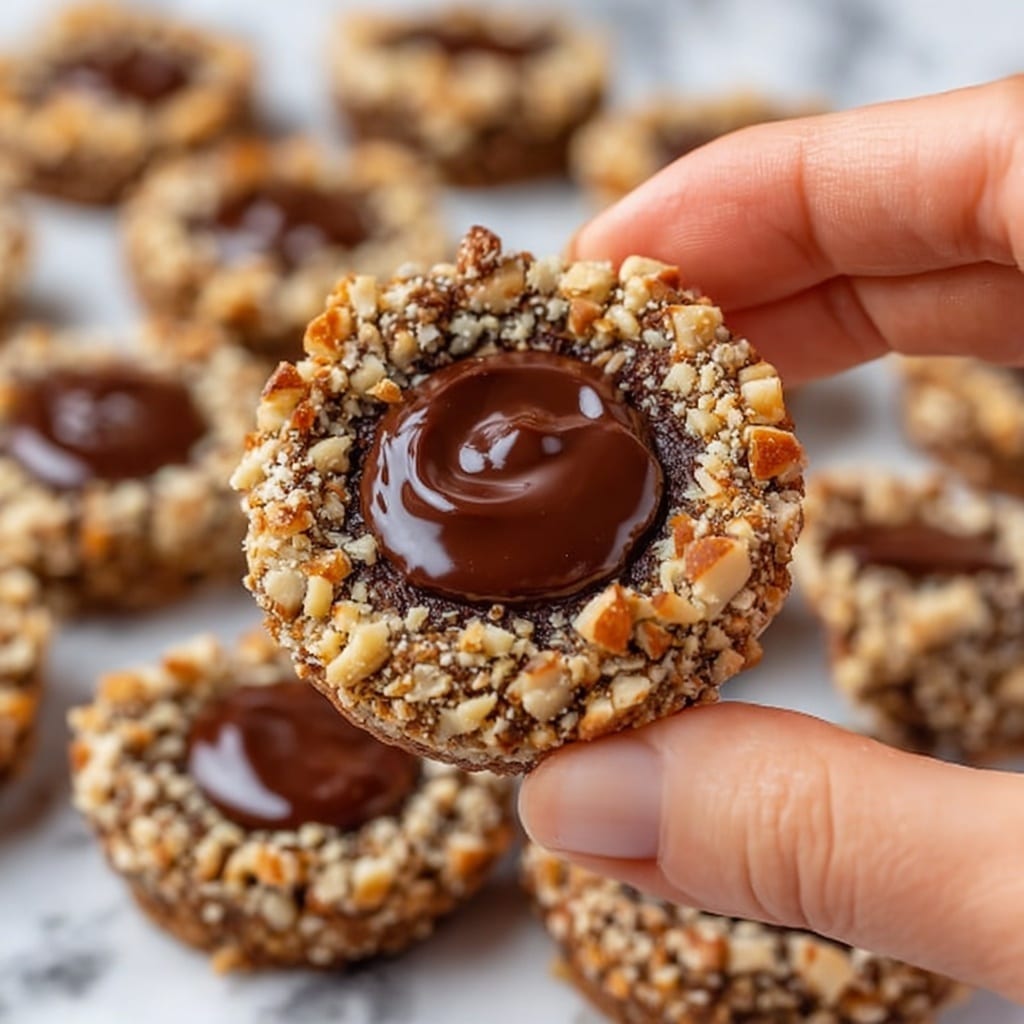
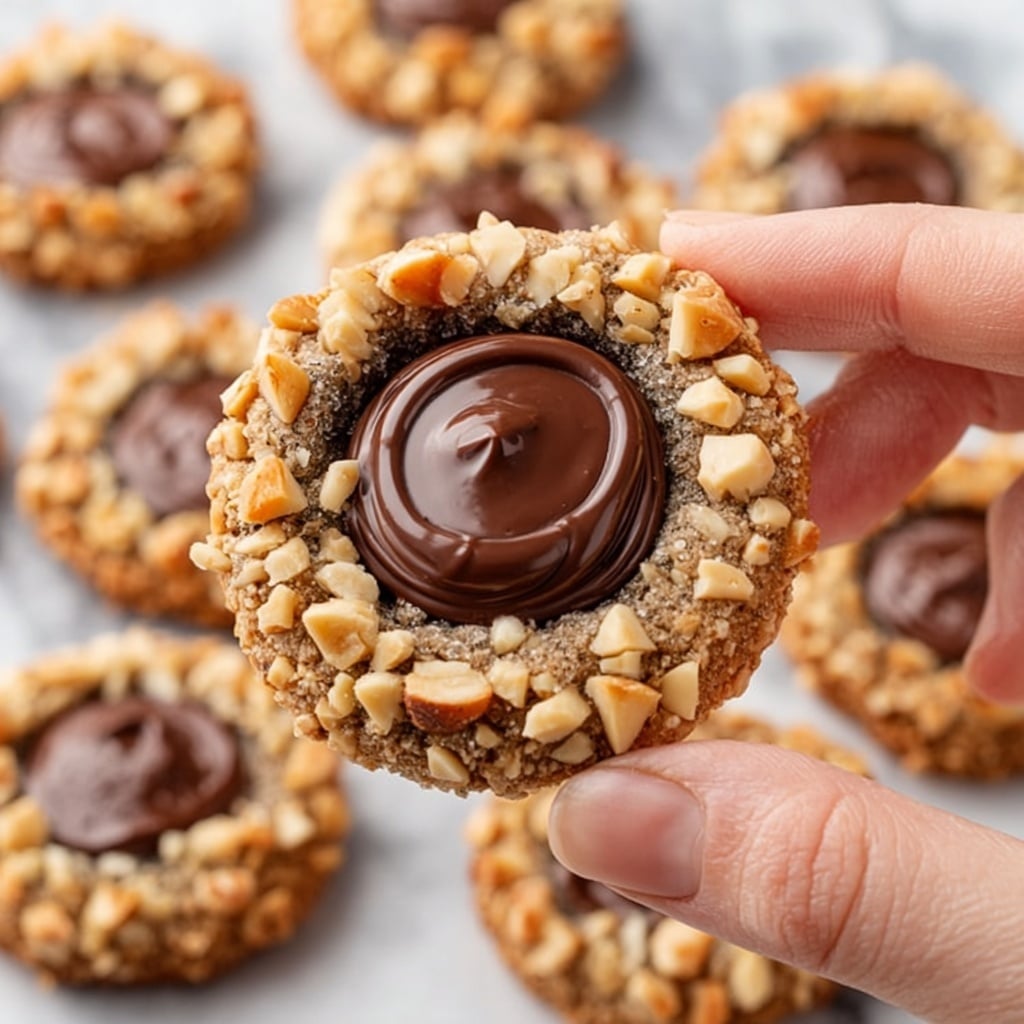
If you are looking for a delightful treat that combines nutty crunch with luscious chocolate in every bite, this Chocolate Hazelnut Thumbprint Cookies Recipe is exactly what you need. These cookies bring together the rich, buttery dough rolled in toasted hazelnuts with a perfect dollop of creamy chocolate hazelnut spread right in the center. Each cookie delivers a fantastic texture contrast and a flavor harmony that feels like a warm hug on a cool afternoon. Whether you’re baking for a special occasion or just because, these irresistible cookies are guaranteed to become a favorite in your dessert rotation.

Ingredients You’ll Need
Gathering simple, quality ingredients is key to making these cookies shine. Each one plays a vital role—from the creamy butter that provides richness, to the toasted hazelnuts that add a wonderful crunch and depth of flavor, right down to the luscious chocolate hazelnut spread that crowns every cookie with indulgence.
- Unsalted butter (1 cup, softened): The base of the dough, giving moisture and richness without overpowering the flavors.
- Granulated sugar (2/3 cup): Sweetens the dough and helps create a tender crumb.
- Egg yolk (1 large): Adds structure and a richer texture to the cookie dough.
- Vanilla extract (1 teaspoon): Elevates the flavors with its warm, fragrant notes.
- All-purpose flour (2 cups): Provides the framework for the cookie, making it soft but sturdy enough to hold its shape.
- Salt (1/4 teaspoon): Balances sweetness and enhances the overall flavor.
- Finely chopped toasted hazelnuts (1 cup): Adds a nutty, crunchy coating that complements the chocolate fill perfectly.
- Chocolate hazelnut spread (3/4 cup): The star ingredient for filling—creamy, rich, and irresistibly delicious.
How to Make Chocolate Hazelnut Thumbprint Cookies Recipe
Step 1: Prepare Your Baking Environment
Start by preheating your oven to 350 degrees Fahrenheit and lining two baking sheets with parchment paper. This ensures your cookies will bake evenly and come off cleanly without any sticking, setting you up for the best final texture.
Step 2: Cream the Butter and Sugar
In a large mixing bowl, beat the softened butter together with the granulated sugar until the mixture turns light and fluffy. This creaming process incorporates air into the dough, making your cookies tender and giving them a delicate crumb.
Step 3: Add Egg Yolk and Vanilla
Mix in the egg yolk and vanilla extract until everything is fully combined. The yolk enriches the dough with fat and structure, while the vanilla infuses a cozy, aromatic flavor that makes these cookies truly special.
Step 4: Incorporate Flour and Salt to Form Dough
Gradually add the all-purpose flour and salt, gently mixing until a soft dough forms. Be careful not to overmix here— this keeps the texture soft and crumbly rather than tough.
Step 5: Shape and Coat the Cookies
Roll the dough into 1-inch balls, then coat each one evenly by rolling it through the finely chopped toasted hazelnuts. This step is where you get that signature crunchy exterior that contrasts so wonderfully with the soft center.
Step 6: Create the Thumbprint Indentation
Place the dough balls on your prepared baking sheets, spacing them a couple of inches apart. Gently press your thumb (or the back of a spoon) into the center of each ball to create a shallow indentation—the perfect little nest for the chocolate hazelnut spread.
Step 7: Bake and Final Touches
Bake for 10 to 12 minutes, just until the cookies are set but not browned. Right out of the oven, press the centers again if needed to restore the indentation, then allow the cookies to cool slightly before filling each one with a generous scoop of chocolate hazelnut spread. Let them cool completely so the filling sets beautifully.
How to Serve Chocolate Hazelnut Thumbprint Cookies Recipe
Garnishes
For a little extra wow factor, sprinkle a pinch of flaky sea salt over the chocolate hazelnut spread once filled. You could also dust the cookies lightly with powdered sugar for a pretty presentation, or add a few chopped toasted hazelnuts on top to echo the coating and boost crunch.
Side Dishes
These cookies pair delightfully with a warm cup of coffee or hot chocolate, making them an ideal treat for cozy afternoons. If you want something lighter, a scoop of vanilla ice cream or a dollop of whipped cream served alongside can complement the cookies’ richness without overpowering them.
Creative Ways to Present
Turn these into charming gifts by arranging them in a pretty tin or clear box layered with parchment. You could also sandwich two thumbprint cookies together with extra chocolate hazelnut spread in the middle for double the indulgence, perfect for parties or sharing with friends.
Make Ahead and Storage
Storing Leftovers
Store leftover cookies in an airtight container at room temperature, where they will stay fresh and delicious for up to 3 days. If you want to extend their life, refrigerate them to keep the chocolate filling firm and the dough moist for up to a week.
Freezing
You can freeze the baked cookies without the filling, placing them on a baking sheet until firm before transferring to a freezer-safe container. When you’re ready to enjoy, thaw them and then add the chocolate hazelnut spread fresh for the best texture. This way, you can have freshly filled cookies anytime.
Reheating
If you prefer your cookies slightly warm, reheat them gently in a low oven or microwave for a few seconds. Just be careful not to overheat, as the chocolate spread can become too runny and the cookie may lose its crispness.
FAQs
Can I use a different nut instead of hazelnuts?
Absolutely! While hazelnuts give a signature flavor and texture, chopped almonds or pecans can be delicious alternatives and offer a similar crunch.
Is it necessary to toast the hazelnuts?
Toasting greatly enhances the nutty aroma and flavor, making the cookies more vibrant. While not mandatory, it is highly recommended to get that authentic, deep taste.
Can I make these cookies gluten-free?
Yes, you can substitute all-purpose flour with a gluten-free blend of your choice, but be sure it’s one that works well in baking to maintain the right texture.
What if I don’t have chocolate hazelnut spread?
You can use melted chocolate or another nut butter spread as a substitute, though the classic creamy chocolate hazelnut spread really makes these cookies special.
How long do these cookies last once filled?
Once filled with chocolate hazelnut spread, they are best enjoyed within 2 to 3 days when stored at room temperature or refrigerated for a little longer freshness.
Final Thoughts
Making this Chocolate Hazelnut Thumbprint Cookies Recipe is like wrapping deliciousness in a cozy little package, perfect for sharing or savoring solo. The balance of buttery dough, crunchy hazelnuts, and luscious chocolate filling creates a treat that feels special yet easy enough to bake anytime. Give this recipe a try—you might just find yourself reaching for these cookies long after the first batch disappears!
Print
Chocolate Hazelnut Thumbprint Cookies Recipe
- Prep Time: 20 minutes
- Cook Time: 12 minutes
- Total Time: 32 minutes
- Yield: 24 cookies
- Category: Dessert
- Method: Baking
- Cuisine: American
- Diet: Vegetarian
Description
These Chocolate Hazelnut Thumbprint Cookies are buttery and tender, rolled in toasted hazelnuts for a delightful crunch, and filled with rich chocolate hazelnut spread. Perfect for holiday treats or anytime you crave a nutty and chocolatey dessert.
Ingredients
Cookies
- 1 cup unsalted butter, softened
- 2/3 cup granulated sugar
- 1 large egg yolk
- 1 teaspoon vanilla extract
- 2 cups all-purpose flour
- 1/4 teaspoon salt
- 1 cup finely chopped hazelnuts, toasted
Filling
- 3/4 cup chocolate hazelnut spread
Instructions
- Preheat Oven: Preheat the oven to 350 degrees Fahrenheit and line two baking sheets with parchment paper to prevent sticking and promote even baking.
- Cream Butter and Sugar: In a large bowl, cream the softened butter and granulated sugar together using an electric mixer until the mixture is light and fluffy, which usually takes about 3-4 minutes.
- Add Egg Yolk and Vanilla: Mix in the egg yolk and vanilla extract until fully combined and smooth.
- Combine Dry Ingredients: Gradually add the all-purpose flour and salt to the mixture, stirring until a soft dough forms. Avoid overmixing to keep the cookies tender.
- Shape the Dough: Roll the dough into 1-inch balls and then roll each ball in the finely chopped toasted hazelnuts, ensuring they are evenly coated for added texture and flavor.
- Create Indentations: Place the dough balls on the prepared baking sheets and gently press your thumb into the center of each ball to create an indentation for the filling.
- Bake: Bake the cookies in the preheated oven for 10 to 12 minutes, or until they are set but not browned to maintain their soft texture.
- Re-Press and Cool: Remove the cookies from the oven and immediately press the centers again with your thumb if needed to deepen the indentations while the cookies are still warm. Let them cool slightly on the baking sheets.
- Fill Cookies: Once the cookies have cooled a bit but are still slightly warm, fill each indentation with the chocolate hazelnut spread using a small spoon or piping bag for a neat presentation.
- Final Cooling: Allow the cookies to cool completely on a wire rack before serving or storing to let the filling set properly.
Notes
- Toast the hazelnuts before chopping to enhance their flavor and aroma.
- Store the cookies in an airtight container at room temperature for up to 3 days or refrigerate to prolong freshness.


