
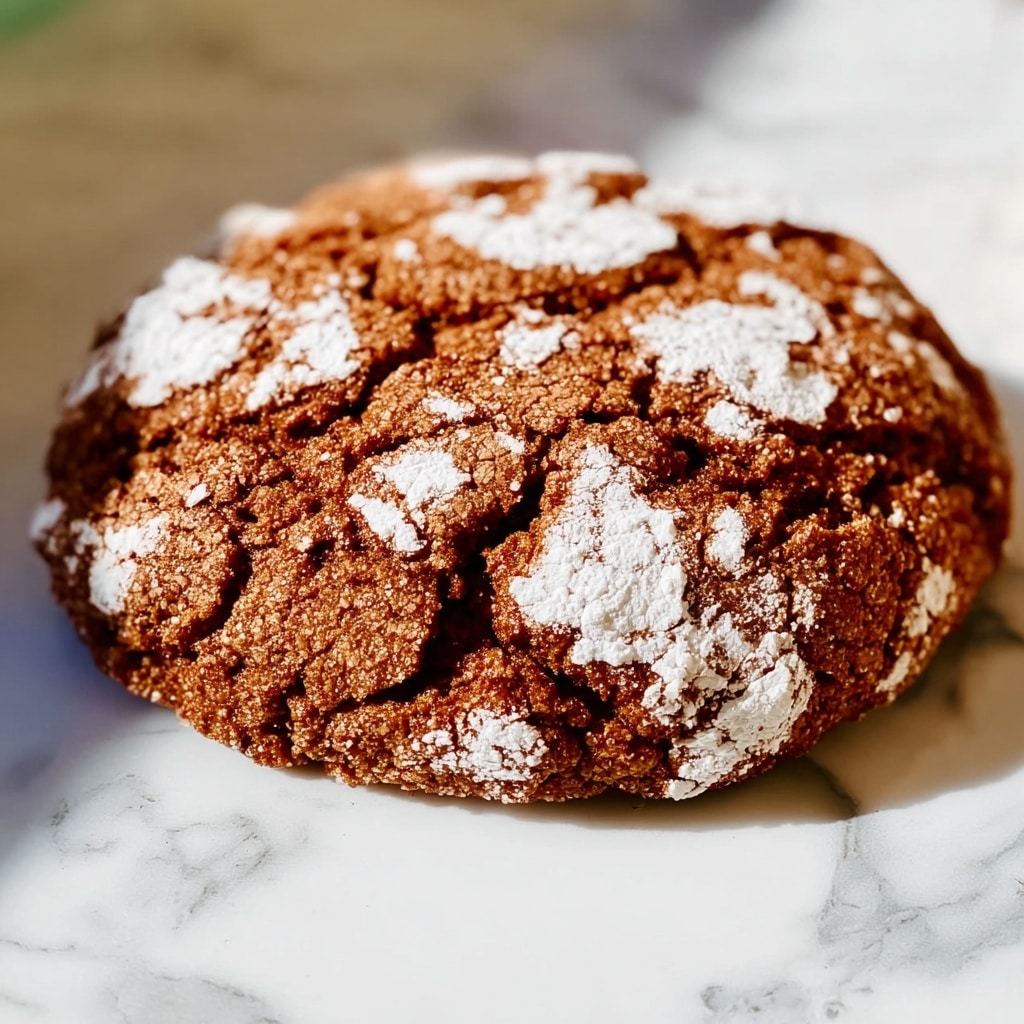
If you’ve ever dreamed of biting into a cookie that’s rich, fudgy, and adorned with a delicate powdered sugar crackle, then this Chocolate Crinkle Cookies Recipe is about to become your new go-to. These cookies deliver that perfect balance of deep cocoa flavor and melt-in-your-mouth texture, making every bite feel like a little piece of chocolate heaven. Whether you’re baking for the holidays, a special occasion, or simply to brighten your day, this recipe is a heartfelt favorite that’s as simple as it is irresistible.

Ingredients You’ll Need
This Chocolate Crinkle Cookies Recipe calls for straightforward ingredients that you likely already have in your pantry. Each one plays a crucial role, whether it’s creating the rich chocolate base, giving the cookies their tender crumb, or adding that signature crackly powdered sugar finish.
- 1 cup unsweetened cocoa powder: Provides the deep chocolate flavor that’s both intense and indulgent.
- 1 1/2 cups granulated sugar: Balances out the cocoa’s bitterness with the right amount of sweetness.
- 1/2 cup vegetable oil: Keeps the cookies moist and tender without overpowering the chocolate.
- 4 large eggs: Binds everything together while lending a delicate structure to the dough.
- 2 teaspoons vanilla extract: Enhances the chocolate flavor with warm, aromatic notes.
- 2 cups all-purpose flour: Provides the body of the cookies for that satisfying bite.
- 2 teaspoons baking powder: Helps the cookies rise and develop that delightful cracked surface.
- 1/2 teaspoon salt: Balances sweetness and deepens all the flavors.
- 1/2 cup powdered sugar: Used for rolling the dough balls, this adds the signature snowy crackle once baked.
How to Make Chocolate Crinkle Cookies Recipe
Step 1: Mix the Wet Ingredients
Start by whisking together the unsweetened cocoa powder, granulated sugar, and vegetable oil in a large bowl until the mixture is smooth and glossy—this creates the luscious chocolate foundation. Then, add the eggs one at a time, mixing thoroughly after each to ensure a silky batter. Finish this step by stirring in the vanilla extract, which will infuse your cookies with inviting warmth.
Step 2: Combine the Dry Ingredients
In a separate bowl, whisk together the all-purpose flour, baking powder, and salt. This dry mixture will provide the structure and leavening needed to give your cookies the perfect rise and texture that makes the crinkle effect so delightful.
Step 3: Bring Wet and Dry Together
Gradually add the dry ingredient mixture into the wet chocolate batter, stirring gently but thoroughly until a thick dough forms. This is where the magic starts as the dough thickens and starts to come together—a sign you’re on the path to those iconic crinkly tops.
Step 4: Chill the Dough
Cover your bowl with plastic wrap and pop it in the refrigerator for at least 2 hours. Chilling is absolutely essential for achieving the classic crackled surface and ensuring the dough is firm enough to roll into neat balls. Trust me, patience here truly pays off.
Step 5: Prepare and Bake
When you’re ready, preheat your oven to 350°F (175°C) and line two baking sheets with parchment paper. Scoop tablespoon-sized portions of the chilled dough, roll each into a smooth ball, then roll it generously in powdered sugar. Place the cookie balls on your prepared sheets, spacing them about 2 inches apart to allow for spreading. Bake them for 10 to 12 minutes, watching for the tops to crack and the cookies to set perfectly.
Step 6: Cool and Enjoy
After baking, let the cookies cool on the baking sheet for a few minutes before transferring them to a wire rack. This cooling step lets them firm up just right, so each cookie offers the ideal chewy interior with that signature crackly exterior.
How to Serve Chocolate Crinkle Cookies Recipe
Garnishes
These cookies are beautiful as they are, dusted with their snowy powdered sugar coating. For a festive touch, sprinkle some extra cocoa or finely chopped nuts on top before baking. You can also drizzle a little melted white or dark chocolate once cooled for an elegant finish that catches the eye and adds flavor dimension.
Side Dishes
Chocolate Crinkle Cookies pair wonderfully with a glass of cold milk or a steaming cup of coffee or tea. Serve them alongside fresh fruit or whipped cream for a simple dessert platter that elevates the experience without overshadowing the cookies’ rich flavor.
Creative Ways to Present
Arrange these cookies on a decorative tray, nestled among holiday greenery or edible flowers for a gorgeous presentation at parties. You can also sandwich them with vanilla ice cream or your favorite frosting for irresistibly fun chocolate crinkle cookie sandwiches—perfect for impressing guests or indulging yourself.
Make Ahead and Storage
Storing Leftovers
Once cooled, store your Chocolate Crinkle Cookies in an airtight container at room temperature. They stay fresh and chewy for up to 5 days, making them a great treat to keep handy for unexpected visitors or a cozy snack anytime.
Freezing
If you want to enjoy these delicious cookies later, they freeze beautifully. Lay them out in a single layer on a baking sheet first, freeze until solid, then transfer to a freezer-safe container or bag. They’ll keep well for up to three months, ready to thaw when your sweet tooth calls.
Reheating
To enjoy your cookies warm, simply pop a frozen or refrigerated cookie in a 300°F oven for about 5 minutes. This gently softens them without drying them out, bringing back that freshly baked feeling.
FAQs
What makes the cookies crackle during baking?
The crackle effect happens because the dough is chilled before baking and rolled in powdered sugar. As the cookies bake, they spread and crack, revealing the dark chocolate beneath the sugary surface in that iconic pattern.
Can I substitute the vegetable oil with butter?
You can use melted butter instead of vegetable oil, but it will affect the texture slightly. Butter adds richness and a firmer structure, which some people prefer, but vegetable oil makes the cookies more tender and moist.
How important is chilling the dough?
Chilling the dough is key for these cookies. It firms up the dough, making it easier to roll and preventing excessive spreading during baking, which helps achieve the perfect crinkle look and fudgy center.
Can I make these cookies gluten-free?
Yes! Substitute the all-purpose flour with a gluten-free blend that includes xanthan gum for best results. This will keep the texture similar while making the recipe suited for gluten-sensitive bakers.
Do these cookies keep well or should I eat them fresh?
While Chocolate Crinkle Cookies are amazing fresh from the oven, they also keep well stored at room temperature for several days. Their fudgy center remains delightful, making them perfect for baking in advance.
Final Thoughts
You simply can’t go wrong with this Chocolate Crinkle Cookies Recipe. It combines ease, flavor, and that gorgeous crinkled look that’s perfect for any occasion or just because. I hope you’ll give this recipe a try and enjoy every rich, chocolatey bite as much as I do. Happy baking, friends!
Print
Chocolate Crinkle Cookies Recipe
- Prep Time: 15 minutes (plus 2 hours chill time)
- Cook Time: 12 minutes
- Total Time: 2 hours 27 minutes
- Yield: 24 cookies
- Category: Dessert
- Method: Baking
- Cuisine: American
- Diet: Vegetarian
Description
These Chocolate Crinkle Cookies are soft, fudgy, and covered in a delicate powdered sugar crust that cracks beautifully when baked. Perfect for holiday celebrations or any time you want a rich chocolate treat, these easy-to-make cookies require simple ingredients and deliver impressive results with their distinctive crinkle effect.
Ingredients
Cookie Dough
- 1 cup unsweetened cocoa powder
- 1 1/2 cups granulated sugar
- 1/2 cup vegetable oil
- 4 large eggs
- 2 teaspoons vanilla extract
- 2 cups all-purpose flour
- 2 teaspoons baking powder
- 1/2 teaspoon salt
For Rolling
- 1/2 cup powdered sugar
Instructions
- Mix the wet ingredients: In a large bowl, whisk together the cocoa powder, granulated sugar, and vegetable oil until the mixture is smooth and glossy. Add the eggs one at a time, beating well after each addition to ensure they are fully incorporated. Stir in the vanilla extract to complete the wet mixture.
- Prepare the dry ingredients: In a separate bowl, whisk together the all-purpose flour, baking powder, and salt. This ensures even distribution of the leavening agent and seasoning throughout the dough.
- Combine wet and dry mixtures: Gradually add the dry ingredients to the wet cocoa mixture, stirring gently until a thick, cohesive dough forms. Avoid overmixing to maintain a tender texture.
- Chill the dough: Cover the dough with plastic wrap or a lid and refrigerate for at least 2 hours, or until firm. Chilling solidifies the fat and prevents cookies from spreading too much during baking, which is essential for the signature crinkled appearance.
- Prepare for baking: Preheat your oven to 350°F (175°C) and line two baking sheets with parchment paper to prevent sticking and promote easy cleanup.
- Shape the cookies: Scoop out tablespoon-sized portions of the chilled dough and roll each into a ball. Generously coat each ball in powdered sugar, ensuring a thick layer that will crack and reveal the chocolate beneath as they bake.
- Bake the cookies: Place the sugared dough balls onto the prepared baking sheets, spacing them about 2 inches apart to allow for spreading. Bake in the preheated oven for 10 to 12 minutes, or until the cookies have spread and the tops exhibit the characteristic crinkled texture.
- Cool and serve: Allow the cookies to cool on the baking sheets for a few minutes to firm up before transferring them to a wire rack to cool completely. Serve once fully cooled for best texture and flavor.
Notes
- Chilling the dough is essential for achieving the classic crinkle effect as it firm ups the dough making it easier to handle and helps to control spreading during baking.
- Store the cookies in an airtight container at room temperature for up to 5 days to maintain freshness and texture.
- These cookies freeze well; freeze baked cookies in a sealed container for longer storage and thaw at room temperature before serving.


