

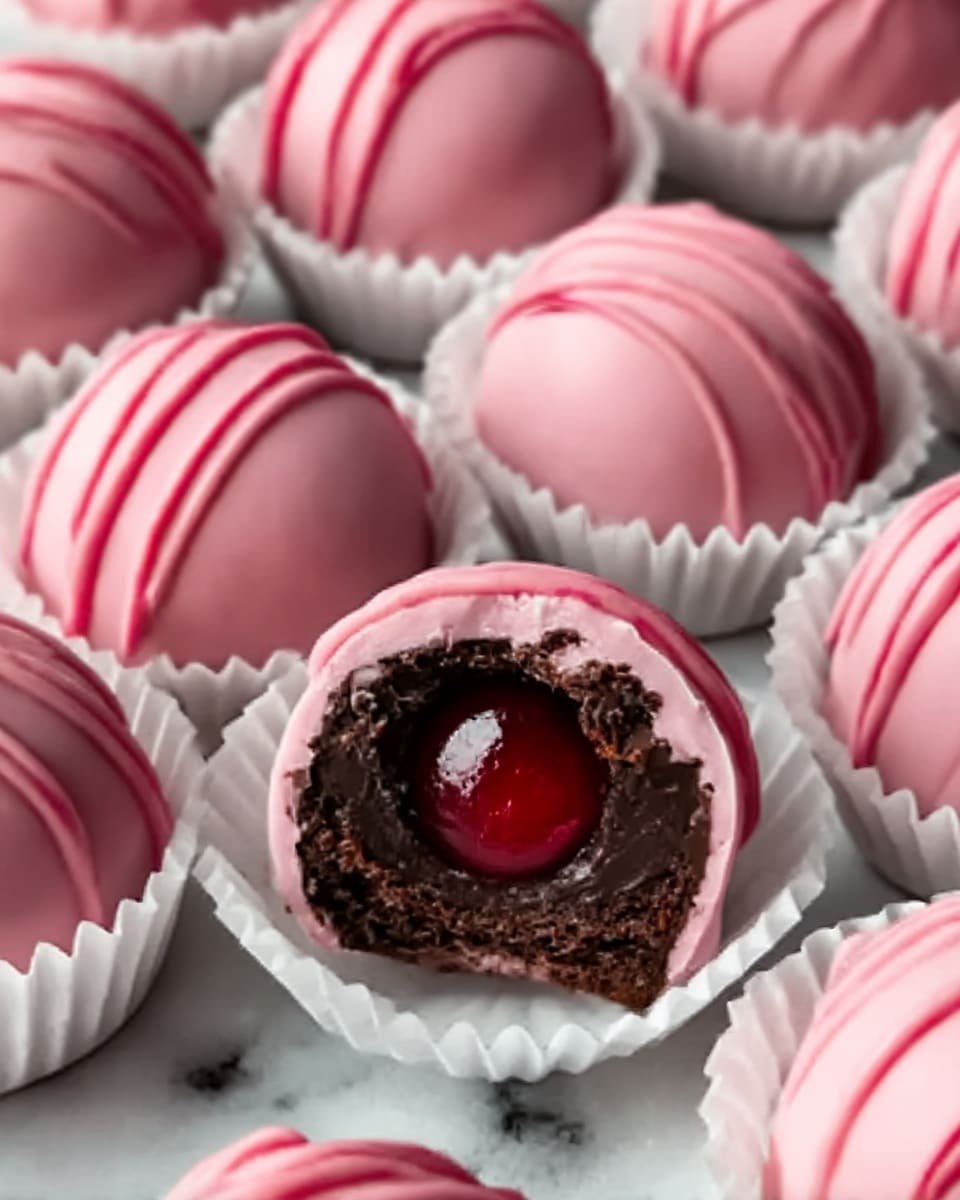
If you love the perfect blend of sweet, nutty, and chocolaty flavors wrapped in a bite-sized delight, then this Cherry Mash Truffles Recipe is going to become your new favorite treat. These luscious truffles combine the juicy burst of maraschino cherries with a rich peanut butter and chocolate coating that’s simply irresistible. Whether you’re making these for a special occasion or to satisfy your own sweet tooth, this recipe delivers a unique twist on classic truffles that’s both nostalgic and novel at the same time.

Ingredients You’ll Need
Getting the ingredients right is the key to nailing the Cherry Mash Truffles Recipe. Each item plays a special role — from the buttery base that holds everything together to the crunchy peanuts that add texture, and the chocolate that coats it all in sweet goodness. Simple yet essential, these ingredients create a wonderful harmony of flavor and texture.
- Maraschino cherries (10 oz jar, drained and finely chopped): Provides the signature cherry burst and moisture for the truffle centers.
- Powdered sugar (2 cups): Adds sweetness and helps achieve the perfect truffle consistency.
- Unsalted butter (½ cup, softened): Creates a creamy, rich base that binds the filling.
- Vanilla extract (1 teaspoon): Enhances the overall flavor with a warm, aromatic note.
- Semisweet chocolate chips (1 cup): Adds deep chocolate flavor and smooth coverage.
- Milk chocolate chips (1 cup): Contributes sweetness and creaminess to the coating.
- Creamy peanut butter (½ cup): Introduces rich nuttiness and smooth texture to the chocolate mixture.
- Chopped peanuts (1 cup): Gives crunch and personality to the outer layer.
How to Make Cherry Mash Truffles Recipe
Step 1: Prepare the Cherry Filling
Start by beating the softened unsalted butter in a large mixing bowl until it’s luxuriously creamy. This step ensures your truffle centers will be smooth and luscious. Next, gradually add the powdered sugar and continue beating until the mixture becomes perfectly smooth. Stir in the finely chopped maraschino cherries and vanilla extract, folding everything together until you have a uniform, flavorful mixture that’s ready to form into bites of pure joy.
Step 2: Roll and Chill the Cherry Balls
Once your cherry filling is smooth and mixed, roll it into 1-inch balls. Using your hands or a small scoop, shape each truffle carefully. Place these onto a parchment-lined baking sheet to avoid sticking. Pop the tray into the freezer and let the cherry balls firm up for at least 1 hour — this chilling step is crucial to make dipping easier later on and to keep your truffles perfectly shaped.
Step 3: Make the Chocolate Coating
While your cherry balls are chilling, prepare the coating by melting the semisweet and milk chocolate chips together with the creamy peanut butter in a microwave-safe bowl. Heat in 30-second bursts, stirring well between each interval to achieve a smooth, glossy mixture without burning. Once melted, stir in the chopped peanuts for added texture and a delightful crunch that balances the smoothness of the chocolate and peanut butter.
Step 4: Dip and Coat the Truffles
Remove the cherry balls from the freezer and, working quickly, dip each one into the luscious chocolate and peanut coating. Use a fork or toothpick to fully coat the cherry ball, allowing excess chocolate to drip off before placing it back onto the parchment-lined baking sheet. This step requires a little patience but is incredibly satisfying, as the truffles start to come alive with glossy, nut-speckled chocolate.
Step 5: Set and Store
Finally, refrigerate the coated truffles for at least 30 minutes until the chocolate hardens and the truffles are ready to savor. Once firm, transfer them to an airtight container and keep them chilled until you’re ready to indulge or share. These little gems taste best when cool, with the chocolate crisping delightfully as you bite in to the sweet, tender cherry center.
How to Serve Cherry Mash Truffles Recipe
Garnishes
While these truffles are already beautiful with their nut-studded chocolate coat, you can take their presentation up a notch with a light dusting of powdered sugar or a sprinkle of finely grated dark chocolate. Fresh mint leaves alongside your serving platter add a pop of color and a refreshing aroma that complements the richness of the truffles perfectly.
Side Dishes
Pair your Cherry Mash Truffles Recipe with desserts like creamy vanilla ice cream or a simple bowl of fresh berries to contrast the richness and add variety to the dessert spread. A cup of hot coffee or black tea also works wonders, balancing the sweetness and cleansing the palate between bites.
Creative Ways to Present
If you’re feeling playful, serve these truffles in mini cupcake liners—cherry red or chocolate brown—to add color and elegance. For gifting or parties, arrange them in decorative boxes layered with parchment paper or tissue for a homemade treat that looks as delightful as it tastes. You can also skewer them with cocktail sticks and drizzle with extra melted chocolate for a fun, interactive dessert experience.
Make Ahead and Storage
Storing Leftovers
The Cherry Mash Truffles Recipe guarantees deliciousness that lasts. Store any leftover truffles in an airtight container in the refrigerator, and they will remain fresh and flavorful for up to two weeks. Keeping them chilled preserves their texture and prevents the chocolate from melting or sweating.
Freezing
If you want to enjoy these truffles at your convenience, they freeze beautifully. Lay them out on a baking sheet to freeze individually before transferring to a freezer-safe container or bag. When properly stored, they can be frozen for up to three months without any loss in taste or texture, making them perfect for holiday preparations or special treats on demand.
Reheating
Since these are best served cool, reheating isn’t necessary. If they thaw too much and get soft, simply pop them back in the refrigerator for a while to firm up before serving again. This way, you maintain the delightful contrast between the crisp chocolate coating and the soft cherry center.
FAQs
Can I use fresh cherries instead of maraschino cherries?
Fresh cherries are a great idea, but since they contain more moisture than maraschino cherries, it can affect the consistency of the truffle filling. If you want to use fresh cherries, make sure to finely chop and drain or pat them dry thoroughly to avoid making the mixture too wet.
Is it possible to make these truffles nut-free?
Yes! To make a nut-free version, simply omit the peanut butter and chopped peanuts. You can replace the peanut butter with additional butter or cream cheese for a similarly rich texture, and substitute chopped peanuts with crispy rice cereal or crushed pretzels for crunch.
What type of chocolate works best for the coating?
A combination of semisweet and milk chocolate chips is recommended for a balanced flavor with a good mix of richness and sweetness. However, feel free to experiment with dark chocolate if you prefer a more intense chocolate flavor or white chocolate for a sweeter, creamier coating.
How do I prevent the chocolate from seizing while melting?
Melting the chocolate slowly in 30-second intervals and stirring after each helps prevent overheating, which is the main cause of seizing. Also, make sure no water gets into the chocolate while melting, as even a small drop can cause it to clump.
Can I double or halve this recipe?
Absolutely! The Cherry Mash Truffles Recipe scales well. Just keep the ingredient ratios the same, and adjust your preparation and chilling times accordingly. It’s perfect whether you want a few truffles or a large batch for a crowd.
Final Thoughts
Making these Cherry Mash Truffles Recipe is more than just a dessert project — it’s a joyous experience that ends with a truly memorable treat. The combination of luscious cherry centers, creamy peanut butter chocolate coating, and crunchy peanuts creates an irresistible harmony of flavors and textures. I hope you enjoy crafting and sharing these delightfully nostalgic truffles as much as I do. Go ahead, gather your ingredients, and get ready to impress everyone with a homemade confection that’s bursting with love and flavor!
Print
Cherry Mash Truffles Recipe
- Prep Time: 20 minutes
- Cook Time: 0 minutes
- Total Time: 1 hour 45 minutes
- Yield: 24 servings
- Category: Dessert
- Method: No-Cook
- Cuisine: American
Description
Delightfully rich and creamy Cherry Mash Truffles combine tangy maraschino cherries with smooth butter and powdered sugar, coated in a luscious blend of semisweet and milk chocolates mixed with creamy peanut butter and crunchy chopped peanuts. These no-bake truffles are perfect for special occasions or as an indulgent homemade treat.
Ingredients
Cherry Mixture
- 1 (10 oz) jar maraschino cherries, drained and finely chopped
- 2 cups powdered sugar
- ½ cup unsalted butter, softened
- 1 teaspoon vanilla extract
Chocolate Coating
- 1 cup semisweet chocolate chips
- 1 cup milk chocolate chips
- ½ cup creamy peanut butter
- 1 cup chopped peanuts
Instructions
- Prepare the Cherry Filling: In a large mixing bowl, beat the softened butter until creamy and smooth, ensuring a light and fluffy texture for the truffle base.
- Add Powdered Sugar: Gradually add the powdered sugar to the butter, beating continuously until the mixture is silky and smooth without any lumps.
- Mix in Cherries and Vanilla: Stir in the finely chopped maraschino cherries along with the vanilla extract, combining thoroughly to distribute the flavors evenly throughout the mixture.
- Shape the Truffle Centers: Roll the cherry mixture into 1-inch balls using your hands or a small scoop, then place each ball on a parchment-lined baking sheet to prevent sticking.
- Freeze the Balls: Freeze the cherry balls for at least 1 hour or until they are firm enough to handle for coating.
- Prepare Chocolate Coating: In a microwave-safe bowl, melt the semisweet chocolate chips, milk chocolate chips, and creamy peanut butter together in 30-second intervals, stirring well after each until the mixture is completely smooth and glossy.
- Add Peanuts: Stir the chopped peanuts into the melted chocolate mixture to add a crunchy texture to the coating.
- Coat the Truffles: Using a fork or toothpick, carefully dip each frozen cherry ball into the chocolate-peanut coating, ensuring it is fully covered for a decadent exterior.
- Set and Chill: Place each coated truffle back onto the parchment-lined baking sheet and refrigerate for at least 30 minutes or until the chocolate is completely firm.
- Store and Serve: Transfer the set truffles to an airtight container and keep refrigerated until serving to maintain freshness and the perfect texture.
Notes
- Ensure the butter is fully softened to achieve a creamy base without lumps.
- Freezing the cherry balls before dipping helps prevent melting and allows a smooth chocolate coating.
- Use parchment paper on the baking sheet for easy removal and minimal mess.
- Store the truffles in the fridge to keep the chocolate firm and preserve freshness.
- For a nut-free version, omit the chopped peanuts and peanut butter and substitute with white chocolate chips for the coating.


