

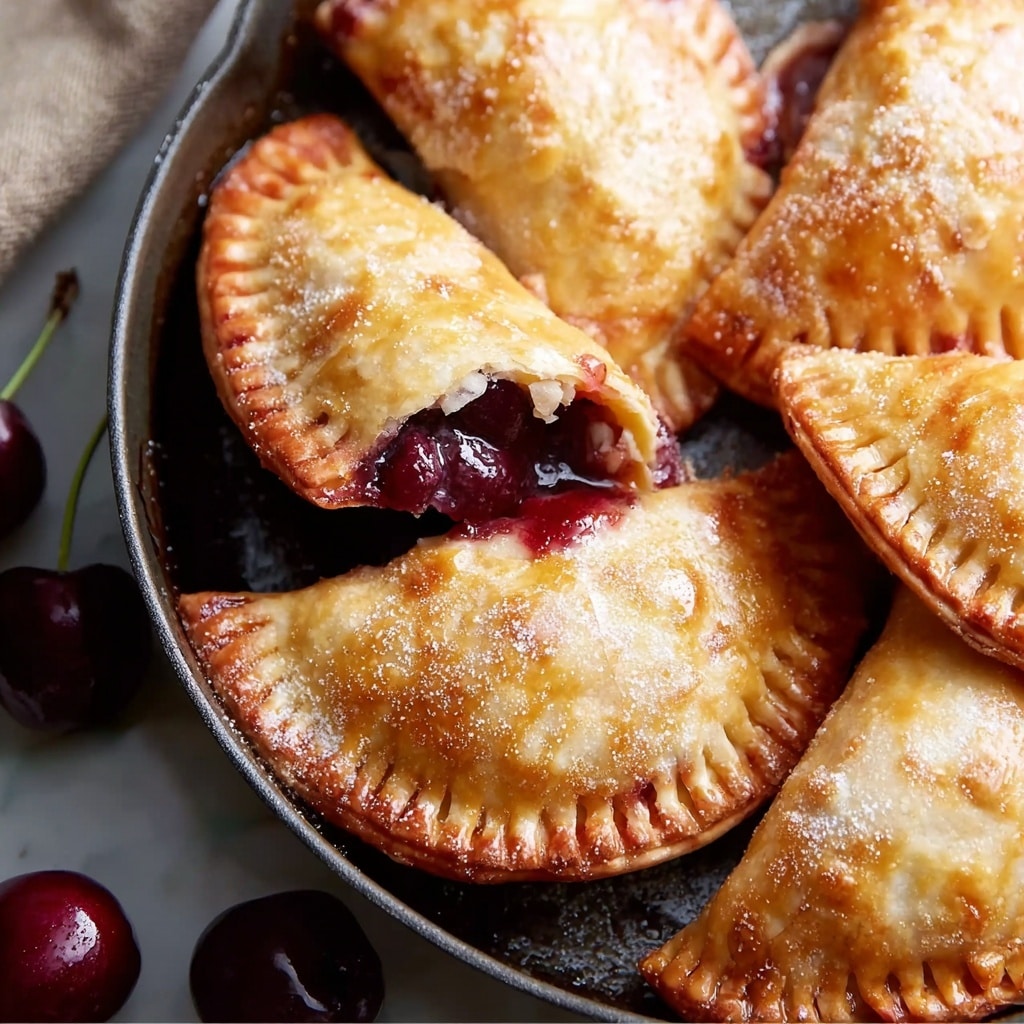
If you are craving a delightful treat that’s bursting with sweet and tangy flavors, this Cherry Hand Pies Recipe is going to be your new best friend in the kitchen. These charming little pies are perfectly portable, with flaky golden crusts hugging a luscious cherry filling that’s both vibrant and comforting. They’re an ideal way to celebrate fresh cherries or satisfy your dessert desires any time of year. Whether you’re baking for a picnic, a party, or just because, these hand pies deliver that wonderful homemade charm with every bite.

Ingredients You’ll Need
Each ingredient in this recipe plays a key role in creating the perfect balance of taste, texture, and visual appeal. From the juicy cherries that provide a natural sweetness and slight tartness, to the flaky pie crust that offers that satisfying crunch, the components come together simply yet brilliantly.
- 2 cups fresh or frozen cherries, pitted and chopped: The star ingredient, offering a juicy burst of fruit flavor and vibrant red color.
- 1/2 cup granulated sugar: Adds sweetness that complements the tart cherries perfectly.
- 1 tablespoon cornstarch: Thickens the cherry filling so that it’s luscious but not runny.
- 1 tablespoon lemon juice: Brightens the filling with a fresh zing and balances the sweetness.
- 1/2 teaspoon vanilla extract: Deepens the flavor with a warm, aromatic touch.
- 1 package refrigerated pie crusts (or homemade pie dough): Provides the flaky, buttery vessel for the filling.
- 1 egg, beaten (for egg wash): Creates a golden, glossy finish on the pies once baked.
- 1 tablespoon coarse sugar (for sprinkling on top): Adds a delightful crunch and sparkle to the crust’s surface.
How to Make Cherry Hand Pies Recipe
Step 1: Preheat the Oven
Begin by setting your oven to 375 degrees Fahrenheit, which is the perfect temperature to get your pies golden and bubbly. Line a baking sheet with parchment paper to prevent sticking and make cleanup a breeze — this small step makes baking more enjoyable overall.
Step 2: Prepare the Cherry Filling
In a medium saucepan, combine the cherries, sugar, cornstarch, lemon juice, and vanilla extract. Cook this mixture over medium heat, stirring frequently so it thickens evenly and the cherries soften just right. This process takes about 5 to 7 minutes and is where your kitchen starts smelling divine. Once thickened, set the filling aside to cool to room temperature—this helps it set nicely inside your pies without leaking.
Step 3: Prepare the Pie Crusts
Lightly flour your surface and roll out the pie crusts to an even thickness. Use a round cutter or a large cup to cut the dough into circles sized just right for your favorite hand-held treat. This makes each pie neat and ensures uniform baking.
Step 4: Assemble the Hand Pies
Spoon about 1 to 2 tablespoons of the cherry filling onto the center of each dough circle. Fold the dough over to make a half-moon shape. Press the edges firmly to seal in the filling and then crimp them with a fork for that classic look and to prevent any juicy escaping during baking.
Step 5: Egg Wash and Bake
Brush each hand pie generously with the beaten egg — this is what will transform the crust into a shiny, golden masterpiece. Sprinkle coarse sugar on top for a subtle crunch and a lovely sparkle. Arrange them on your prepared baking sheet and bake in the preheated oven for about 20 to 25 minutes until the crusts are golden brown and the filling bubbles enticingly from within.
Step 6: Cool and Serve
Once your Cherry Hand Pies come out of the oven, give them a few minutes to cool so the filling can settle and won’t burn your mouth when you take a bite. These are best enjoyed warm, letting the sweet-tart cherry flavors shine through with every flaky, buttery mouthful.
How to Serve Cherry Hand Pies Recipe
Garnishes
For an extra touch of elegance and flavor, consider dusting your hand pies with powdered sugar or adding a drizzle of vanilla glaze. Fresh mint leaves can also brighten the presentation and add a refreshing contrast to the warm cherry filling.
Side Dishes
Pair these hand pies with a scoop of vanilla ice cream or a dollop of freshly whipped cream for a classic combination. If you want something lighter, a simple green salad or a tangy yogurt dip enhances the flavors without overwhelming the palate.
Creative Ways to Present
Transform your serving experience by placing hand pies on rustic wooden boards or colorful plates for a charming, inviting look. Pack them into festive boxes or wrap individually in parchment paper tied with twine for perfectly portable snacks or thoughtful homemade gifts.
Make Ahead and Storage
Storing Leftovers
To keep your Cherry Hand Pies fresh, store them in an airtight container at room temperature for up to two days. If your kitchen is warm, refrigeration will extend their life for up to four days, but bring them back to room temperature or warm slightly before enjoying.
Freezing
You can freeze these pies either before or after baking. Wrap them tightly in plastic wrap and then foil to prevent freezer burn. Frozen hand pies maintain their best quality for up to three months. When ready to eat, thaw them overnight in the fridge.
Reheating
Reheat chilled or thawed pies in a 350-degree Fahrenheit oven for 10 to 15 minutes to refresh their crisp crust and warm the filling perfectly. Avoid microwaving if possible, as it can make the crust soggy rather than flaky and delightful.
FAQs
Can I use frozen cherries for this Cherry Hand Pies Recipe?
Absolutely! Frozen cherries work wonderfully and are often more convenient than fresh, especially out of season. Just make sure to thaw and drain any excess juice to avoid soggy crusts.
Is it possible to make the pie crust from scratch?
Yes, homemade pie dough gives a lovely personal touch and can be tailored to your tastes. Use your favorite recipe with butter or shortening, and roll it out as directed in Step 3 for excellent results.
How do I prevent the filling from leaking?
Sealing the edges firmly and crimping with a fork is key. Also, avoid overfilling the pies and ensure the filling has cooled when assembling. These tips help keep everything neatly inside while baking.
Can I adjust the sweetness?
Definitely! If you like your pies sweeter, add a bit more sugar to the filling, or for a tarter bite, reduce it slightly or add more lemon juice to brighten the flavor.
Are these hand pies suitable for freezing raw or baked?
Both work well! Freezing raw hand pies lets you bake fresh ones anytime, while freezing baked pies means you can enjoy a treat on demand with minimal effort.
Final Thoughts
There is something truly special about sharing warm, homemade Cherry Hand Pies with friends and family. This Cherry Hand Pies Recipe strikes the perfect balance between simple preparation and delicious results, making it a must-try for anyone who loves fruit-filled baked goods. Once you make them, you’ll find yourself coming back to these charming treats again and again.
Print
Cherry Hand Pies Recipe
- Prep Time: 20 minutes
- Cook Time: 25 minutes
- Total Time: 45 minutes
- Yield: 6 hand pies
- Category: Dessert
- Method: Baking
- Cuisine: American
Description
These Cherry Hand Pies are delightful individual pastries filled with a sweet and tangy cherry filling. Made with a flaky pie crust and baked to golden perfection, they are perfect for a snack, dessert, or special occasion treat. The combination of luscious cherries, a hint of vanilla, and a crisp sugar topping makes these hand pies irresistible.
Ingredients
For the Cherry Filling:
- 2 cups fresh or frozen cherries, pitted and chopped
- 1/2 cup granulated sugar
- 1 tablespoon cornstarch
- 1 tablespoon lemon juice
- 1/2 teaspoon vanilla extract
For the Pie Crust:
- 1 package refrigerated pie crusts (or homemade pie dough)
- 1 egg, beaten (for egg wash)
- 1 tablespoon coarse sugar (for sprinkling on top)
Instructions
- Preheat the Oven: Preheat the oven to 375°F (190°C). Line a baking sheet with parchment paper to prepare for baking the hand pies.
- Prepare the Cherry Filling: In a medium saucepan, combine the cherries, granulated sugar, cornstarch, lemon juice, and vanilla extract. Cook over medium heat, stirring frequently, until the mixture thickens, about 5 to 7 minutes. Remove from heat and let it cool to room temperature.
- Prepare the Pie Crusts: Roll out the pie crusts on a lightly floured surface. Use a round cutter or a cup to cut out 4 to 6 circles, depending on your preferred size for the hand pies.
- Assemble the Hand Pies: Spoon 1 to 2 tablespoons of the cherry filling onto the center of each pie crust circle. Fold the dough over to create a half-moon shape, pressing the edges together to seal. Use a fork to crimp the edges both decoratively and securely.
- Egg Wash and Bake: Brush the tops of the hand pies with the beaten egg, then sprinkle with coarse sugar for a sparkling finish. Place the pies on the prepared baking sheet and bake for 20 to 25 minutes, or until the crust is golden brown and the filling is bubbling.
- Cool and Serve: Allow the hand pies to cool for a few minutes after baking. Serve warm or at room temperature and enjoy!
Notes
- Use fresh or frozen cherries depending on availability; make sure frozen cherries are thawed and drained for best results.
- The cornstarch is essential for thickening the cherry filling; do not skip.
- For a vegan version, substitute the egg wash with a plant-based milk or a mixture of maple syrup and water.
- Pie crust can be store-bought or homemade based on your preference.
- Allow pies to cool slightly before eating to avoid burning from hot filling.


