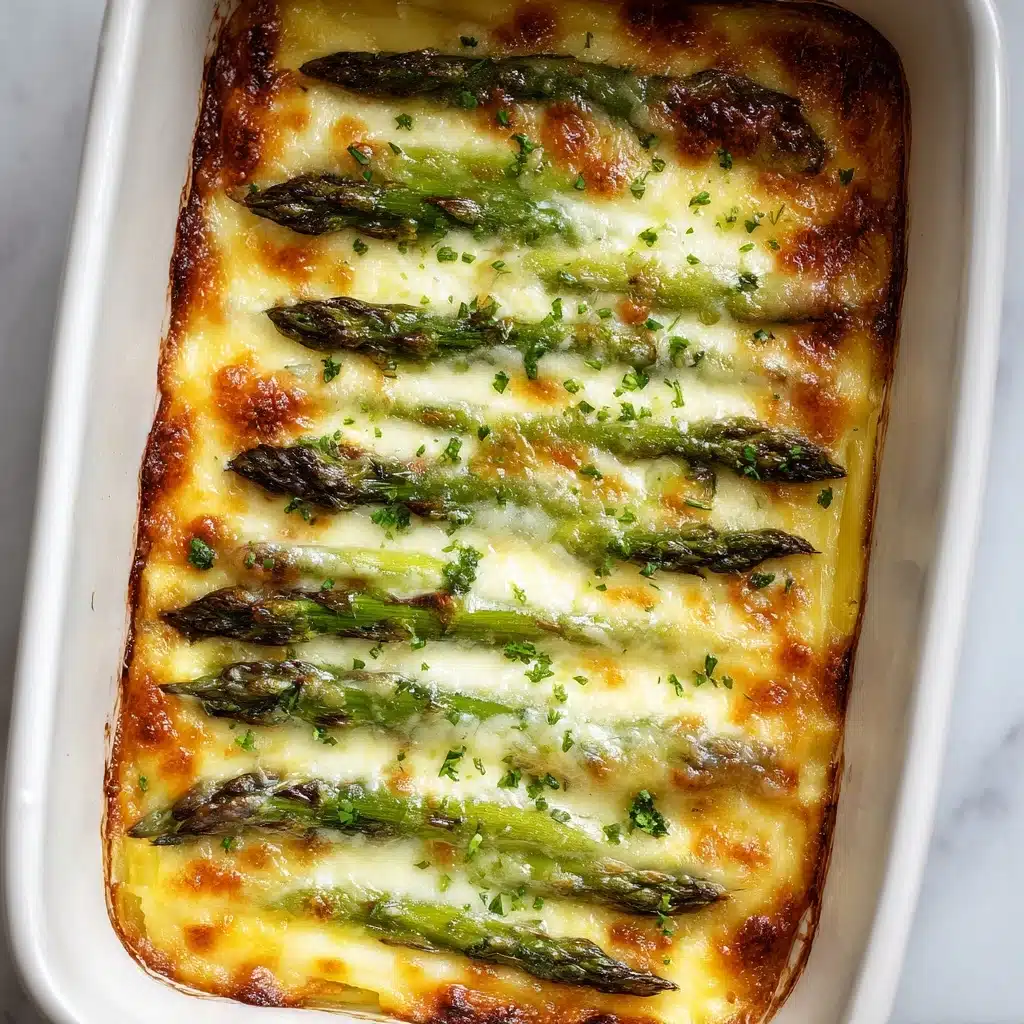
If you’re craving a side dish that combines vibrant veggies with ooey-gooey comfort, Cheesy Baked Asparagus is your answer. Imagine fresh, green spears roasted to tender perfection under a blanket of bubbling cheese, finished with a sprinkle of simple seasonings that let the flavors truly shine. This recipe is quick enough for busy weeknights yet impressive and irresistible for a weekend feast. All it takes are a handful of everyday ingredients and barely any prep, but the result is an indulgent, crowd-pleasing side you’ll want to make again and again.
Ingredients You’ll Need
All you need are a few staple ingredients to create this Cheesy Baked Asparagus, but each one plays a starring role. From the crunch and color of the asparagus to the creamy melt of the cheese, every element boosts both flavor and texture.
- Asparagus: Fresh, medium-thick stalks work best for a tender bite and sturdy base for all that cheese.
- Olive Oil: Just a drizzle helps the asparagus roast evenly and brings out its natural nuttiness.
- Salt and Pepper: Simple seasoning that brings out the best in both cheese and veggies—don’t skip this step!
- Garlic Powder: Adds a gentle aromatic kick without the hassle of mincing fresh garlic.
- Mozzarella Cheese: Provides that classic stretchy, melty cheese factor we all love.
- Parmesan Cheese: A sprinkle on top adds a nutty, salty finish and gorgeous golden color.
How to Make Cheesy Baked Asparagus
Step 1: Prep the Asparagus
Wash your asparagus under cold water and pat them dry. Snap or trim off the woody ends—just bend gently and they’ll naturally break where tender meets tough. This step guarantees every bite of your Cheesy Baked Asparagus will be perfectly crisp and fresh.
Step 2: Season and Arrange
Spread the asparagus evenly on a baking sheet (for best results, line it with parchment or foil for easy cleanup). Drizzle with olive oil, then sprinkle with salt, pepper, and garlic powder. Toss briefly to coat each spear. Lining them up in a single layer helps them roast evenly and ensures none get smothered in the cheese later.
Step 3: Add the Cheese
Generously sprinkle the mozzarella over the asparagus, making sure each spear gets some cheese coverage. Top it off with a little parmesan for that extra hit of flavor and to help everything brown beautifully as it bakes. This simple topping is what transforms regular roasted asparagus into a truly Cheesy Baked Asparagus delight.
Step 4: Bake to Perfection
Slide the tray into a preheated oven at 400°F (200°C). Bake for about 12–15 minutes, or until the asparagus is just tender and the cheese is golden, melty, and bubbling. If you want a bit more browning on top, broil for the last 1–2 minutes, keeping a close eye so nothing burns. The aroma at this stage is pure heaven!
How to Serve Cheesy Baked Asparagus

Garnishes
Fresh garnishes make Cheesy Baked Asparagus feel restaurant-special at home. A sprinkle of chopped parsley or chives adds color and freshness, while a delicate grating of lemon zest gives your dish a pop of brightness.
Side Dishes
This side dish pairs beautifully with just about everything—think roasted chicken, grilled salmon, or even a hearty vegetarian main. The cheesy, savory flavors also make it a hit next to simple grains or a tangy tomato salad.
Creative Ways to Present
Try serving Cheesy Baked Asparagus family-style on a big platter, or arrange them in single-serving bundles tied with a fresh chive for an elegant dinner party touch. Stack them up over a toasted slice of baguette for a tasty appetizer twist.
Make Ahead and Storage
Storing Leftovers
If you find yourself with leftover Cheesy Baked Asparagus, let it cool completely before transferring to an airtight container. Store in the fridge for up to 3 days—the cheese may firm up, but the flavor stays delicious!
Freezing
While you can technically freeze it, the texture of the asparagus and cheese will soften once thawed. If you do freeze, wrap portions tightly with foil and transfer to a freezer bag, storing for up to a month. Reheat from frozen if possible for best results.
Reheating
For best texture, reheat Cheesy Baked Asparagus in the oven at 350°F until warmed through, about 8–10 minutes. The cheese will re-melt, and the spears should stay tender. Microwave reheating works in a pinch, but expect softer asparagus.
FAQs
Can I use another type of cheese?
Absolutely! Cheesy Baked Asparagus is versatile—swap in cheddar, Gruyère, Monterey Jack, or even crumbled feta for different flavors and textures. Mixing a couple of cheeses works well too!
Should I peel the asparagus?
For medium or thick spears, you can peel the lower stalks if they’re especially tough, but it’s usually not necessary. Just trimming the woody ends is enough in most cases.
Can I make Cheesy Baked Asparagus ahead of time?
You can prep the asparagus and keep it on the baking sheet, covered, in the fridge for a few hours before baking. Add cheese just before baking to keep it fresh and melty.
What’s the best way to get extra crispy cheese?
Try broiling the dish for a minute or two at the end of baking, and make sure your parmesan is generously sprinkled on top for that perfectly crisp, golden finish.
Is this recipe gluten-free?
Yes, Cheesy Baked Asparagus is naturally gluten-free just as written, making it a great choice for guests with dietary restrictions—just check your cheeses to be sure.
Final Thoughts
This Cheesy Baked Asparagus is the kind of dish you’ll reach for when you want something easy, cheesy, and absolutely crave-worthy. Give it a try, and I promise it’ll become your new go-to way to enjoy asparagus whether you’re serving family or friends. Enjoy every cheesy, veggie-packed bite!
Print
Cheesy Baked Asparagus Recipe
- Prep Time: 10 minutes
- Cook Time: 20 minutes
- Total Time: 30 minutes
- Yield: 4 servings
- Category: Main Course
- Method: Skillet
- Cuisine: Mediterranean
- Diet: Vegetarian
Description
Cheesy Baked Asparagus features tender roasted asparagus spears topped with melty mozzarella and a golden parmesan finish—an easy, irresistible side that’s big on flavor and simplicity.
Ingredients
- 1 bunch fresh asparagus, trimmed
- 1 tablespoon olive oil
- 1/2 teaspoon salt
- 1/4 teaspoon ground black pepper
- 1/2 teaspoon garlic powder
- 1 cup shredded mozzarella cheese
- 1/4 cup grated parmesan cheese
Instructions
- Preheat oven to 400°F (200°C). Line a baking sheet with parchment paper or foil for easy cleanup.
- Wash and trim woody ends from asparagus. Spread spears evenly on the baking sheet in a single layer.
- Drizzle with olive oil and sprinkle with salt, pepper, and garlic powder. Toss to coat evenly.
- Sprinkle mozzarella cheese evenly over the asparagus, then top with grated parmesan.
- Bake for 12–15 minutes until asparagus is tender and cheese is melted and golden. Optional: broil for 1–2 minutes for extra crispiness.
- Serve warm, optionally garnished with chopped parsley or lemon zest.
Notes
- Top with parsley, chives, or lemon zest for fresh contrast and color.
- Pairs well with grilled chicken, salmon, vegetarian mains, or grains.
- Serve in bundles tied with chives or on baguette slices as an appetizer.
- Refrigerate leftovers for up to 3 days in an airtight container.
- Freeze tightly wrapped portions for up to 1 month; reheat from frozen for best texture.
- Reheat in a 350°F oven for 8–10 minutes or microwave briefly if needed.
- Try different cheeses like cheddar, Gruyère, or feta for variety.
- Peeling thick asparagus stalks is optional if they’re tough; trimming ends usually suffices.
- Prep asparagus ahead and refrigerate; add cheese just before baking.
- Broil briefly at the end to get extra crispy, golden cheese topping.


