
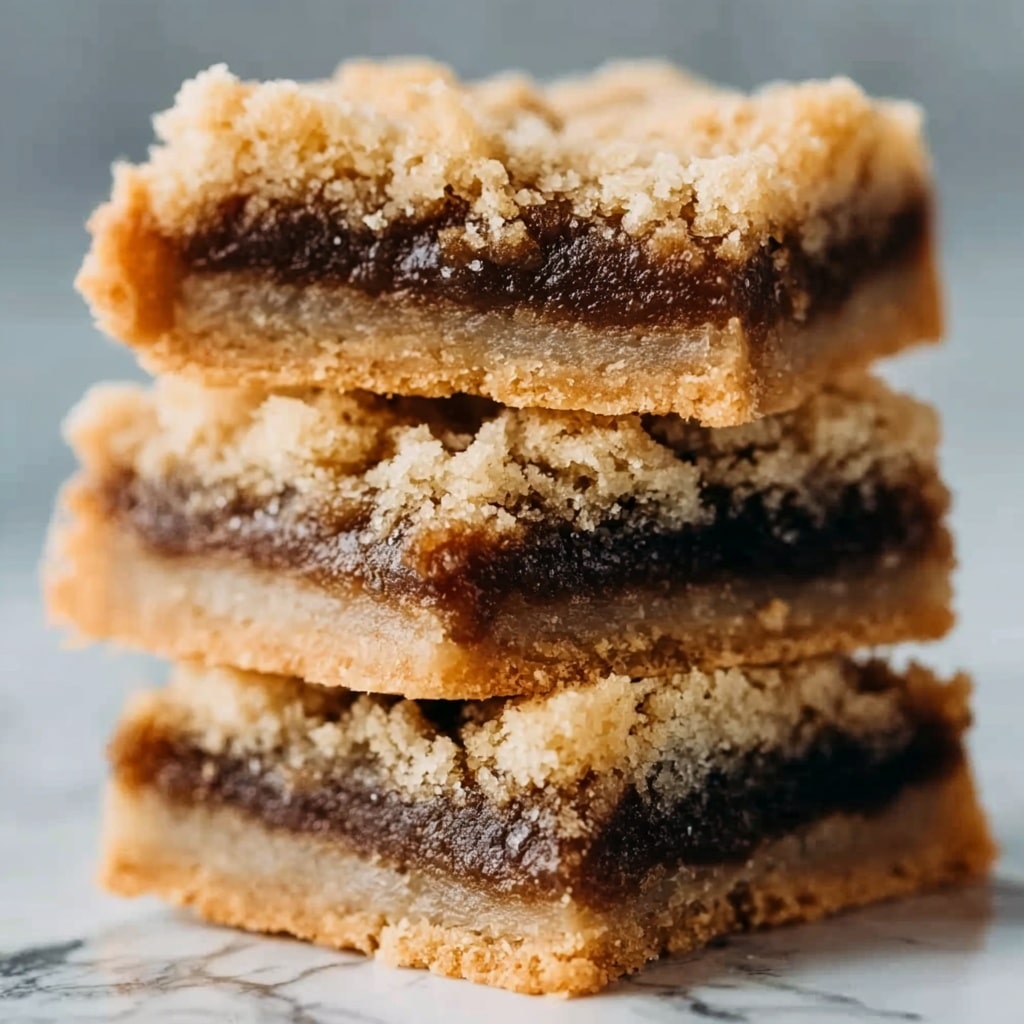
If you’re craving a treat that combines chewy oats, luscious caramel, melted chocolate, and a buttery crumb, you will absolutely fall in love with this Caramelitas Recipe. It’s a delightful bar cookie that balances rich textures and flavors with every bite, making it perfect for sharing or indulging solo. Whether you’re new to baking or a seasoned pro, this recipe is straightforward and yields a crowd-pleaser that’s ideal for any occasion.

Ingredients You’ll Need
This recipe calls for simple, pantry-friendly ingredients that each play a crucial role in bringing together the perfect Caramelitas. From the nutty oats providing chewiness to the glossy caramel that binds everything with sweetness, these ingredients combine to deliver a deliciously satisfying bar.
- Unsalted butter (1 cup, melted): Adds richness and helps create that tender, crumbly texture in the crust and topping.
- Light brown sugar (1 cup, packed): Brings moisture and deep caramel notes that amplify the overall flavor.
- All-purpose flour (1 1/2 cups): Gives structure to the oat mixture and helps bind the bars.
- Old-fashioned rolled oats (1 cup): Offers a hearty texture and wholesome flavor that balances the sweet elements.
- Baking soda (1 tsp): Helps the crust rise slightly and stay soft rather than dense.
- Salt (1/4 tsp): Enhances flavors and balances sweetness perfectly.
- Semi-sweet chocolate chips (1 cup): Melts into gooey pockets of chocolate that complement the caramel wonderfully.
- Chopped pecans (3/4 cup, optional): Adds a satisfying crunch and a nutty contrast to the chewy textures.
- Soft caramels (1 11-oz bag, unwrapped): The star ingredient that melts into a luscious, sticky layer.
- Heavy cream (1/2 cup): Smooths and enriches the caramel sauce for that perfect gooey consistency.
How to Make Caramelitas Recipe
Step 1: Prepare the Crust
Start by preheating your oven to 350°F (175°C) and greasing or lining a 9×13 inch baking dish with parchment paper. This will make removing the bars easier and keep everything from sticking. Then, in a large bowl, stir together the melted butter, brown sugar, flour, oats, baking soda, and salt until the mixture becomes crumbly and well combined. Press half of this oat mixture firmly and evenly into the bottom of your prepared pan—it will form your delicious base.
Step 2: Bake the Crust
Pop the pan into your oven and bake the crust for 10 minutes. This short bake sets the foundation, ensuring your bars don’t turn out soggy once you add the luscious caramel and chocolate layers. Once baked, pull it out and get ready for the gooey magic.
Step 3: Melt the Caramel
While the crust is baking, melt together the unwrapped caramels and heavy cream in a saucepan over medium-low heat. Stir gently and patiently until the caramel turns silky smooth and combined with the cream. This step is key to achieving that irresistible gooey texture that defines the classic Caramelitas.
Step 4: Assemble the Layers
Sprinkle the baked crust evenly with chocolate chips and chopped pecans (if you’re adding nuts). Pour the warm caramel sauce over this chocolate and nut layer, spreading it out gently so it covers the top without mixing the layers. Then crumble the remaining oat mixture evenly over the entire pan, creating a textured, golden topping.
Step 5: Final Bake and Cool
Return the pan to the oven for another 15 to 20 minutes. You’ll know it’s ready when the topping turns a lovely golden brown and you see bubbles of caramel oozing around the edges. Remove it from the oven and—this part is crucial!—let the bars cool completely in the pan before slicing. This cooling time allows the caramel to set properly so your slices hold together beautifully rather than turning into a sticky mess.
How to Serve Caramelitas Recipe

Garnishes
To elevate your Caramelitas, try a light dusting of powdered sugar for a delicate touch that contrasts with the rich caramel. You can also sprinkle a few flaky sea salt crystals on top before serving to bring out the sweetness through a subtle salty crunch. If you’re feeling adventurous, a drizzle of melted chocolate over the cut bars makes for a beautiful and decadent finish.
Side Dishes
Caramelitas shine on their own but make an excellent pairing with a scoop of vanilla ice cream or a dollop of whipped cream for an extra indulgent treat. A cup of freshly brewed coffee or a robust black tea can also beautifully balance the sweet richness with a warm, slightly bitter contrast. For a lighter approach, pair with fresh berries that add a pop of color and tartness.
Creative Ways to Present
If you’re sharing these bars at a gathering, arrange them on a pretty wooden board or tiered dessert tray to wow your guests. Cut into bite-sized squares and serve with toothpicks for easy snacking. You could also sandwich a scoop of ice cream between two Caramelita bars for a fun and creative dessert twist that’s sure to impress.
Make Ahead and Storage
Storing Leftovers
Store your Caramelitas in an airtight container at room temperature for up to 3 days. Keeping them covered ensures they maintain their moist, chewy texture without drying out. If your kitchen is particularly warm, it’s best to store them in the fridge where they will keep for up to a week.
Freezing
If you want to extend their shelf life, Caramelitas freeze beautifully. Wrap individual bars tightly in plastic wrap and then place them in a freezer-safe container or zip-top bag. They’ll stay fresh for up to 3 months and can be thawed at room temperature when you’re ready to enjoy them.
Reheating
For that just-baked gooey warmth, gently reheat your Caramelitas in the microwave for 10-15 seconds or warm them in a 300°F oven for about 5 minutes. This brings back the soft texture and melts the chocolate slightly without overheating and drying them out. Always reheat in small increments to avoid melting the caramel too much.
FAQs
Can I use a different type of nut instead of pecans?
Absolutely! Walnuts, almonds, or even macadamia nuts make fantastic substitutes that will add their own unique crunch and flavor to your Caramelitas.
Is it possible to make this recipe without nuts for a nut-free version?
Yes, simply omit the pecans entirely and proceed with the recipe as usual. The bars will still be deliciously chewy and gooey with the oats, caramel, and chocolate.
Can I use caramel sauce instead of unwrapped caramels and cream?
Using caramel sauce might change the texture slightly since the homemade caramel layer here is thicker and more substantial. If you use sauce, look for a thicker type and reduce the added cream so it doesn’t become too runny.
What’s the best way to cut Caramelitas without them falling apart?
Letting the bars cool completely before cutting is essential. Using a sharp knife warmed under hot water and wiped dry will also help you slice clean edges without tearing or sticking.
Can I make these bars gluten-free?
Yes, substitute the all-purpose flour with a gluten-free baking blend that measures cup for cup. Make sure your oats are certified gluten-free too for the best results.
Final Thoughts
Once you try this Caramelitas Recipe, you’ll understand why it’s such a beloved classic. The irresistible layers of chewy oat crust, silky caramel, and melty chocolate create a bar that’s truly unforgettable. Whether for a casual snack, a potluck favorite, or a comforting homemade dessert, these Caramelitas will quickly become one of your go-to recipes to share that special homemade magic.
Print
Caramelitas Recipe
- Prep Time: 10 minutes
- Cook Time: 30 minutes
- Total Time: 40 minutes
- Yield: 16 servings
- Category: Dessert
- Method: Baking
- Cuisine: American
Description
Deliciously chewy and gooey Carmelitas featuring a buttery oat crust layered with melted caramel and semi-sweet chocolate chips, topped with crunchy pecans for a perfect homemade treat.
Ingredients
Crust and Topping
- 1 cup (2 sticks) unsalted butter, melted
- 1 cup light brown sugar, packed
- 1 1/2 cups all-purpose flour
- 1 cup old-fashioned rolled oats
- 1 tsp baking soda
- 1/4 tsp salt
- 1 cup semi-sweet chocolate chips
- 3/4 cup chopped pecans (optional)
Carmel Sauce
- 1 (11 oz) bag soft caramels, unwrapped
- 1/2 cup heavy cream
Instructions
- Preheat and Prepare Pan: Preheat the oven to 350°F (175°C) and grease or line a 9×13 inch baking dish with parchment paper for easy removal of the bars.
- Mix Dry Ingredients with Butter: In a large bowl, combine the melted butter, light brown sugar, all-purpose flour, old-fashioned rolled oats, baking soda, and salt, mixing until the mixture is crumbly and well incorporated.
- Form Base Layer: Press half of the oat mixture evenly into the prepared baking pan to create the crust base.
- Bake the Crust: Bake this crust in the preheated oven for 10 minutes until set, then remove from the oven.
- Melt Caramel Mixture: While the crust bakes, melt the unwrapped caramels with heavy cream in a saucepan over medium-low heat, stirring frequently until the mixture is smooth and fully combined.
- Add Chocolate and Nuts: Sprinkle the baked crust evenly with semi-sweet chocolate chips and chopped pecans if using.
- Pour Caramel Layer: Pour the smooth melted caramel sauce evenly over the chocolate chips and nuts layer.
- Add Topping Crumble: Crumble the remaining oat mixture over the caramel layer evenly to cover it.
- Final Bake: Return the pan to the oven and bake for an additional 15 to 20 minutes, until the top turns golden brown and the caramel bubbles around the edges.
- Cool and Slice: Allow the bars to cool completely in the pan so the caramel can set properly before slicing into 16 bars.
Notes
- To easily remove the bars from the pan, line it with parchment paper leaving some overhang on the sides.
- Chopped pecans are optional but add a nice crunch and flavor contrast.
- Make sure to cool the bars completely before slicing to ensure clean cuts and prevent caramel oozing.
- Store leftovers in an airtight container at room temperature for up to 5 days, or refrigerate for longer freshness.


