

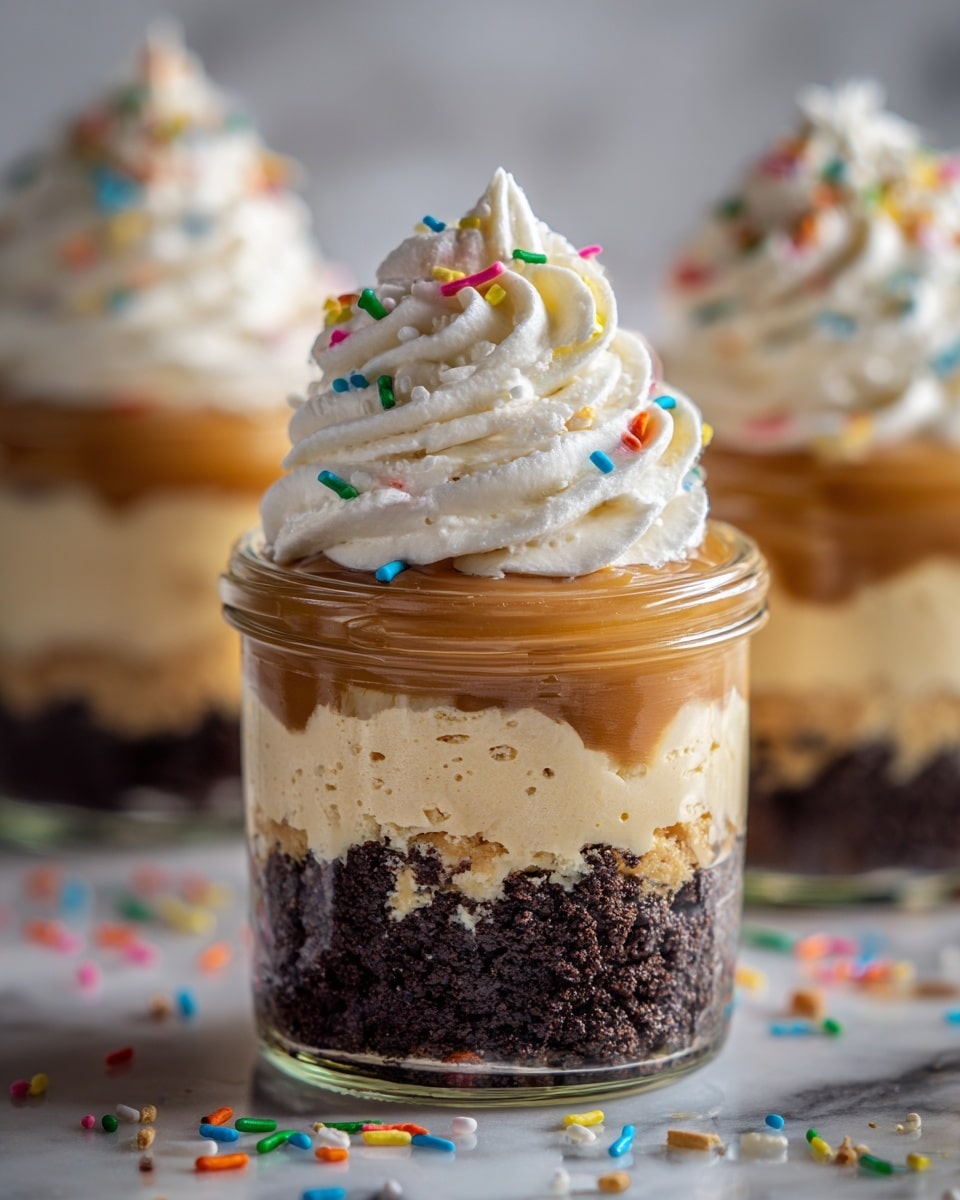
If you have a soft spot for charming, portable desserts that taste like a celebration in every bite, you are going to fall head over heels for this Cake in a Jar Recipe. It’s a delightful twist on classic cake that turns every portion into a personal party packed in a cute glass jar. Perfect for gifting, sharing at picnics, or simply indulging solo, this recipe blends convenience with whimsy, making baking and serving fun and fuss-free. Trust me, once you try this, you’ll wonder how you ever enjoyed cake any other way!
Cake in a Jar Recipe: Ingredients You’ll Need

Ingredients You’ll Need
Gathering these ingredients is a breeze, but each one plays a crucial role in bringing your Cake in a Jar to life. From the moist crumb to the luscious frosting, every component is essential to nail that picture-perfect, delicious result.
- 1 box of cake mix (any flavor): The foundation of your cake, choose your favorite flavor to personalize the treat.
- 1 cup of water: Helps create the perfect batter consistency for fluffy cakes.
- 1/3 cup of vegetable oil: Adds moisture and tenderness to the cake crumb.
- 3 large eggs: Acts as a binder and gives the cake structure and richness.
- 1/2 cup of frosting (any flavor): The sweet crowning glory that makes each jar irresistible.
- 6-8 small mason jars: Ideal for baking and serving, these jars bring charm and practicality to your dessert.
How to Make Cake in a Jar Recipe
Step 1: Prepare Your Jars and Oven
Start by preheating your oven to 350°F (175°C). While the oven warms up, lightly grease the insides of your mason jars with cooking spray or butter. This step prevents sticking and ensures your mini cakes come out cleanly.
Step 2: Mix the Batter
In a large bowl, whisk together the cake mix, water, vegetable oil, and eggs. Following the instructions on your cake mix box helps guarantee a smooth and perfectly textured batter—no lumps allowed!
Step 3: Fill the Jars with Batter
Pour the batter into each mason jar, filling them about halfway. Leaving space is important because the cake needs room to rise as it bakes without overflowing.
Step 4: Bake the Cakes
Arrange your filled jars on a baking sheet for stability and bake for 25 to 30 minutes. You’ll know they’re done when a toothpick inserted into the center comes out clean — a surefire tip for moist yet fully cooked cakes.
Step 5: Cool the Cakes
Let the cakes cool completely inside the jars. This cooling step keeps everything neat and sets you up perfectly for the next step: frosting!
Step 6: Decorate with Frosting
Once cooled, top each jar cake with your chosen frosting flavor. You can get creative by piping on the frosting for an elegant look or simply spoon and spread it for a more homespun aesthetic. For an extra wow factor, layer frosting and cake in the jar itself for a beautiful, striped effect.
Step 7: Seal and Serve
Put the lids on your jars and serve these adorable individual cakes as they are, or save them for later. They’re perfect for gifting, parties, or that spontaneous craving.
How to Serve Cake in a Jar Recipe
Garnishes
Enhance your jar cakes with fresh berries, edible flowers, or a sprinkle of chopped nuts. These add texture, color, and a burst of freshness that pairs wonderfully with the sweet frosting. A light dusting of powdered sugar can also give a pretty finish that looks like snowfall on your dessert jars.
Side Dishes
Because this Cake in a Jar Recipe is a dessert all on its own, pair it with light accompaniments like a cup of freshly brewed coffee or a glass of milk. For celebrations, a dollop of cream or a small scoop of ice cream on the side turns your jar cake into an indulgent treat.
Creative Ways to Present
Layer cakes with alternating frosting and cake sections inside the jar for a stunning visual. Tie a ribbon or a twine bow around the jar lid for a rustic gift vibe. You can even add a little personalized tag with a message or flavor note to wow friends and family.
Make Ahead and Storage
Storing Leftovers
If you have any cake jars left, keep them sealed in the refrigerator. They’ll stay fresh for up to 3 days, making it easy to enjoy a delightful dessert without needing to bake again.
Freezing
You can freeze your Cake in a Jar by tightly sealing the lids and wrapping the jars in plastic wrap for extra protection. Freeze for up to 1 month. When you’re ready to enjoy, thaw in the fridge overnight to keep that perfect texture.
Reheating
To warm up a cake jar, remove the lid and microwave for 20-30 seconds if desired. This brings back that just-baked feeling without drying out the cake. Just be careful not to overheat, as jars can get hot.
FAQs
Can I use homemade cake batter instead of a box mix?
Absolutely! Any cake batter works wonderfully for this recipe. Using your own batter lets you customize flavors and ingredients to your liking while still enjoying the same charming jar presentation.
What size jars work best for this recipe?
Small mason jars around 4 to 6 ounces in capacity are ideal. They provide a single-serving size perfect for individual portions while ensuring the cake bakes evenly.
How do I prevent the cake from sticking to the jar?
Lightly greasing the inside of the jars with butter or cooking spray before filling helps the cake come out cleanly if you want to remove it. However, many enjoy cutting and eating straight from the jar for convenience.
Can I make this Cake in a Jar Recipe gluten-free?
Yes! Just swap the regular cake mix for a gluten-free variety. Be sure to check the frosting and other ingredients to keep your dessert free from gluten.
Is it safe to bake directly in glass jars?
Most mason jars are oven-safe up to certain temperatures, but it’s important to use jars designed for cooking and baking to avoid cracking. Always preheat your oven and avoid sudden temperature changes for safety.
Final Thoughts
There is something wonderfully heartwarming about the simplicity and charm of a Cake in a Jar Recipe. Whether you’re treating yourself, making something special for friends, or prepping ahead for a gathering, these jar cakes bring joy and smiles with every bite. I can’t wait for you to give it a try and add your own creative twists — happy baking and even happier eating!
Print
Cake in a Jar Recipe
- Prep Time: 10 minutes
- Cook Time: 25-30 minutes
- Total Time: 40 minutes
- Yield: 6 servings
- Category: Dessert
- Method: Baking
- Cuisine: American
Description
Enjoy a delightful and convenient dessert with these easy Cake in a Jar recipes. Using your favorite boxed cake mix, this recipe combines simple ingredients baked directly in mason jars, creating charming individual servings perfect for parties, gifts, or anytime indulgence. The cakes bake to moist perfection inside the jars, then get topped with creamy frosting for a customizable, portable treat.
Ingredients
Cake Batter
- 1 box of cake mix (any flavor)
- 1 cup of water
- 1/3 cup of vegetable oil
- 3 large eggs
Frosting
- 1/2 cup of frosting (any flavor)
Additional
- 6–8 small mason jars (or any glass jars with a lid)
- Cooking spray or butter (for greasing jars)
Instructions
- Preheat and Prepare Jars: Preheat your oven to 350°F (175°C). Lightly grease the inside of the mason jars with cooking spray or butter to prevent sticking.
- Mix the Batter: In a large bowl, combine the cake mix, water, vegetable oil, and eggs. Follow the instructions on the cake mix box to ensure the batter is smooth and well-prepared.
- Fill Jars: Pour the batter into each mason jar, filling them about halfway to allow room for the cake to rise while baking.
- Bake the Cakes: Place the filled jars on a baking sheet and bake in the preheated oven for 25-30 minutes. To check doneness, insert a toothpick into the center of the cakes; if it comes out clean, the cakes are ready.
- Cool the Cakes: Remove the jars from the oven and let the cakes cool completely while still inside the jars.
- Frost the Cakes: Once cooled, top each cake with 1/2 cup of your favorite frosting. You can pipe the frosting on for a neat appearance or spread it with a spoon. For a layered effect, alternate cake and frosting layers inside the jar.
- Serve and Store: Place the lids on the jars to keep the cakes fresh. Serve these charming desserts individually, perfect for gifts or on-the-go treats.
Notes
- Use any flavor of boxed cake mix and frosting to customize your jars to your liking.
- Do not overfill jars to avoid batter overflow during baking.
- Allow cakes to cool completely before frosting to prevent melting.
- These cakes can be stored in the refrigerator with lids on for up to 3-4 days.
- Ensure jars are oven-safe to avoid breakage; if unsure, use heat-resistant glass jars specifically designed for baking.


